Very often, for example, after reinstalling a browser or in the process of switching to another browser, you need to restore all previously saved bookmarks (links to sites). This, of course, can be done manually - well, it’s very painstaking to type in addresses and save them. In this case, it is optimal to import bookmarks and export bookmarks, that is, create backup copies of URLs automatically and use them.
Exporting bookmarks from the Yandex browser, or backing them up, can be done in two ways. Perform this procedure regularly if you save a lot of links so as not to lose anything important. It's better to have several recent backups than one from three months ago.
1. Open the menu bar. Select Settings.
2. Go to the “Bookmarks” subsection.

3. On the right side of the Manager page, click the “Arrange” option. In the drop-down list, run the “Export...” command (the very last one in the list).

4. In the system window, specify the folder in which you want to place the file with a copy of your bookmarks. By default it is named “bookmarks_”, but you can specify your own name. Then click "Save".


Double-click on the file icon and a list of URLs, sorted by directory (as you placed them), will open in the tab.

Any bookmark can be opened with a mouse click. You can also import a URL from the same backup file if the question suddenly arises of how to reinstall bookmarks in the Yandex browser after deleting it and reinstalling it.
This method is more advanced. Since it implies remote storage of links and other important user data and their transfer to the browser on other devices (and not just on your home PC). But to implement it, you will need an account in the Yandex system (or Yandex mailbox credentials). In the absence of it, you must register it (link to the form on the search engine page).
1. Through the browser menu, go to the “Settings” section. At the top of the tab, click the “Customize...” button.

3. Click in the “Enable...” panel.

To fine-tune synchronization in the next window, click “Change...”.

Uncheck the boxes next to items that you do not want to back up, such as passwords (that is, unchecked data types are not saved).

When the settings are complete, click “Close Window”.
The process of loading bookmarks using the “Synchronization” option is performed in a similar way. You need to activate the option again and log in to your Yandex profile.

Importing bookmarks can also be done in two ways. Each of them is good in its own way, depending on the specific user task. Let's look at their implementation step by step.
So, in order to transfer bookmarks from another browser, you must first save them to a file in that same browser. This procedure is based on the export principle (see previous instructions).
Below are guides for saving a copy for popular browsers:
Google Chrome
1. In the Chrome menu, open: Menu → Bookmark Manager.

2. In the panel, click “Manage” and activate “Export...” in the list.


Firefox
1. Click the “Bookmarks” section in the menu.

2. In the panel, click “Show all...” (first item).

3. In the Library, click the mouse to open the “Import ...” list and click the “Export ... to HTML file” item.

4. Specify the path to save the file.

Opera
In Opera, reservations are best done using the special Bookmarks Import & Export addon. It can be downloaded from the official browser app store.

After installation is complete, click on its icon. On the page that opens, click “Export”.

A backup copy of your bookmarks is saved to your downloads folder. This directory is set in the Opera main settings panel, in the “Downloads” block.

To view the contents of the file (to make sure that all bookmarks have been successfully saved), click the “folder” icon in the additional window that appears after the import procedure is completed.

Now that you have an HTML file with a copy, you can safely start transferring bookmarks:
1. In the menu, click: Bookmarks → Import bookmarks.

2. In the “Transfer…” panel, in the drop-down list, specify “HTML file with bookmarks”. Click "Transfer".
This method uses the same option as Method No. 1, but with a different add-on.
1. Open: Bookmarks → Import bookmarks.

2. In the “From” list, specify the browser from which you want to transfer bookmarks.
3. In the list of items, be sure to check the box next to “Favorites and bookmarks.”
Attention! You can transfer other available data in the same way. To do this, also mark them in the list.
4. Click Transfer.
5. Click “Finish” after importing.
Don't forget to use the folder display setting on the external panel for quick access. By default, the folder name will be in the “Bookmarks” format.

Save bookmarks in a file, store it on a PC, flash drive, in remote storage, synchronize them in your Yandex profile. Over time, your collection of bookmarks can number dozens or even hundreds of links, and you need to make sure that they don’t get lost. You can learn how to add, delete, and view bookmarks in the Yandex browser.
Many users, having decided to reinstall the browser, want to do this without losing important information, in particular, saved bookmarks. This article will tell you how you can reinstall Yandex Browser while saving them.
Today you can reinstall the Yandex browser, saving your bookmarks, using three methods: by exporting bookmarks to a file, through the synchronization function, or by dragging and dropping the file. They will be discussed in more detail below.
This method is notable in that you can save bookmarks to a file, and then use it not only for reinstalled Yandex, but also for any other web browser available on the system.


Like many other web browsers, Yandex has a synchronization function that allows you to store its basic data on Yandex servers. This useful function will help you save not only bookmarks after reinstallation, but also logins, passwords, browsing history, settings and other important information. We have already looked at how to carry out the first synchronization in Yandex.Browser, and you can find this information in the material at the link below.
The sequence of actions is clear: you activate the synchronization function, remove the browser, install it again and enable synchronization again. You will find links to articles on how to properly remove and install Yandex in the previous method.
Not the most convenient option, but it can be a great help in situations when Yandex.Browser does not open due to an error, which means it will not be possible to export or enable synchronization in it. It consists of manually copying a file with bookmarks from the browser folder, reinstalling it, and then replacing the newly created file with the old one. Let's look at the procedure:

Three ways to save bookmarks allow you not to lose them and painlessly reinstall Yandex.Browser - you just have to decide which one will be preferable.
A Firefox backup may be needed in many cases. For example, when reinstalling the operating system, to transfer bookmarks, passwords and browser settings to another computer, as well as when correcting errors and crashes in Firefox.
If you need to create a one-time backup copy of the Firefox browser to restore it on a new computer or after reinstalling the OS, then you can simply save the profile files of this browser in a convenient place, for example, on a memory card or disk. By default, these files are located at: c:\Documents and Settings\Username\Application Data (or AppData)\Roaming\Mozilla\Firefox\Profiles\********.default\
To find and copy these files, hidden files and folders must be visible in Explorer.
After installing Firefox on a new computer or after reinstalling Windows, the contents of the new profile folder must be replaced with the contents of this folder. After this, if necessary, you will need to enable some installed extensions.
To back up only the saved passwords, you need to find and save only two files from this folder: key3.db and signons2.txt.
The previous method is very simple and takes a little time, but often users remember about a backup copy when it’s too late. Therefore, it is better to take care of creating backups automatically and in advance. The FEBE extension is great for this. It can backup both individual elements (for example, bookmarks, passwords, etc.) and the entire profile. You can also schedule these copies to be created daily, weekly, monthly, or when you start or close your browser.
To install the FEBE add-on, go to the extension page. Click the “Proceed to Installation” button. And on the next page - “Add to Firefox”.


After installation, restart the browser. If necessary, add the FEBE extension icon to the browser toolbar (right-click on the panel > Configure).

After this, you need to configure the extension. To do this, launch the FEBE settings window.

In the tab What to backup select the objects that need to be saved.


You can also make additional settings for the extension, connect it to cloud storage and view information about FEBE.
To restore the necessary data in a new browser, just install FEBE and select the necessary objects to restore in the extension menu. Or restore your profile completely.

After installing this extension in your browser, you don't have to worry about losing important bookmarks or saved passwords. You will also save a lot of time after reinstalling Windows or when transferring browser settings to a new computer.
Copying Yandex Browser on separate media or in a separate folder will help you easily and conveniently restore information when moving your system or browser settings to a new location. In Handy Backup, a copy of Yandex Browser can be stored on any modern storage medium.
If you are somehow not satisfied with the default settings, you can give Handy Backup detailed instructions on how to backup the Yandex browser using the most convenient method for you. Choose suitable storage, methods for partial and full backup, encryption, etc.
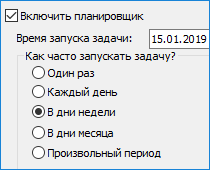
For the Yandex browser, a backup can be created according to a schedule, including the exact start time and frequency of task repetition (in minutes, hours, days of the week, months). You can also associate Yandex Browser backup with system events.
Manage all aspects of Yandex Browser copying through a graphical user interface, the same for Windows and Linux. And if you are distracted by the interface, run the configured program in “silent” mode as a service and receive reports by mail!
Handy Backup supports a wide range of different data storages into which you can back up the Yandex browser. These are local and network drives, external USB drives, NAS devices, FTP, SFTP, FTPS servers, as well as various cloud services.
Note: Handy Backup supports backup to Box, 4shared, Yandex.Disk, Google Drive, Dropbox, OneDrive, Amazon S3, BackBlaze and some others, as well as any private and commercial clouds via the WebDAV protocol and special cloud storage HBDrive.
Download
Buy!

Version 8.0.5 dated August 20, 2019. 104 MB
Backup program Handy Backup. 1200 RUB for a license
The Standard solution for home and office machines ensures reliable storage of a copy of Yandex Browser on major modern storage media, including clouds.
Before you make a copy of Yandex Browser, look where the program stores its files. On Windows this is usually a hidden folder:
C:\Users\\AppData\Yandex\YandexBrowser
Attention: here is a substring that must be replaced with the name of a specific user in the system for whom the Yandex browser backup is being created.
On Linux, this same path usually looks a little simpler (note: this folder is also always hidden!):
~/.yandex/yandexbrowser
Note: Handy Backup always sees hidden folders!
On a note: for Handy Backup network solutions, you can pre-select the name of the machine being serviced on your local network from the drop-down list in the upper left corner of the Step 2 window. Further actions are the same as for a local machine

Using Handy Backup, you can implement the task of copying Yandex Browser with a wide variety of additional measures and tricks that make life easier for the user.
Convenient and flexible settings make Handy Backup the optimal solution for copying Yandex Browser. Get started with it right now by downloading a 30-day free, fully functional trial version of the program!
When reinstalling Windows, there are a number of problems that make you not want to do this. In particular, there is a fear that all saved data from your favorite browser will be lost, namely, favorite bookmarks, autofill history and search engine settings. In general, everything that we are so accustomed to in our “good old” life. From this article you will learn how to easily save all this data and then restore it on a new system.
In order to save browser data, let's use the free FavBackup program.
At the moment, the utility supports browsers: Internet Explorer 6/7/8, Firefox 2-3.6, Opera 9-10.6, Safari 3/4, Google Chrome 1-6 and Flock 2.0/2.5.
Works in 32/64-bit versions of Windows XP, Windows Vista, Windows 7 and Windows 8.
There are 3 color schemes.
In order to download a free program for saving almost all data from the browser FavBackup, follow the link to and scroll down the page to this point:
here you can choose either the program itself, or (the size in the archive is naturally smaller).
The program does not require installation, therefore, immediately after launching the .exe file, the main program window will appear:


For browser data recovery select a tab Restore, select a browser, select the data you want to restore, indicate in the “Backup location” the path to the backup file and click Next .
Please note that the "Profile" and "Restore to the following profile" fields indicate the found profile to restore and the choice of the profile to save to.

By the way, because I don’t have Google Chrome (and I’ve repeatedly written why I don’t like it) and I use much better alternatives for it, I couldn’t save my data. On the one hand, this may be bad, but on the other hand, I am more than pleased and consider this another plus in favor of my favorite Iron and Comodo Dragon.
This is about the fact that those who have Chromium-based browsers will not be able to save.


By the way, based on the fact that the program does not require installation and is portable, you can fool around with it on how to do it - I think you can guess for yourself. A couple of clicks and someone else’s information from your browser


