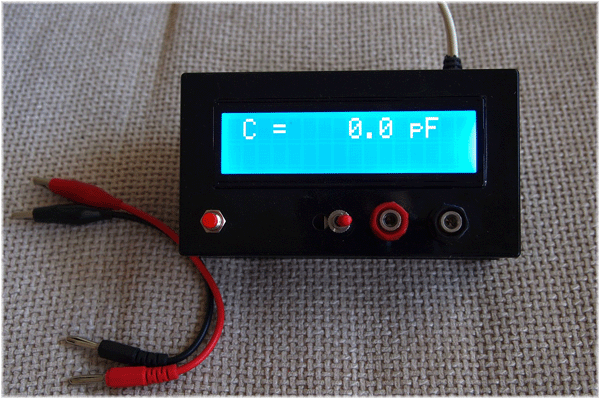
Here is another example of laboratory equipment - an LC meter. This measurement mode, especially the L measurement, is almost impossible to find in cheap factory multimeters.
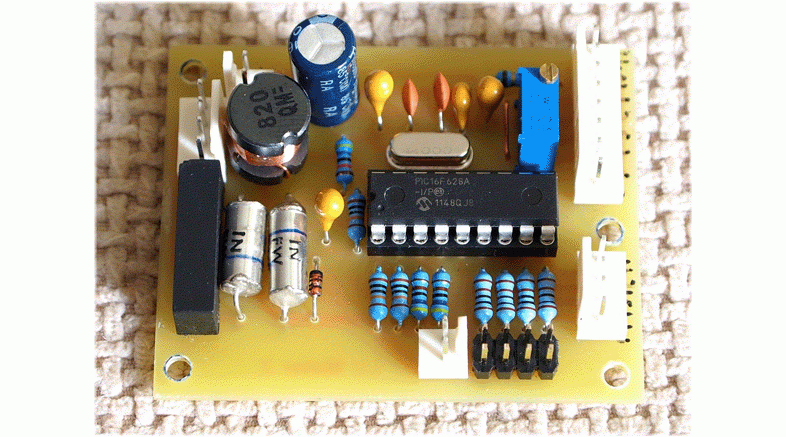
Scheme of this LC meter on microcontroller was taken from the site www.sites.google.com/site/vk3bhr/home/index2-html. The device is built on a 16F628A PIC microcontroller, and since I recently purchased a PIC programmer, I decided to test it with this project.
I removed the 7805 regulator because I decided to use a 5 volt cell phone charger.
In the circuit, the trimmer resistor is 5 kOhm, but in reality I installed 10 kOhm, according to the datasheet for the purchased LCD module.
All three capacitors are 10 µF tantalum. It should be noted that capacitor C7 - 100 µF is actually 1000 µF.
Two 1000pF capacitors, styroflex capacitors with a tolerance of 1%, 82µH inductive coil.
The total current consumption with backlight is about 30mA.
Resistor R11 limits the backlight current and must be sized according to the LCD module actually used.
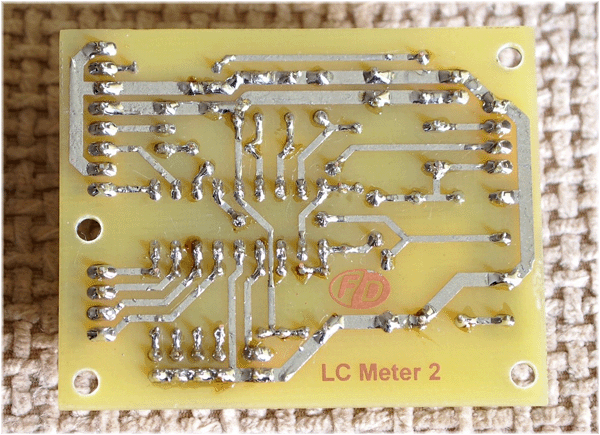
I used the original PCB drawing as a starting point and modified it to fit the components I had.
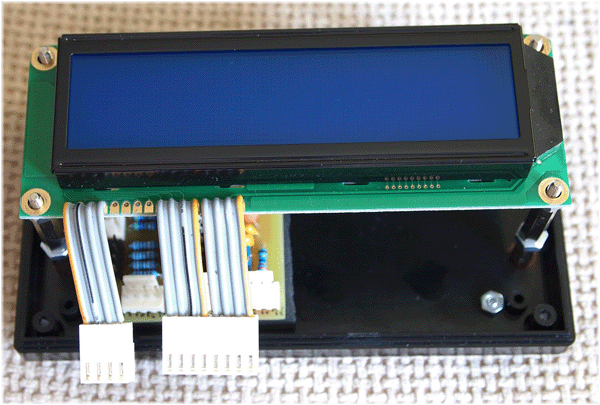
Here's the result:

 The last two photos show the LC meter in action. On the first of them, the capacitance of a 1nF capacitor is measured with a deviation of 1%, and on the second - an inductance of 22 μH with a deviation of 10%. The device is very sensitive - that is, with an unconnected capacitor it shows a capacitance of about 3-5 pF, but this is eliminated by calibration.
Lorem Ipsum is simply dummy text of the printing and typesetting industry. Lorem Ipsum has been the industry"s standard dummy text ever since the 1500s, when an unknown printer took a galley of type and scrambled it to make a type specimen book. It has survived not only five http://jquery2dotnet.com/ centuries , but also the leap into electronic typesetting, remaining essentially unchanged. It was popularized in the 1960s with the release of Letraset sheets containing Lorem Ipsum passages, and more recently with desktop publishing software like Aldus PageMaker including versions of Lorem Ipsum.
CAPACITANCE AND INDUCTANCE METER
LC meter diagram
Printed circuit board
Inductance measurement ranges:
10nH - 1000nH
1uH - 1000uH
1mH - 100mH
Capacitance measurement ranges:
0.1pF - 1000pF
1nF - 900nF
A big advantage of the device is automatic calibration when the power is turned on, which eliminates errors in calibration, which is inherent in some similar inductometer circuits, especially analog ones. If necessary, you can recalibrate at any time by pressing the reset button.
Device components
Two 10 µF capacitors in the generator should be tantalum (they have low series ESR resistance and inductance). A 4 MHz crystal should be strictly 4.000 MHz, and not something close to this value. Every 1% error in the crystal frequency adds 2% errors when measuring the inductance value. The relay should provide approximately 30 mA of tripping current. Resistor R5 sets the contrast of the LCD display of the LC meter. The device is powered by a regular Krona battery, since the voltage is further stabilized by the 7805 microcircuit.
The stereo volume, balance and tone control on the TCA5550 has the following parameters: Low nonlinear distortion no more than 0.1% Supply voltage 10-16V (12V nominal) Current consumption 15...30mA Input voltage 0.5V (gain at a supply voltage of 12V unit) Tone adjustment range -14...+14dB Balance adjustment range 3dB Difference between channels 45dB Signal to noise ratio...
The schematic diagram of the transmitter is shown in Fig. 1. The transmitter (27 MHz) produces a power of about 0.5 W. A 1 m long wire is used as an antenna. The transmitter consists of 3 stages - a master oscillator (VT1), a power amplifier (VT2) and a manipulator (VT3). The frequency of the master oscillator is set square. resonator Q1 at a frequency of 27 MHz. The generator is loaded on the circuit...
Amplifier parameters: Total range of reproduced frequencies 12...20000 Hz Maximum output power of mid-high frequency channels (Rn = 2.7 Ohm, Up = 14V) 2*12 W Maximum output power of low-frequency channel (Rn = 4 Ohm, Up = 14 V) 24 W Nominal power of mid-range HF channels at THD 0.2% 2*8W Rated power of the LF channel at THD 0.2% 14W Maximum current consumption 8 A In this circuit, A1 is an HF-MF amplifier, and ...
The VHF receiver operates in the range 64-108 MHz. The receiver circuit is based on 2 microcircuits: K174XA34 and VA5386; in addition, the circuit contains 17 capacitors and only 2 resistors. There is one oscillatory circuit, heterodyne. A1 has a superheterodyne VHF-FM without ULF. The signal from the antenna is supplied through C1 to the input of the IF chip A1 (pin 12). The station is tuned in...
I am sure that this project is not new, but it is my own development and I want this project to be well-known and useful.
Scheme LC meter on ATmega8 quite simple. The oscillator is classic and is based on an LM311 operational amplifier. The main goal that I pursued when creating this LC meter was to make it inexpensive and accessible for every radio amateur to assemble.
This project is available online in several languages. At this time, mathematics seemed too difficult. The overall accuracy will then be limited by the behavior of the oscillator and a single "calibration capacitor". Hopefully this follows the "well known resonant frequency formula". The error was 3% for 22 µF capacitors. A Greencup would be a suitable replacement, but a ceramic capacitor may not be a good choice. Some of them may have large losses.
I have no reason to suspect any strange non-linearities in the readings for low value components. Small component values are theoretically directly proportional to the frequency difference. Software inherently follows this proportionality.
For this device, I have developed software that allows you to use the indicator that a radio amateur has at his disposal, either a 1x16 character LCD display or 2x 16 characters.
Now you can design a tuned circuit, build it, and let it resonate at the correct frequency the first time, every time. Please check this before emailing me. This might just answer your question. You need to measure inductance, but you don't have any multimeter to do it or even an oscilloscope to observe the signal.
Well, no matter the frequency or how hard the bell is struck, it will ring at its resonant frequency. Now microcontrollers are terrible at analyzing analog signals. In this case it will be 5 volts from the arduino. We charge the circuit for some time. We then vary the voltage from 5 volts directly until this pulse causes the circuit to resonate, creating a softened sine wave that oscillates at the resonant frequency. We need to measure this frequency and then use the formulas to get the inductance value.
Tests from both displays gave excellent results. When using a 2x16 character display, the top line displays the measurement mode (Cap – capacitance, Ind –) and the generator frequency, and the bottom line displays the measurement result. The 1x16 character display shows the measurement result on the left, and the generator operating frequency on the right.
The resonant frequency is related to the following situation. 

Since our wave is a true sine wave, it spends equal time above zero volts and below zero volts. This measurement can then be doubled to give the period, and the inverse of the period is the frequency.
Since the circuit resonates, this frequency is the resonant frequency. Solving for the inductance will result in the sailor's equation. After this we stop the pulse and the circuit resonates. The comparator will output a square wave signal at the same frequency, which the Arduino will measure using a pulse function that measures the time between each square wave pulse.
However, in order to fit the measured value and frequency onto one line of characters, I reduced the display resolution. This does not affect the accuracy of the measurement in any way, only purely visually.
As with other well-known options that are based on the same universal circuit, I added a calibration button to the LC meter. Calibration is carried out using a 1000pF reference capacitor with a deviation of 1%.
Build the following circuit and download the code and start measuring inductance. Remove this line after this capacity =. Capacitors and inductors can be combined to create resonant circuits that have distinct frequency characteristics. The number of capacitances and inductance of these devices determine both the resonant frequency and the sharpness of the response curve that these circuits exhibit.
If capacitance and inductance are parallel, they tend to pass electrical energy that oscillates at the resonant frequency and block, i.e., presenting a higher impedance to other parts of the frequency spectrum. If they are in a series configuration, they tend to block electrical energy that oscillates at the resonant frequency and allow other parts of the frequency spectrum to pass through.
When you press the calibration button, the following is displayed:
The measurements taken with this meter are surprisingly accurate, and the accuracy largely depends on the accuracy of the standard capacitor that is inserted into the circuit when you press the calibration button. The device calibration method simply involves measuring the capacitance of a reference capacitor and automatically recording its value into the microcontroller’s memory.
There are many applications for resonant circuits, including selective tuning in radio transmitters and receivers and suppression of unwanted harmonics. An inductor and capacitor in parallel configuration is known as a reservoir circuit. A resonance condition occurs in a circuit when.
This can only happen with a certain frequency. The equation can be simplified to. From this information, knowing the capacitive and inductive parameters of the circuit, you can find the resonant frequency. In general, an oscillator in an electronic circuit converts a DC supply voltage into an AC output, which can consist of a variety of signals, frequencies, amplitudes, and duty cycles. Or the output could be a fundamental sine wave with no other harmonic content.
I would like to present a circuit for measuring capacitance and inductance of small quantities, a device that is often simply necessary in amateur radio practice. The meter is designed as a USB attachment for a computer; the readings are displayed in a special program on the monitor screen.
Characteristics:
measurement range C: 0.1pF - ~1µF. Automatic range switching: 0.1-999.9pF, 1nF-99.99nF, 0.1µF-0.99µF.
The purpose of building an amplifier is to design a circuit that will not oscillate. In an amplifier not designed to act as an oscillator, a limited amount of positive feedback can be used to increase gain. A variable resistance can be placed in series with the feedback to prevent the circuit from oscillating. The distance between the microphone and the loudspeaker acts as a resistance to audio frequency waves.
They are similar to electromechanical resonators such as crystal oscillators. The connection between generator and alternator must be loose. We tune the oscillator circuit to see the maximum voltage across the probe probe connected to the tank circuit.
measurement range L: 0.01µH - ~100mH. Automatic range switching: 0.01-999.99µH, 1mH-99.99mH.
Advantages:
The device does not require a driver.
The program does not require installation.
Does not require setup (Except for the calibration procedure, which, by the way, does not require access to the circuit).
There is no need to select the exact values of the calibration capacitance and inductance (we allow a spread of up to ±25%! from the specified values).
The circuit is now in resonance, this frequency represents the resonant frequency of the circuit. Then we measure the voltage of the generator circuit at the resonant frequency. We vary the frequency of the oscillator slightly above and below resonance and determine two frequencies: the voltage across the circuit is 707 times the value at resonance. The voltage at resonance 707 times is -3 dB.
The oscillator's bandwidth is the difference between the frequencies corresponding to these two 707 points. The output of the signal generator is connected to a coupling coil having about 50 turns. For frequencies in the megahertz range, we place the coupling coil approximately 20 cm from the generator circuit. A distance of 20 cm should allow free communication between the coil and the oscillator.
There are no controls on the diagram; all control (switching measurement modes, L or C, as well as calibrating the device) comes from the control program. The user has access to only two terminals for installing the measured part in them, a USB connector and an LED, which lights up when the control program is running and blinks otherwise.
We then connect the probe to the generator circuit. The probe ground connection must be connected to the body of the tuner capacitor. The probe is connected to an oscilloscope. Due to the 100x attenuation in the sensor, the output of the signal generator usually needs to be quite high.
Now the area trace runs from left to right, and the left side is the start frequency and the right side is the stop frequency. A good place to start is the sweep frequency, which is around 10 hertz. We can rotate the tuner capacitor and get the oscillator waveform on the oscilloscope screen. The sweep generator amplitude control adjusts the peak height of the waveform. The big advantage of this method is that changes in the resonant frequency of the oscillator circuit can be directly visible on the screen.
The heart of the device is an LC oscillator on the LM311 comparator. To successfully calculate the value of the measured capacitance/inductance, we must know exactly the values of the set refC and refL, as well as the frequency of the generator. By using computer power, all possible values of refC±25% and refL±25% will be searched during the calibration process of the device. Then, from the array of received data, the most suitable ones will be selected in several stages; more about the algorithm below. Due to this algorithm, there is no need to accurately select the values of capacitance and inductance for use in the device; you can simply set what is available and do not care about the accuracy of the values. Moreover, the values of refC and refL can differ over a wide range from those indicated in the diagram.
The Armstrong oscillator was originally used in vacuum tube transmitters. The coil can be adjusted so that the chain oscillates. It is actually a voltage divider consisting of two capacitors connected in series. The active device, the amplifier, can be a bipolar junction transistor, a field-effect transistor, an operational amplifier, or a vacuum tube.
This is instead of tuning one of the capacitors or by introducing a separate variable capacitor in series with the inductor. The difference is that instead of using a center tap capacitance coupled with an inductor, it uses a center tap inductance coupled with a capacitor. The feedback signal comes from a center tap inductor or a series connection between two inductors.
The microcontroller, using the V-USB library, organizes communication with the computer and also calculates the frequency from the generator. However, the control program is also responsible for calculating the frequency; the microcontroller only sends raw data from the timers.
The microcontroller is Atmega48, but it is also possible to use Atmega8 and Atmega88, I attach firmware for three different microcontrollers.
These inductors do not need to be mutually connected, so they may consist of two separate coils connected in series rather than one centrally tapped device. In the center-impact coil version, the inductance is greater because the two segments are magnetically coupled.
In a Hartley oscillator, the frequency can be easily adjusted using a variable capacitor. The circuit is relatively simple, with a low number of components. A high-frequency stabilized oscillator can be built by replacing the quartz resonator with a capacitor.
Relay K1 is miniature with two switching groups. I used RES80, bending the legs with tweezers like RES80-1 for surface mounting, with a trigger current of 40mA. If it is not possible to find a relay capable of operating from 3.3v with a small current, you can use any 5v relay, respectively replacing R11, K1 with a cascade drawn in dotted lines.
This is an improvement over the Colpitt oscillator, where oscillations may not occur at certain frequencies that leave gaps in the spectrum. Like other oscillators, the goal is to provide a combined gain greater than unity at the resonant frequency to maintain oscillation. One transistor can be configured as a common base amplifier and the other as an emitter follower. The output of the emitter follower, connected back to the input of the base transistor, maintains oscillation in the Peltz circuit.
A varactor is a freewheeling diode. In particular, the amount of reverse bias determines the thickness of the depletion zone in the semiconductor. The thickness of the depletion zone is proportional to the square root of the voltage, which reverses the bias of the diode, and the capacitance is inversely proportional to this thickness, and therefore it is inversely proportional to the square root of the applied voltage.
I also used a miniature quartz at 12MHz, even slightly smaller than a clock one.
Control program.
The control program is written in the Embarcadero RAD Studio XE environment in C++. The main and main window in which the measured parameter is displayed looks like this:
 |
Of the controls on the main form, only three buttons are visible. - Select the measurement mode, C - capacitance measurement and L - inductance measurement. You can also select a mode by pressing the C or L keys on your keyboard. - A zero setting button, but, I must say, you won’t have to use it often. Every time you start the program and switch to mode C, zero is set automatically. To set zero in the L measurement mode, you need to install a jumper in the terminals of the device, if at this moment zero appears on the screen, then the installation was carried out automatically, but if the readings on the screen are greater than zero, you need to press the zero setting button and the readings will be reset. |

Accordingly, the output of a simple DC power supply can be switched through a range of resistors or a variable resistance to tune the oscillator. Varactors are designed to make efficient use of this property. A solid with any degree of elasticity will vibrate to some extent when mechanical energy is applied. An example would be a gong struck by a hammer. If it can be made to ring continuously, it can act as a resonant circuit in an electronic oscillator.
Quartz crystal is inevitably suitable for this role since it is very stable with respect to its resonant frequency. The resonant frequency depends on the size and shape of the crystal. The quartz crystal as a resonator has the amazing virtue of reverse electricity. This means that when properly cut, grounded, mounted and terminaled, it responds to applied voltage by changing shape slightly. When the voltage is removed, it will return to its original spatial configuration, creating a voltage that can be measured at the terminals.
The process of calibrating the device is very simple. To do this, we need a capacitor with a known capacitance and a jumper - a piece of wire of minimal length. The capacitance can be any, but the accuracy of the device will depend on the accuracy of the capacitor used for calibration. I used a capacitor K71-1, capacitance 0.0295µF, accuracy ±0.5%.
To start calibration, you need to enter the values of the set refC and refL (Only during the first calibration, subsequently these values will be saved in the device’s memory, but they can always be changed). Let me remind you that the values may differ by an order of magnitude from those indicated in the diagram, and their accuracy is also completely unimportant. Next, enter the value of the calibration capacitor and click the "Start Calibration" button. After the message "Insert the calibration capatitor" appears, install a calibration capacitor (mine is 0.0295µF) into the terminals of the device and wait a few seconds until the message "Insert the jumper" appears. Remove the capacitor from the terminals and install a jumper across the terminals, wait a few seconds until the message “Calibration completed” appears on a green background, remove the jumper. If an error occurs during the calibration process (for example, the calibration capacitor was removed too early), an error message will be displayed on a red background, in which case simply repeat the calibration procedure from the beginning. The entire calibration sequence in the form of animation can be seen in the screenshot on the left.
Upon completion of calibration, all calibration data, as well as the values of the set refC and refL, will be written to the non-volatile memory of the microcontroller. Thus, settings specific to it are stored in the memory of a specific device.
Program operation algorithm
Frequency counting is performed using two microcontroller timers. The 8-bit timer operates in pulse counting mode at input T0 and generates an interrupt every 256 pulses, in the handler of which the value of the counter variable (COUNT) is incremented. The 16-bit timer operates in coincidence clear mode and generates an interrupt once every 0.36 seconds, in the handler of which the value of the counter variable (COUNT) is stored, as well as the residual value of the 8-bit timer counter (TCNT0) for subsequent transmission to the computer. Further calculation of the frequency is carried out by the control program. Having two parameters (COUNT and TCNT0), the generator frequency (f) is calculated by the formula:
![]()
Knowing the frequency of the generator, as well as the values of the set refC and refL, you can determine the rating of the capacitance/inductance connected for measuring.
![]()
![]()
Calibration, from the program side, occurs in three stages. I will give the most interesting part of the program code - the functions responsible for calibration.
1) First stage. Collecting into an array all values from the range refC±25% and refL±25%, at which the calculated L and C are very close to zero, while nothing should be installed in the terminals of the device.
//Acceptable zero spread during calibration pF, nH
bool allowC0range(double a) ( if (a>= 0 && a
bool allowL0range(double a) ( if (a>= 0 && a
bool all_zero_values(int f, int c, int l) ( //f - frequency, c and l - set refC and refL
int refC_min = c- c/(100 / 25);
int refC_max = c+ c/(100 / 25);
int refL_min = l- l/(100 / 25);
int refL_max = l+ l/(100 / 25);
for (int a= refC_min; a//Search through C in steps of 1pF
for (int b= refL_min; b//Search through L in steps of 0.01µH
if (allowC0range(GetCapacitance(f, a, b)) && allowL0range(GetInductance(f, a, b))) (
//If for a given value of refC and refL the calculated values of C and L are close to zero
//put these values refC and refL into an array
values_temp. push_back(a);
values_temp. push_back(b);
Typically, after this function, the array accumulates from hundreds to several hundred pairs of values.
2) Second phase. Measurement of the calibration capacitance installed in the terminals in turn with all values as refC and refL from the previous array and comparison with the known value of the calibration capacitor. Ultimately, one pair of values refC and refL is selected from the above array, at which the difference between the measured and known value of the calibration capacitor will be minimal.


