One of the most reliable means of storing personal information is flash media. For many, such a device becomes the first assistant in their work; with its help, you can easily carry the necessary information just in your pocket. When it comes to the security of storing various programs and files, special software is often used. It is designed to protect the media from copying, deleting or moving materials, as well as from reading, without entering a special code.
But even if you have not used such programs, and when you run the command to transfer its contents, the error appears: “The disk is write-protected,” do not panic, determine the reason and use the suggested methods. Removing protection from a flash drive is not a difficult task at all, and most importantly, it can be solved and is more economical than buying a new one.
We present to your attention the “TOP 7 effective ways” on how to remove write protection from a flash drive, all of them have been tested and confirmed by a large number of users.
Hardware method using Windows command line
First you need to start the line, we do this by simultaneously pressing two keys on the keyboard: Windows + R. The “Run” window will open and enter the command “ cmd"and press the OK button;

The system response is to open the command line;

Required to enter " Diskpart»;

and press Enter. A new window will open - disk management program;

To continue, enter " list disk", confirm the action by pressing the Enter button;

In the window that opens, a list will appear on which you need to determine the number of the required media, focusing on the amount of memory, in our case it is Disk 5 - an 8Gb flash drive. Select a disk using the command: select disk )(, where -)(, this is the disk number, in our case 5;
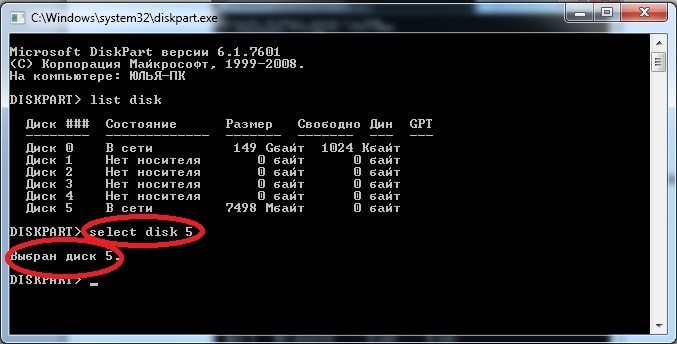
After it has written to you: “Disk selected )(”, enter the following command, which will remove the block from all protected files that had a “read-only” error when opened. Command: attributes disk clear readonly(can be copied);

When “Disk attributes have been successfully cleared” is displayed, you can exit the program by entering the “Exit” command.
After closing the utility, check the media for functionality. Once you are confident in the operation of the method, you can continue to use the device without extra costs.
Virus scanning
One of the most relevant ways to solve this problem is also to scan the media for virus infection. To do this, you will need to go to “My Computer” and right-click on the name assigned to the device by the operating system, for example, “Disk Z”.
Then select “Check for viruses” in the menu. After a few minutes, the scanning result window will appear on the screen. This method can be applied to any antivirus software installed on your PC.
The flash drive can be write-protected by unauthorized installation of virus software. A clearly demonstrated method will help solve this problem, and will also protect your computer from automatic installation of unnecessary gadgets.
Hardware button on the carrier. Mechanical protection
Some models of portable USB drives have built-in protection that is turned on/off using an installed button. Be sure to pay attention to this; to allow recording and moving, the button must point to the “open lock.”
Formatting
Often, to eliminate such an error, utilities created for formatting are used. Remember, using this method will completely delete all files from the media.
Applying Windows Group Policy
It is possible to restrict rights by local group policy; the elimination of such infringement of rights should be carried out by following the algorithm:
Press Windows + R at the same time and enter the command gpedit.msc, click OK;

In the window that appears, go through the tabs sequentially:


By clicking twice, an option window will open;

Check “Disable” → “Apply” → and confirm by clicking “Ok”.
By completing such a simple process, you can easily remove the interference in the infringement of the rights to use the media and continue working.
Soft disks are designed for expensive storage media; for less valuable storage devices there are also a lot of programs, for example:
JetFlash Recovery Tool- a free program in the public domain, intended for media from A-Data and Transcend. Its main functionality includes the ability to eliminate writing and reading errors, as well as unlocking. After downloading the utility from its creator’s resource, run it using the file of the same name, .exe format. After waiting for installation, click the JFRecoveryTool.exe shortcut. When the working window opens, insert the USB flash drive into the USB input and click “Start”. After the process is completed, check the drive to see if the error has been resolved.
Apacer Repair- the utility is created individually for media produced by Apacer Technology Inc, and is also applicable for third-party drives. The functionality can eliminate recording problems. It is recommended to download the program from the official resource, where it is posted and is available for download completely free of charge. After completing the download process and connecting the USB drive, run the utility. First of all, she will do the formatting, for which there will be a warning. By clicking “Format”, the successfully completed process will allow you to forget about the recently disturbing problem.
Knowing the brand name of your carrier, it will not be difficult for you to select the required program; there are tons of them on the Internet. It is to solve such problems that manufacturers create them and post them on Internet resources; it is worth noting that they are all freely available.
It is not always possible to determine the true cause of a malfunction and remove write protection. But having used the above methods, based on the result you will understand exactly what to do next: safely use a working device, or buying a new one will become an inevitable event.
We do not guarantee the safety of information!
How to remove write protection from a flash drive - step-by-step instructions
The era of floppy disks is long gone, but sometimes when trying to write to a flash drive, the user may encounter a situation known since the days of using floppy media - it is blocked and cannot be used.
We will look at how to solve this problem in detail in our article today.
So, you need to write some information to a flash drive, you insert it and receive a message like “The disk is write-protected, remove the protection or use another one.”
This problem can be solved quite quickly, and we will talk about this a little later, but now we should say a few words about the purpose of installing protection against downloading on a digital medium.
Note! This operation is performed for only one purpose - to protect the drive from viruses that can spontaneously be copied to removable media without the user’s knowledge.
There are 2 key ways to remove protection from a flash drive: hardware and software.
The hardware solution is to install a lock switch, which is present in some drive models, as well as SD cards.
Most often, the toggle switch is located on the side edge of the drive.
Carefully inspect your existing drive and look for an open/closed lock icon or the word Lock on it.
Note! Removing the lock is very simple - just move the lock lever in the opposite direction. That's all. Insert the media into the appropriate slot and repeat the file writing operation again.
The software solution involves the interaction of the operating system and the flash drive controller, which is responsible for the ability to record information.
You can remove write protection using this method using the command line of the registry editor or local group policy in Windows 7/8.
Learn more about all of the above methods.
1. Click “Start” and enter regedit in the search field. Right-click (RMB) on the program and in the context menu go to the “Run as administrator” item.
2. Go to the StorageDevicePolicies section:
HKEY_LOCAL_MACHINE\SYSTEM\CurrentControlSet\Control\StorageDevicePolicies
Important! Important! If there is no such thing, you will have to create it. To do this, click on the section Control - New - Section. We call it “StorageDevicePolicies” without quotes. If there is no such section, you need to create it.
Create (RMB in the right column of the registry) a DWORD parameter (32 bits) in the created branch. For convenience, let's call the element WriteProtect.
3. Make sure that the WriteProtect value is 0. Right-click on WriteProtect and select “Change”. If the value is “1” you need to change it to “0” and click “Ok”.
4. Close the registry editor, remove the media and restart the computer. Insert the flash drive. Now the flash drive works as usual, allowing you to write files.
If the flash drive could not be unlocked using regedit, let's try to do it using the Diskpart command interpreter, which allows you to manage the commands that the user enters into the command line when working with partitions and disks.
1. “Start”, in the search field enter the name of the Windows command line - cmd. Right-click in the program and select “Run as administrator” in the context menu.
2. Now you should enter the commands: diskpart and list disk, and after entering each of them, press the Enter key.
3. In the list above, determine what serial number in the name the flash drive has.
This can be done based on the specified size, in our case an 8 GB flash drive, presented in the table as “Disk 1” with a capacity of 7441 MB.
4. Select the disk with the “select” command, clear the attributes that allow only reading “attributes disk clear readonly”.
If the flash drive needs formatting, you should enter the following commands: “clean”, create a partition “create partition primary”, format it in NTFS “format fs = ntfs” or FAT “format fs = fat”.

I apologize for the title, but this is exactly how the question is asked when, when working with a USB flash drive or SD memory card, Windows reports the error “The disk is write-protected. Remove protection or use another disk" (The disk is write-protected). In this instruction, I will show you several ways to remove protection from a flash drive or memory card and tell you where it comes from.
I note that in different cases the message that the disk is write-protected may appear for various reasons - often due to Windows settings, but sometimes due to a damaged flash drive. I will touch on all the options and the corresponding methods for removing protection in Windows 10, 8.1 or Windows 7. If something is not entirely clear, then at the bottom of the article there is a video that demonstrates almost all the ways to fix the error.
Another way that can help remove a USB disk error that suddenly shows a writing error is to remove protection on the command line.
To do this, do the following:
Close the Command Prompt, unplug and reconnect the flash drive, then try to do something with the flash drive, such as formatting it or writing down some information, to see if the error goes away.
Below is a video on this error, which shows all the methods described above. Perhaps she can help you figure out the problem.
I hope one of the approaches helped you solve the problem. If not, I also recommend checking your flash drive on another computer or laptop: this will allow you to determine whether the write protection is a consequence of the system parameters or whether the drive itself is to blame.
Nowadays, a lot of users ask how to remove protection from a flash drive.
This need arises at the moment when a person wants to write something to his removable storage device or delete some information from it, but cannot do this due to an error. It says that “The disk is write protected,” so nothing can be done with it.
But there are several ways to solve this problem, and some of them are incredibly simple.
Many drives have a standard switch, which, in fact, is responsible for installing protection.
If this switch is set to the “On” position, the user will only be able to view the contents of the flash drive, but not edit it. He will not be able to copy anything to his computer or write anything new to the drive.
Therefore, carefully inspect your flash drive for this very switch. If you find it, change position and try using the media again.

If after this the USB flash drive does not work as expected, you will have to resort to a more complex method of solving the problem.
As you know, Windows has a command line that allows you to very easily and quickly perform various manipulations with the system using text commands. A protected flash drive may also cease to be so if you enter some commands correctly.
In general, you need to do the following:


It is worth saying that this method is quite strong and helps in most cases. But if all else fails, use the Registry Editor.
This method is also considered quite effective and efficient.
It involves the following actions:


If this method does not help, you can use the Group Policy Editor.
This method involves the following steps:


It is quite possible that this method will not help either. Then all that remains is to format the flash drive. Then absolutely all its parameters will be removed, including write protection. How to do this is clearly shown in the video below.
If you have any problems or questions regarding all the steps described above, write about it in the comments.
When you try to add data to a flash drive, your computer may display the error message “The disk is write-protected.” Therefore, it is important for anyone to know how to remove write protection from a flash drive. It is difficult for the user to check the cause of the phenomenon, but often this acts as a precaution against downloading viruses from laptops, computers, and other devices to the drive. It is difficult to clear a flash drive of them; it is much easier to protect it and then remove the recording.
Unlocking is accomplished via a lock switch in some flash or removable SD cards. If you find a switch, then the method to remove write protection from a USB flash drive is to switch the lock lever in the desired direction of the open lock image. After this, reinsert the media into the PC port, access to it will become free, and you will be able to record information. To return to the “Flash drive is write protected” state, switch the lever to the “Protect” position. The same applies to following the point on how to remove protection from a memory card.
The system registry editor is a way to return the flash card to working condition using simple steps. Follow these simple steps:
The command line is an alternative method for solving the question of how to remove protection from a flash drive. The process includes the following points:

Holders of Transcend flash cards can resort to using a utility created exclusively for the brand. The file is called “JetFlashRecovery” and can be downloaded from the company’s official website. The utility is completely free to access, eliminates write protection problems and other difficulties that arise. To make it easier to find the utility, use the file name.
In addition to this utility, the already described command line or registry editor methods are suitable for the Transcend brand. The lock removal tool by switching the locking lever will be an alternative method of removing write protection from such a flash drive. You can try all the methods, because at least one of them should work and help eliminate this painful problem.


