Many businesses use a VPN to transfer data between computers. To set up a VPN, Windows 7, XP, 8 and 10 have built-in software that allows you to create a private virtual network in a few minutes and use it to protect private information.
On Windows XP, Vista and later versions of the OS, you can create and connect to VPN networks using built-in software. Let's consider this connection step by step:
If the remote VPN server receives the correct data, then within a few minutes the computer will connect to the new private network. In the future, you do not need to configure the connection each time; it will be in the quick connection selection section. 
For the connection to work correctly, it is recommended to slightly change its parameters. To do this, after clicking the Connections button, in the menu that appears, select the Properties button. You can also open these properties through the “” section from the Control Panel.

Follow the instructions:
Setting up a VPN on Windows xp, 7, 8, 10 through the Control Panel is the same in terms of execution algorithm. The exception is a slightly modified design depending on the operating system version.
After the connection is established, you need to figure out how to remove the VPN. To do this, just go to the section “ Change adapter settings» from the Control Panel. Next, right-click on the unnecessary element and select “ Delete».
The connection setup process is almost the same as in Windows 7.


Now the connection can be made through the networks menu. You just need to enter the user and password to log in.

This instruction is valid for versions from XP and higher. Unfortunately, the standard virtual private network tool can only connect one user per session.

If you do not create a permanent IP or domain name, then to connect a user you will have to change the server address each time.
This completes the creation of the server; now you can connect one user to it. To log in, use the login and password from the previously created account.
These instructions are relevant for setting up Windows 7, 8 and 10. In XP, the settings wizard is used for settings.

In the future, user and IPv4 protocol settings are made as on other versions of Windows.
VPN connection on Windows 8 has become easier to use and is done through a small program. It is located in the section " Net» - « Connections» - « VPN».

A VPN connection on Windows 10 and 8 can be configured not only through “ Control Panel", but also through the built-in program. In it you need to specify the connection name, server address and login information.

After entering the data, the network can be started from the connections menu. At this point, the question of how to create a VPN connection can be considered resolved.

If the user has any problems connecting to the VPN, this is indicated by a pop-up window with the number and description of the problem.
It is the most common and occurs when connecting via a MikkroTik gateway with the L2TP protocol.
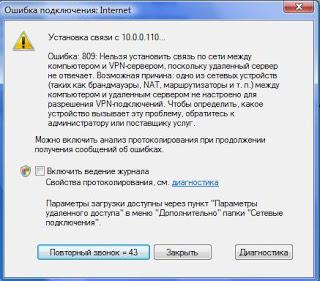
To fix it, you need to perform 3 configuration steps:

If after these settings error 809 is not resolved, then you need to change the registry. To do this, use the Win + R key combination and enter regedit Next, go to the section HKEY_LOCAL_MACHINE\System\CurrentControlSet\Services\Rasman\Parameters. Next, create a DWORD value named ProhibitIpSec with a value of 1.

After this, restart your PC.
After setting up a VPN Windows 8 may appear error 806. It occurs when the network setup or network cable connection is incorrect.

Let's look at solving these problems:
Thus, the remote server will transmit all data through this port and the connection will not be broken.
On Windows 7 it occurs when the security of the VPN connection is incorrectly configured.

In most cases, it occurs when the user name and password are entered incorrectly, but it can also appear when the connection is blocked by a firewall or when the access point is incorrect. If all entered data is correct, then the error is due to incorrect security settings. They need to be reset:
A VPN connection allows you to reliably protect all transmitted data. Thanks to additional encryption protocols, unwanted parties will not be able to view information sent between users and servers. The main thing is to correctly configure the connection to the server.
Many users who need to visit a blocked site or simply change their IP address use a VPN. In order to perform this action, you can use any of the four possible options. Each method will be described in more detail later in the article.
To begin with, you must know exactly for what purpose you need to install a VPN. To simply unblock the browser, it will be enough to specify certain settings in the menu. If you need to run more serious software, you will have to install a special application.
There are quite a lot of free utilities for setting up a VPN. They come with different interfaces, may have certain traffic restrictions, and so on. But despite this, almost all work according to the same principle. You can take a closer look at the actions that need to be performed using the Windscribe program as an example.


Many free virtual private communication programs have traffic limits. If you plan to use such a utility regularly, you should consider purchasing the full version.
This connection setup option is popular because of its simplicity. You can install the extension in your browser very quickly, in just a few clicks. The rest of the article will discuss all the actions that need to be performed, using the Hola utility as an example.


This is not the only browser extension option. You can choose any of the existing add-ons, all steps to connect will still be the same.
If you use the Tor browser, you can be sure that your anonymity on the Internet is preserved. In addition, it allows you to use the .onion pseudodomain. To transmit the signal, a number of addresses are used, each of which is an active user. To install the browser follow these steps:


Naturally, this browser is not unique. Finding a similar option with similar functionality is not difficult.
If you registered with services that provide VPN services, you can establish a connection using standard OS tools. This must be done this way:


After completing all the steps described, you can continue working in the OS using virtual private communication.
This article described in detail all the methods of free VPN connection on a PC. They work on different principles. This connection can be used for various situations. Once you have familiarized yourself with each connection option in detail, you can choose the one that suits you best.
Every day the Internet is growing rapidly, the number of users is increasing. Then providers begin to offer us to use VPN technology. Indeed, this connection has a lot of advantages, but there are practically no disadvantages, we will talk about this below. In this article we will look at how to set up a VPN connection and why it is needed.
VPN is an acronym in English that translates to “Private Virtual Network”. It is important to know that VPN technologies are used on top of an already installed local or Internet network. They easily connect all computers into one single system. The most important and important advantage of VPN is the excellent protection of transmitted data, which is ensured through code encryption.
If computers have physical access to each other, which is provided through a connection via a network cable or wi-fi, then a vpn server must be installed. Don’t worry, a regular computer or laptop is perfect for this role. However, you will have to install the necessary software.
The task of the vpn server is to manage and configure the connection between the virtual network and the child machine.
On computers or, more simply put, machines, you will need to install a VPN Connection. This process can be simplified and written like this: setting up and setting the vpn server name, recording the address and password, which will be useful for a successful connection. The trouble is that there are many different operating systems, and, accordingly, the settings are different everywhere. Let's look at the most popular options in more detail.
How to set up a VPN connection
Follow these instructions:
After creating the network, the computer should automatically connect you to it. If this does not happen, then do it manually. Don't forget that the created connection can be completely edited and changed.
More and more people are switching from win xp to win 7, and only the most faithful remain. This is not surprising, time passes, technologies change, and people are drawn to something more advanced and simpler.
To create a connection on this operating system, you only need to follow the instructions below. The main part of the process is practically the same as the previous version, but there are still some minor changes.

vpn server
That's all, now you know how to set up a VPN server on Win 7. For convenience, you can install a shortcut with the connection in the quick launch panel or on the desktop. To do this, right-click on the shortcut and click on “Create Shortcut”, then select it and move it to the desired location.
To connect to a new connection, double-click on the shortcut, or right-click on it and select “Open”.
You can also simplify your future work and select the “Save password and login” option. This way you won't have to enter your personal information all the time.
When you first start the VPN connection system, you can select your location. If you click on the “Public Place” item, you will receive additional protection from the win 7 system.
Similar to the win xp system, the seven offers you to make any settings and changes to the system. You can change your password, name and other settings. To do this, right-click on the connection shortcut and select “Properties”.
Perhaps one article is not enough to describe all the advantages of this operating system. But in our lesson we are discussing a completely different topic, so we will not deviate from the course. So, to make all the settings, you need to do the following:
Now you know how to set up VPN on Android. It is worth mentioning that here you can make any settings and changes. You can also create a shortcut for convenience, save your personal data and autoload this connection.
sovetisosveta.ru
VPN is a feature available on iPhone, iPad and iPod touch that allows you to replace the device's IP address when accessing the Internet. There are several ways to use it.
Using a VPN leads to the fact that when you access the Internet, all sites and other objects requesting your IP will receive not your individual number, which records from which location you are accessing the network, but another one, tied to another location or another country .
This function can be useful in cases where you need to access a site that is blocked in your country, or log into any resource blocked by the settings of the Wi-Fi network through which the connection is made. VPN provides anonymity, that is, no one will know that it was from your device that you entered a particular Internet resource.
That is, if you are, for example, in Russia, then with the help of a VPN you can set an IP for your connection, thanks to which it will be displayed everywhere that you are, for example, in Italy.
The use of VPN is officially prohibited in Russia.
On iPhone, iPad, and iPod touch, there are two ways to use VPN services: through the device's built-in settings or through a third-party application.
To use this method, you will have to find a site that provides VPN services in advance and create an account on it.

There are many programs that provide a VPN connection. One of the best is Betternet, which can be installed for free from the App Store. To connect and disconnect a VPN you only need to press one button, and the time you can use the VPN is not limited. That is, you don’t have to manually enter settings, create accounts or use any other additional services. Just install the application, go into it and press the Connect button to connect and Disconnect to disconnect.
 Connecting or disconnecting from a VPN via Betternet
 You can also choose which country the VPN will link you to.
 Choosing a VPN server via Betternet
If the device is connected to the network via VPN, an icon will indicate this in the top notification bar. The disappearance of this icon means that you are still connected to the Internet, but redirection via the VPN has ended. That is, the VPN connection is interrupted; it may deactivate on its own due to an unstable Internet connection or problems with the server providing VPN services. In this case, you must manually reconnect to the VPN using one of the methods described above. You may need to reboot your device first before reconnecting.
 VPN icon in notification bar
 A VPN connection may not work for two reasons: an unstable Internet connection or a problem with the server that provides VPN services. First, check whether your connection to the mobile Internet or Wi-Fi network is stable. Secondly, check the correctness of the entered settings if you used the first method described above, or install any other application other than the one described above in the second method, if you used it.
The best way to get rid of the VPN connection problem is to choose a different service or application. The main thing is to choose a VPN that will work in your area.
A VPN allows you to use services that are blocked in your area. You can use it through the settings of your Apple device or a third-party application.
dadaviz.ru
A Virtual Private Network is a virtual private network that is used to provide secure connections within corporate connections and Internet access. The main advantage of a VPN is high security due to the encryption of internal traffic, which is important when transferring data.
Many people, when they come across this abbreviation, ask: VPN – what is it and why is it needed? This technology opens up the possibility of creating a network connection on top of another. VPN works in several modes:
Organization of a private virtual network at network levels allows the use of TCP and UDP protocols. All data that passes through computers is encrypted. This is additional protection for your connection. There are many examples that explain what a VPN connection is and why you should use it. This issue will be discussed in detail below.

Each provider is able to provide user activity logs upon request from the relevant authorities. Your internet company records every activity you do online. This helps relieve the provider of any responsibility for the actions carried out by the client. There are many situations in which you need to protect your data and gain freedom, for example:
When you use another VPN channel, your IP will belong to the country where this secure network is located. When connected, a tunnel will be created between the VPN server and your computer. After this, the provider’s logs (records) will contain a set of incomprehensible characters. Analyzing the data with a special program will not produce results. If you do not use this technology, the HTTP protocol will immediately indicate which site you are connecting to.

This connection consists of two parts. The first is called an “internal” network; you can create several of these. The second is the “external” one, through which an encapsulated connection occurs; as a rule, the Internet is used. It is also possible to connect to the network of a separate computer. The user is connected to a specific VPN through an access server connected simultaneously to the external and internal networks.
When a VPN program connects a remote user, the server requires two important processes to go through: first identification, then authentication. This is necessary to obtain the rights to use this connection. If you have fully completed these two steps, your network is empowered, which opens up the possibility of work. In essence, this is an authorization process.
There are several types of virtual private networks. There are options for the degree of security, implementation method, level of operation according to the ISO/OSI model, and the protocol involved. You can use a paid access or a free VPN service from Google. Based on the degree of security, channels can be “secure” or “trusted”. The latter are needed if the connection itself has the required level of protection. To organize the first option, the following technologies should be used:

For all computer users, there is a way to connect a VPN yourself. Below we will consider the option on the Windows operating system. This instruction does not provide for the use of additional software. The setup is carried out as follows:

The method described above is how to create a VPN connection on a personal computer. However, many have long been doing everything using their phone. If you don’t know what a VPN is on Android, then all the facts described above about this type of connection are also true for a smartphone. The configuration of modern devices ensures comfortable use of the Internet at high speed. In some cases (to run games, open websites), proxy substitutions or anonymizers are used, but for a stable and fast connection, a VPN is better suited.
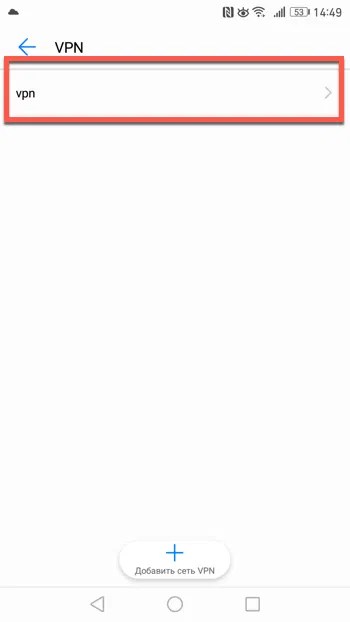
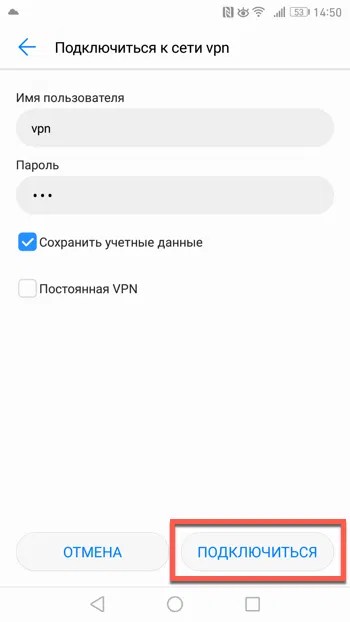
If you already understand what a VPN on a phone is, then you can proceed directly to creating a tunnel. This can be done on any device that supports Android. The connection is made as follows:
sovets.net
Let's look at how to quickly enable VPN mode in the Opera browser to remain anonymous online.
This technology allows you not only to hide your location, but also to protect all data that is transmitted and processed during the session.

Only after connecting to a private network is it better to log in to social networks, enter logins and passwords and make transactions via the Internet. Most often, technology is important for users not so much for data protection as for opening access to blocked sites and services.
Contents:
Browser developers have created a built-in system for protecting user data. The network can now be activated without downloading additional programs and browser extensions.
The user simply needs to activate the mode and continue to use sites as usual.
Before using the mode, make sure that the following requirements are met:
To enable it in the desktop version, follow the instructions:

Fig.2 – main browser window

Fig. 3 - activating a private network using built-in browser functions
After enabling the option, the Internet connection speed may drop by an average of 20%-30%. This is due to the fact that all user requests are first sent not to the provider, but to a remote server, which requires additional time.
The provider of the proxy server for the built-in VPN is SurfEasy Inc.
This instruction demonstrates how to connect to the VPN Gate relay server using the L2TP/IPsec VPN client built into the Android mobile operating system.


Note
2. Starting a VPN connection
3. Internet without restrictions
ip8.com
This instruction demonstrates how to connect to the VPN Gate relay server on iPhone/iPad using the L2TP/IPsec VPN client built into iOS.


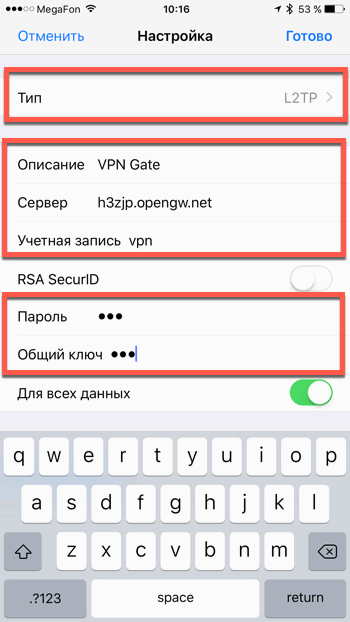

1. Pre-configuration
For the L2TP/IPsec Windows, Mac, iPhone, Android No client required column, the list of servers must have a checkmark that indicates support for the custom L2TP/IPsec protocol.
Note: It is recommended to use the DDNS name - you can continue to use it even if the corresponding DDNS IP address changes in the future. However, in some countries you may not be able to use a DDNS hostname, in which case you must use an IP address.
2. Starting a VPN connection
3. Internet without restrictions
Once the connection is established, all network traffic will go through the VPN server. You can also go to ip8.com to view your global IP address. You will be able to see your web-visible location, which will be different from your actual location.
When connected to a VPN, you will be able to visit blocked websites and use blocked applications.
In addition to a powerful computer and an impressive list of additional programs for convenient surfing and safe work on the Internet, you need a reliable server - a tool that provides communication with people, services, companies and information sites. Among the different types, the best choice would be a VPN server, if only because it is included as an option in the Windows operating system. Read on, and you can launch and configure it on Windows 7 yourself and at no cost.
Don't be alarmed. It is not difficult to create and prepare a VPN server for correct operation, but a prerequisite is that you have administrator rights.
Literally, VPN (Virtual Private Network) translates as “virtual private network.” Technically, this is a set of protocols and solution architecture that provides secure communication in the digital environment. Essentially, a VPN is a secure add-on on top of the usual virtual network.
Installing and configuring a VPN server will not require much of your time, since it is already built into the Windows operating system. According to experts, the most successful private server configuration is contained on this platform.
This is what a simplified connection diagram via a VPN server looks like:
The server's job is to create tunnels connecting the user to the endpoints he wants to get to. Moreover, the information is encrypted using a complex algorithm, which is almost impossible to decode. No one from the outside can enter the tunnel. The server blocks such attempts, leaving personal information well protected - correspondence, calls, messages, video and audio files.
The essence of the answer is in the tasks that the server performs. It not only combines many devices in the virtual space, such as computer terminals, laptops, tablets and even mobile devices. Its technology provides anonymity, data encryption and protection of confidential information from interception by attackers.
Some will object: we have no need for anonymity and data protection, because there is nothing to hide. Let me not believe you. Encrypted traffic is not only used by attackers; most are not averse to protecting data so as not to “share” access passwords to their bank cards or to avoid becoming an object of blackmail due to leakage of personal information. As they say: it is stupid to leave the door of the house open if the world does not consist of only good and kind people. Anonymity also adds a nice detail - the ability to visit resources that were previously inaccessible for various reasons.
 One of the most common reasons for using a VPN is the reluctance to be tied to a workplace
It’s also a good idea to mention the benefits of using a VPN:
A VPN server is also extremely necessary when creating corporate networks, when for the safe operation of a company or enterprise it is necessary to limit access to information circulating among employees by unauthorized persons. Using VPN technical solutions, it is not difficult to organize the confidentiality of clients located outside the company.
The sequence of actions that need to be performed to launch and configure a VPN server on the Windows 7 platform is as follows.
 Go from the Start menu to Control Panel
 Open the “Network and Internet” section
 Select "Network and Sharing Center"
 Select “Set up a new connection or network”
 Click on the “Connect to Workplace” button
 Select "Use my Internet connection (VPN)"
 Select “Delay Internet connection setup”
 Enter the VPN server address and write the name of the connection in the “Destination name” field
 Enter the username and password registered on the VPN server. Check the box "Remember this password"
 Close a window
 Go to “Change adapter settings”
 In the VPN connection window, right-click on it and go to its “Properties”
 Open “Security” and in the “VPN Type” field select “Point-to-Point Tunnel Protocol (PPTP)”, in the “Data Encryption” field select “optional”
 On the “Network” tab, uncheck the boxes next to the items: “Client for Microsoft Networks” and “File and Printer Sharing Service for Microsoft Networks”
 On the “Options” tab, uncheck the box next to “Include Windows login domain”, then click “OK”
Before starting, the VPN will ask for a location. The best choice is “Public Place”, then the greatest privacy in the digital space will be ensured. If desired, in the “Connection” menu, configure the settings for encryption and use of other devices.
The installation process is quite simple, except that you will need to temporarily disable the antivirus. When loading the program, the TAP-Win32 Adapter V9 virtual network adapter and its driver are introduced into the system. OpenVPN's task is to set the IP address and mask of the local add-on.
First of all, you need to copy the configuration file that your provider should provide to you. Save the data in the C:\Program Files\OpenVPN\config folder. Once in it, click on the “Insert” item.


