Some users don't know what to do next. Personally, I have a habit, or, more precisely, an action plan, which is automatically executed after the next reinstallation of the operating system. Therefore, if you don’t know what to do after installing the OS, then perhaps this article will be extremely useful for you.
As an example, we show how to configure Windows 7 after installation. Although similar steps can be performed on Windows 10, 8, 8.1.
First of all, you need to check the activation of Windows. To do this, right-click on the “My Computer” icon and open “Properties”. A new window will appear - scroll down and look at the “Windows Activation” field.
There can be only 2 options here: either the operating system is activated or not. In the latter case, it will be written that Windows is valid for 30 days. And during this period you need to activate it.
The product code is indicated on the disk or on a special card if you purchased a PC with the OS installed. If you bought a digital copy of Windows, then look for the code in the email.
Typically, Windows 7 independently finds and installs drivers for the Internet, sound, etc. But not always. Therefore, if you do not have access to the Internet or sound, find them at the office. manufacturer's website.
It’s easier for PC owners: usually there are disks included with the computer. And you just need to insert them into the drive and install what you need.
How to find out which drivers are installed and which are not? To do this, go to: Start - Control Panel - Device Manager.

Unidentified devices for which Windows 7 did not find a driver will display yellow exclamation marks. That is, in this case you need to find and install them yourself.

And one more nuance that you need to know. Windows 7 installs a standard VGA driver on the video card. But it is not suitable for normal operation. Therefore, you need to find the latest version of it on the official website of the manufacturer.
If you don’t know what video card you have, then I recommend checking out – ?
I disable this feature first. Firstly, it is annoying, since updates pop up almost every day. Secondly, I don't need it.
Over the past 4 years, Windows 7 has worked perfectly: there were no crashes or glitches, no viruses. And this is completely without updates. Therefore, in terms of PC security, everything is fine, and no vulnerabilities or holes particularly worry me.
Decide for yourself whether to disable this function or not. Here, each user determines at his own discretion whether he needs it or not.
An important point for laptop owners. Although you can also configure a power plan on your computer.
The default option is Balanced. If your computer is a gaming computer, or vice versa, it is too weak, you can enable the “High Performance” mode. To extend the laptop's battery life, there is an "Energy Saver" option. But performance in this case will be reduced.
You can also configure when to turn off the display and put the computer into sleep mode. To do this, go to Start – Control Panel – Power Options.

And in the new window, click on the line “Setting up a power plan” and select the desired option (you can also select “Never” here).


After this you need to configure Windows 7:


After the initial setup of Windows 7 has been completed, you need to install the programs. First of all, antivirus. You may also need:
P.S. After setting up Windows and installing all programs, it is recommended to create an image of a working version of the operating system. So that if something happens, you can quickly restore it. This can be done using special programs or
Have you bought a brand new laptop or assembled a computer, installed Windows and... what's next? We went to the Desktop, and there was only the Recycle Bin. Even if you bought a laptop with Windows already installed, you still need to configure and install other programs. For what? To improve the performance of your device.
Everyone should have a list of programs that need to be installed immediately after installing the operating system. I have prepared my list. The programs below are suitable for most versions of Windows (XP, 7, 8 or 10). But first of all, you need to understand the drivers.
For those who have a pirated version! First of all, turn off “Firewall” and “Windows Update” - they are located in the “Control Panel”. Then activate Windows.
Drivers(or more "firewood") is software that is responsible for the functionality and correct connection of other programs to the hardware of a computer or laptop, for example: Wi-Fi will not work without the appropriate driver, the monitor will distort the image (stretch, use the wrong resolution), there will be no sound etc.
Note: In Windows 10, after connecting to Wi-Fi, the system itself finds and installs all the necessary drivers.
The first step is to check what is installed and what is not. Many people have pirated versions of Windows, and many people also buy laptops with DOS(lack of an installed operating system) and then install pirated versions. Even when it’s a pure licensed Windows, you still need to install drivers. But before that, you need to check which of them are installed and which are not. To do this, right-click on the shortcut My Computer > Properties > Device Manager:

If you have all the drivers installed, you will see something like this:

If a driver is not installed, a yellow exclamation mark will appear next to it:

There are three ways to install drivers:
From the official website of the manufacturer. For example, if the laptop is ASUS, then you need to search on the website asus.com.
From the disk that was included (if there was one at all).
Using Driver Pack Solution.
Some drivers are automatically installed by default, which we don't need. For example, a standard driver for a video card may be installed, and then the video card will not work at full capacity, which will affect the graphics in games or when working in serious photo or video editors.
The best way to install drivers- download from disk (if it was in the box) or from the official website. Each driver is installed separately. The included disc usually contains drivers for only one specific version of Windows. The best and optimal solution is to go to the manufacturer’s official website, find the “Drivers” item in the “Support” menu, select your version of Windows and install from there. This way, you will get maximum efficiency and performance from your device.
Rule: Always download and install drivers from the manufacturer's official website.

There are paid and free ones. Leaders among paid ones - Kaspersky, Eset,Dr.Web. Leaders among free ones - Comodo,Avira,Avast. I have it free Comodo Internet Security, which fully copes with its functions. If you have extra money, then buy a paid antivirus for a year. But protection must be mandatory.


Telegram. Where would we be without him? Very useful and fast messenger. Must have.
![]()
Notepad++. A convenient and functional text code editor with support for dozens of programming languages and more. Syntax highlighting, plugins, themes and a lot more.

VirtualBox. A program that allows you to have two operating systems on one computer. For example, you can install Windows 10 as the main one and Linux as the secondary one. The program completely virtualizes the presence of a second OS.
In this article you will learn how to properly install Windows 7 on your computer or laptop. In addition, I will tell you how to prepare for this process so that everything goes without negative consequences. Follow all the steps, be careful and you will succeed.
Before you properly install Windows 7, you need to make sure that everything is ready for this. Four requirements must be met:
The installation is divided into three stages:
Let's look at each of these stages.
Before you install Windows 7 correctly, you need to understand that a disk or flash drive with the distribution kit is not enough. You also need to configure the computer to boot from this disk (or from a flash drive), and not from the hard drive. By default, most computers are configured to boot from the hard drive.
There are many BIOS versions, and setting the boot order of devices is different everywhere. You can find out how popular BIOS versions are configured for booting from external media.
Finally got to installing Windows. When your BIOS is configured to boot from the required device, connect this same device (that is, a disk or flash drive) and restart the computer. Booting from removable media should begin.
If you are installing original Windows, then before booting the message “Press any key to boot from CD...” will appear. While it is lit, you must press any key to start the installation. If you don’t have time, the normal download from the hard drive will begin. If you are installing some build of Windows, then such an inscription may not appear. Instead, there may be a menu where you need to select the installation of Windows 7.
The installation begins. The first step is to select various language options and then click “Next”.
 Choose language
 After this a window appears. Click Install.
 Start installation
 Before you properly install Windows 7, you need to choose which version you will install. This is done at this step. You need to select the desired OS version from the list. The system capacity is also determined here. After selecting the version, you need to click “Next”.
 Select Windows 7 version
 Now check the box that you agree to the license and click the “Next” button.
 Agree to the license
 Now you need to choose: update the system or perform a full installation. To install Windows 7 correctly, select the full installation.
 Select full installation
 Before you properly install Windows 7, you need to work with your hard drive. Click Disk Setup.
At this stage of installation, you will have a utility at your disposal with which you can operate hard disk partitions. So, using the buttons you can delete, create and expand partitions, as well as format them.
 Click "Settings"
 Select (or create) a partition on which Windows will be installed and click the “Format” button. A warning will appear stating that now everything will be deleted from this section - we boldly agree, because we have prepared for the installation and have saved everything we need in another place.
 Format the drive
 Once formatting is complete, click Next.
And wait for the process to complete. This may take a long time.
 Wait for the installation to complete
 When everything you need has been copied and unpacked, Windows 7 will prompt you to enter names for the user and computer. Enter these details and click “Next”.
 Enter your username and computer name
 Now, if necessary, you can create a password. You can leave all fields blank and click Next.
 Enter a password if required
 You may then be asked to enter your Windows activation code. Enter and click Next. If there is no code, then you can skip this step and activate Windows later.
 Enter your Windows activation code
 After that, select the desired security mode on your computer and click “Next”.
 Select security mode
 Now you need to select today's date, set the clock and time zone. After that, click "Next".
 Set date and time
 If your computer is currently connected to the network, you will need to select a connection type. Then click "Next".
Immediately after installing the Windows 7 operating system, some users notice that the USB ports on their computer do not work. Let's figure out what actions need to be taken to be able to connect devices to a PC using the above protocol.
Let us immediately note that this article will talk about a specific problem after installing, reinstalling or updating Windows 7, that is, about a situation where before installing the operating system everything worked fine, but after performing the specified procedures, it stopped functioning. We will not dwell on other possible malfunctions related to the fact that the computer does not see USB devices. A separate lesson is devoted to this problem on the site.
The problem we are studying has two main causes:
This solution is suitable just in case you upgraded to Windows 7 from an earlier operating system. In this case, entries in the system registry about previous connections of USB devices may be saved, which will be incorrect in the updated OS, which will lead to problems with further connection attempts. In this case, all records of previous connections must be deleted. The easiest way to do this is using the USB Oblivion utility, which is precisely intended for this purpose.

Microsoft has its own USB troubleshooter. Unlike the previous utility, it can help not only after installing the operating system, but also in many other cases.


After installing Windows 7, it is possible that your computer will not be able to receive and transmit data via the USB protocol due to the lack of necessary drivers. This situation is especially common if USB 3.0 connectors are installed on a desktop PC or laptop. The fact is that Windows 7 was developed even before this standard began to be widely implemented. For this reason, the basic version of the said OS does not contain the necessary drivers immediately after installation. In this case, they need to be installed.
The easiest way to solve this problem is if you have a disk with the necessary drivers. In this case, you just need to insert it into the drive and extract the contents to your computer using the prompts that appear. The functionality of the USB ports will be restored. But what to do if you don’t have the required disk at hand? We will consider the actions that need to be taken in this situation below.
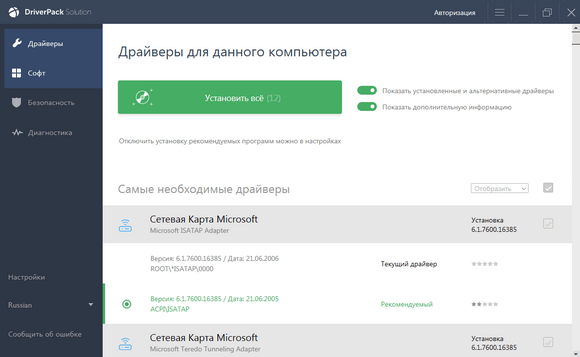
The easiest way to solve this problem is to use special programs designed to search and install missing drivers on your computer. One of the best applications in this class is DriverPack Solution.


The necessary drivers can also be installed without installing additional software to search for them. But this will require a little more tinkering.


These are the types of ports. The list will most likely have one of these names, but it may appear multiple times depending on the number of USB outputs on your computer. Despite this, it is enough to perform the procedure described below with one of the identical elements, since drivers will be installed on the computer for all ports of the same type. If there are several different names of elements from the above list, then for each of them you will have to perform manipulations separately.
So, right click ( RMB) by element name and select from the list "Properties".


Attention! The main thing is that after this, do not copy any more data until the operation to find the necessary drivers is completely completed. Otherwise you will simply replace the information in "Clipboard" about driver IDs with new data. If you still need to copy something else during the procedure, then first paste the data from the equipment properties window into "Notebook" or any other text editor. This way, if necessary, you can quickly copy them again.


If you use the DevID DriverPack service, you will need to specify the OS name and bit depth there before you start the search.


There is another option for downloading the necessary drivers - do it from the official website of the manufacturer of USB controllers that are installed on your PC. But in this case, you must definitely find out the address of this Internet resource, as well as the exact name of the controller model.
There are two main reasons why USB ports may not work after installing Windows 7, although before that they functioned normally. Firstly, these are incorrect entries in the system registry left over from the old OS, and secondly, the lack of necessary drivers. Each of these problems can be solved in several ways, which we described in detail in this article. So, after reading the material, users can independently choose the most convenient and acceptable course of action for them.
Sometimes, due to certain life circumstances, it is necessary to install an operating system. Quite often, users discover that the sound has disappeared after reinstalling the system.
The possibility of a situation where the sound disappeared after installing Windows 7, unfortunately, is far from uncommon. Fortunately, it can be solved quite simply if you know exactly the reason.
There may be several reasons for the sound to disappear. The main ones are hardware errors, that is, a malfunction of the sound card. In this case, you cannot do without specialized help. Or there are problems in the software, and specifically, in the lack of drivers for the sound card.
If the problem is with hardware, then you are unlikely to be able to solve the problem without special equipment and skills. Solving software problems is much simpler and does not require special knowledge and skills. To do this, you just need to confidently use the computer and not be afraid of it.
So, if after installing Windows 7 there is no sound, then the first thing you need to do is check the connection of the audio system to the computer, and also that the audio system you are using is selected in the settings. The check is as follows:
If the audio system is turned on and in use, but there is still no sound, then the most likely reason why the sound may disappear is that after reinstalling Windows 7, the drivers for the sound card or audio device were not installed. This problem is not so terrible and quite easily solved.
There are several ways to return sound after reinstalling Windows; the easiest way is to install control program distributions from the media that comes with the device; it contains all the necessary drivers. But if it happens that there is no disk, you can install the drivers using standard Windows tools.
So, to convince the OS to reinstall the drivers, follow the path indicated in the address bar of Explorer: “ Control Panel» → « system and safety" → "". And select " device Manager».

After completing these steps, the following window will appear:

In the window that appears, select “ Sound, video and gaming devices" and from the list that opens, select the desired system by double-clicking on the name. A properties window will appear in which you need to select the “ Driver».

In this window, you need to select the Update... button, and in the window that appears, click on the item “ Automatically search for updated drivers" After this, Windows will begin to search for the program on the Internet and update or install it if such a need exists.
If the built-in Windows service tells you something like “The installed software for this device does not need to be updated,” this does not mean that you actually have it installed and do not need to be updated.
If you just installed the system, then there are no audio drivers there. But the system simply failed. Also, quite often the automatic update service cannot find the necessary software, in this case the direct path is to manually search and install the necessary programs.
To do this, the first thing you need to do is decide which sound card you have installed. If your card is integrated into the motherboard, then most likely it is from Realtek, which means that you need to go to the manufacturer’s website and download the necessary software there. Device Manager identifies built-in cards as High Definition Audio Device.
But since you may have another audio card, it’s better to find out which one in advance. To do this we follow Start, we find " Execute" and write in the search bar " dxdiag" and click OK.

In the window that appears, go to the “ Sound" (sound).

Line " Name"(name) will tell you what card you have installed. After that, feel free to go to the manufacturer’s website and download the latest version of the software for your card.
After installing the software, restart the computer and check for sound.
If you have already tried everything, but after reinstalling Windows 7 the sound still does not work, then you have two options. The first is to take the computer to a service center or use specialized software to install drivers, for example. It is better to download it from the official website.
After launch, the program will diagnose the system and indicate those drivers that need to be updated. It will also select the software recommended for installation. Among other things, it will contain Avast And Yandex browser, if you don’t need this happiness for nothing, find the button at the bottom of the window Switch to expert mode and manually configure what should be installed.
Feel free to install all the recommended drivers, but here are the software and programs that DRP suggests deleting, better viewing and changing the settings to those that suit you. The program may remove something you need.
Sometimes the drivers are really fine, but problems arise because the audio service does not start. First, try changing the system sound a couple of times:

If all the previous methods did not bring the desired result, then most likely there are problems with the hardware. An audio card may fail due to the failure of some individual elements, and not the entire board as a whole. But this will not reassure owners of integrated cards at all. The built-in cards are not repairable, so if it fails, you will have to buy a discrete sound card.
Discrete cards, as a rule, can be repaired, but you should not try to repair this device yourself without the appropriate skills and equipment; most likely, you will only aggravate the situation and spend much more money than if you gave the card to professionals.
Reasons for refusal:
To extend the life of your computer, clean it several times a year. This will allow the cooling system to perform its function most efficiently and problems such as overheating and damp contacts will most likely not affect you.
However, the lack of sound is not always a consequence of the fact that the audio card has failed. The first step is to check the functionality of the audio system; to do this, simply connect other speakers to the computer.
Also, cords can fail, replacing which is not difficult, this is especially true for headphones.
It is not always possible to determine at home without equipment whether the audio card has really failed or whether there is a problem with another device. Therefore, you should not panic right away; it is best to carry out diagnostics at a service center, and also update your computer software.


