Most people live in separate apartments and private properties. And often for each room it is necessary to solve one small, but rather insidious problem: in an affordable, low-cost, but effective way to create an access point for connecting to the Internet. It would seem that the answer is obvious - purchase, configure a Wi-Fi router and forget about all the problems. However, wired Internet still remains the most common and reliable solution, because such a signal is much more stable. This leads to another problem - how to hide the Internet wiring? Usually it is mounted on walls and plugged into sockets, although not of a completely standard type: they are called computer or simply Internet sockets.
The main difference between an Internet outlet and a conventional electrical outlet is that it has its own unique connector, to which a special type of wiring called twisted pair is suitable. It is unique in that it contains 8 individual copper wires twisted together in 4 pairs. Thanks to such a connection system, existing electromagnetic interference is leveled, which ultimately ensures a high data transfer rate (up to 1000 Mbps).
The Internet socket has a special connector to which a twisted pair cable is connected.
The return connector is called RJ-45/8p8c. It is mounted on the cable using a special tool, and the connector wires must be arranged in a strictly defined order.
The sequence of colors of wires connected to the pins of the connectors is determined by the standard scheme
IT specialists classify Internet sockets according to their distinctive features:

The most correct, but at the same time, the most difficult solution for laying an Internet cable in a home (office) environment is its installation inside the walls. The advantages of such wiring are obvious: the cable does not get under your feet and does not affect the decorative design of the room. A significant disadvantage of in-wall installation is that in the future there may be problems with access to the cable for its repair or maintenance. But with proper cabling along the strobes in a corrugated PVC pipe, you can not only minimize the risk of a malfunction, but also provide relatively easy access to the twisted pair without complicated dismantling.
Before you start laying an Internet cable, it is worth marking the places where it should be located. Remember that unshielded twisted pair is made of copper, which is very sensitive to electromagnetic interference. Try to keep the distance between computer and electrical wiring at least 50 cm.

When crimping a twisted pair, it is necessary to adhere to a certain pinout (color scheme). There are two generally accepted connection standards.

To select the correct connection color scheme, you should contact your Internet service provider and get information from him about which scheme was used during the connection.
We perform the work in the following order.

A two-pair RJ-45 cable uses data rates up to 1 Gb/s.
The two-pair cable is connected to one side of the socket contacts.
The pinout of a two-pair cable is made in the same way as a four-pair cable. Only instead of eight multi-colored wires, only four are switched: white-blue, blue, white-orange and orange. Then the cable is crimped, the socket is assembled and installed and its performance is checked.
When pinning the cable to the terminals of the Internet outlet, they should be crimped. This will affect the performance of your internet connection. Based on a similar process for conventional electrical outlets, one would assume that crimping an Internet outlet is a similarly time-consuming process, removing the protection from each individual wire and then connecting them with bolts. In fact, everything is much simpler and faster. At the Internet cable, the contacts are arranged in such a way that when the conductor is firmly connected to them, they cut the insulating coating, due to which they come into contact with the copper core. Because of this, stripping each wiring is not necessary.
Usually, an extractor is used to crimp socket contacts - a crossover knife. Work should be done carefully to avoid damaging the cable.
The cable is crimped in a computer outlet using a crossover knife
After pinning out the Internet outlet and the RJ-45 connector at the opposite end of the cable, you should make sure that the line is working. Testing is best done with a special device called a cable tester.
It is better to check the performance of the outlet with a specialized device.
It consists of two parts - a signal generator that transmits short electrical impulses using encrypted codes, and a receiver that processes these codes. The generator connects to your router and the receiver connects to an internet outlet.
After the transmission of electrical signals, they are compared. If all connections are in order, two green LEDs on the generator and receiver housings light up sequentially. If there is a break somewhere on the cable or there is a short circuit on the Internet outlet itself, then one or both LEDs will not light at all.
Without exception, all Internet outlets are divided into two large subgroups: mortise and outdoor. The manufacturer usually only slightly changes the mechanism for attaching the outlet to the wall, but the principle of connecting it to the Internet always remains the same. Consider the most common brands of manufacturers.
Internet sockets from the French manufacturer are not only among the most popular, but also have one of the best cable retention mechanisms. The wiring diagram for Legrand sockets does not differ from generally accepted standards. At the same time, any Internet socket can be connected both according to type A and type B. The color schemes for connecting are located on the terminal of the socket itself.
The pinout and connection of the Legrand socket is made according to the generally accepted scheme.
Viko sockets are cheaper than Legrand ones, while their quality remains at a high level. The case is made of durable polymer materials, and the internal assembly is very ergonomic.
Viko sockets are an economical and high quality solution
The only major difference from other manufacturers is that inside the terminal there are no hints in the form of a color scheme for connecting. Therefore, the pinout should be done very carefully.
Lezard brand switches and sockets are produced by the Turkish company Dernek GROUP. They do not have any distinguishing features.
Connecting and mounting the Lezard socket is quite simple.
This socket is connected by analogy with others. Often it can be double, then you have to run two cables from the router, since parallel connection is not supported by network equipment.
The most common version of the Schneider socket has two outputs.
Connecting the Internet network via cable is the most common way today. Wired Internet is still considered the most stable. For the convenience of connecting it, there are special sockets, thanks to which any cable can be hidden in the wall. Such a seemingly time-consuming task of connection and installation is actually solved relatively easily, without requiring the use of an expensive tool. Therefore, anyone can connect an Internet outlet.
In a modern house or apartment, it is impossible to get by with only one electrical outlet.
Computers, telephones and modems require completely different elements to connect an electronic high-speed signal. One of the elements of such fittings, which may be needed when combining several computers into one network, is an rj45 socket. How to connect this device will be detailed below.
This fitting is designed to transmit a computer signal from one system unit to another. One of the most frequently installed devices is a combined computer socket - TV. The convenience of using this element is achieved by installing an rj11 telephone connector in one case. Such a device allows not only to connect a computer to a home network, but also to connect a landline phone to the network.

Before you learn how to connect such a device, you need to understand what models of computer fittings exist.
The rj45 computer socket can be surface-mounted and for installation using internal mounting. If you plan to install an internal model, then .

To install an external computer outlet, you do not need to make holes in the wall, but the cable channel located along the wall will significantly spoil the entire interior of the room. The outdoor method is more suitable when you need to install a large number of computers connected to one network. If you need to add another computer to the system, it will not be difficult. It will be enough to connect the cable section to the last device.

Combined external rj11 sockets are also in demand for connecting computers in the office.
Connecting together with a computer and a telephone allows you to rationally use the space on your desktop and, if necessary, easily disconnect the device from the network.
Sockets for connecting a computer can be single or double.

If you need to connect more than one computer to the network at one workplace, then the dual model will completely abandon the various devices that are used to increase the number of ports.
Proper installation, regardless of the model of the element being installed, will allow you to safely use expensive computer equipment. If the connection of the computer outlet is carried out with violations, then the sensitive microprocessor equipment may be disabled. Signal transmission from one outlet to another is carried out using a twisted pair cable.
This connection allows you to transmit a high-speed signal, over a distance of up to 100 meters, without loss of quality.
The cable for connecting this device contains 4 pairs of colored wires, which greatly facilitates the correct installation. The pinout of the connector depends on the connection standard of the device.
The T568A connector has the following pinout:
1 contact - white-green.
2 - green.
3 - white-orange.
4 - blue.
5 - white-blue.
6 - orange.
7 - white-brown.
8 - brown.
If the T568B standard is used (used more often), then the wiring is as follows:
1 contact - white-orange wire.
2 pin - orange.
3 - white-green.
4 - blue.
5 - white-blue.
6 - green.
7 - white-brown.
8 - brown.

These pinout options are interchangeable and completely identical in signal transmission quality.
When connecting, the computer socket must be connected to the cable in such a way that the involuntary loss of the conductor from the clamping contact is completely excluded. To do this, you must correctly connect the device with a high-speed cable. Connection is carried out using a special plug. The plug should be of the required size, the thickness of the tip of the tool should not exceed the diameter of the wire.

Cable installation is carried out in the following sequence:
Some installers use a slotted screwdriver of the appropriate size instead of a special plug to save money. But this method is artisanal, sometimes leading to a wire break or loosening of the clamp contacts. Although it also has a place to live.
When connecting the cable, it is not necessary to strip the wires. Blades that are built into the connector clip cut through the insulating sheath securely.
Computer, and external way. How to install this element depends on personal preferences and the appropriateness of using one or another model of such a device.
If we install the device in a room that is designed to accommodate a large number of computers, then the most suitable option would be to use an external device. To carry out the fastening of such an element, it is necessary to install the cable into the connector, then using two dowels, the inside of the socket is fastened to the wall. The next, final step will be the installation of the decorative part of the computer outlet.
It will take much more time to install the internal structure.
Such a device is connected to the cable in the manner described above, but the installation of this element to the wall is completely different. Installation of the internal model is performed in the following sequence:
Despite the more complicated option of installing a hidden computer outlet, the use of this installation method can significantly improve the aesthetic qualities of such a connection.
How to connect a computer rj45 is described in detail in this article. If the installation is carried out in accordance with all the rules, then the socket will last a long time, without any disruption in operation, and a network game will be possible even if the second computer is in another room.
To beautifully organize the point of connection of a computer or other device to a wired local network or Internet cable, a special socket with an RJ 45 type connector is installed on the wall.
In this case, the hanging "tails" of the cable will not spoil the interior, and the probability of their damage will be reduced to zero. In this article, we will discuss the connection of the RJ 45 socket.
Computer sockets are available in a variety of designs. According to the number of connectors, they are divided into:
Also, computer sockets may differ in the type of connectors. In addition to RJ 45 jacks, they can be equipped with connectors for connecting audio systems, telephones, etc.
Another distinguishing feature of computer sockets is the category. It must match the network bandwidth:
 The installer will need:
In addition to the tools you will need:
You also need to purchase a box or a corrugated pipe: the first is used when laying the cable along the wall, the second - in the strobe.
Before proceeding directly with the installation of a computer outlet, you must do the following:

Connecting an RJ-45 socket: diagram
Let's consider two options:
If a switch with a Wi-Fi transmitter is used, it cannot be installed in a metal cabinet.
The Ethernet cable is laid away from electrical wires, otherwise they will interfere. If it is not possible to maintain a sufficient distance, a shielded cable is used.
The following options are used:
You can not bend the cable, since its cores are quite thin (designed for weak currents) and therefore can easily break.
Legrand products combine affordable cost, high quality, great variety and good design, which is why it is one of the most popular.
It would be logical to consider the installation order using the example of a socket of this brand:

If everything works, the socket is installed in the socket. In order for it to fit completely there, the cable in the socket is distributed evenly, while avoiding kinks. Next, screw the frame with screws and install a decorative panel.
For mounting an Internet outlet in a cabinet, special DIN tires are produced. Recall that a router with a Wi-Fi transmitter cannot be installed in a metal cabinet: metal walls absorb the radio signal.
Connecting the cable to the outlet is carried out according to the scheme described above.
An important point - the order lived when connected to the outlet. For an Internet cable, follow the order adopted by the provider when installing the connector. In other cases, proceed in accordance with the purpose of the outlet.
The cores are installed in the same order as they are installed in the RJ45 lug from the switch side (direct connection).
The sequence of colors can be arbitrary, but in order to avoid mistakes in the future, it is better to adhere to the generally accepted scheme:
In this case, a cross connection is used: on one side of the cable, the cores are arranged in the indicated order, on the other, the white-green and green cores are interchanged, respectively, with white-orange and orange.
After installing a computer socket, the user does not have to worry about the safety of the cable: completely hidden in a box or wall, it will not be damaged during cleaning or due to repeated kinks when dragging. In addition, the socket looks more aesthetically pleasing than a protruding cable tail.
Despite the rapid development of wireless communications, RJ-45 sockets are still indispensable elements of the structured cabling system of a modern building. We offer to consider their device, types, pinout options and installation methods. The apparent simplicity of the question can be misleading, since there are certain nuances that need to be paid attention to.
Despite the variety of types of twisted-pair sockets, their design is almost identical, with the exception of small details. Let's take a typical external single-port device as an example.
Rice. 1. Basic elements of an external RJ-45 socketDesignations:
Outwardly, the socket resembles a telephone standard RJ-11, the main difference is the number of connector pins, there are eight of them, not four. Accordingly, a computer socket can be used as a telephone socket, but not vice versa.
Different types of devices may have minor characteristic features, but in general the design concept remains unchanged.
The main parameters of these switching devices are determined by the following criteria:
Let's briefly talk about each of them.
More doesn't mean better.
One of the main parameters is the number of ports. As a rule, they can be from one to four. If you want to use more connections, then it is easier to install a patch panel, but such a need indicates ill-conceived network wiring. In addition, it should be borne in mind that a large number of patch cords connected nearby causes some inconvenience.
 Rice. 2. Krauler 4-port external socket
 In practice, when organizing an office or home LAN, one and two-unit modules are mainly used.
This parameter is directly related to the characteristics of the cable used to install the computer network. We are talking about the bandwidth, which determines both the speed of data transfer and the possibility of using special network technologies. Below is a table that shows the relationship of category to bandwidth.

Currently, when installing a LAN, cables with a category below 5e are practically not used.
Execution.
The method of mounting the switching device depends on this parameter. There are two versions:
 Internal two-port RJ-45 socket disassembled and assembled
 As a rule, the choice of one or another version depends on how the LAN wiring is done. If it is external (for example, laid in boxes), external sockets are used. In cases where hidden wiring is done, internal devices look more aesthetically pleasing.
Separately, it is necessary to highlight the sockets that are installed directly on the box. Technically, such a design can be considered both internal and external.

The performance of the LAN is not affected by the execution.
Modular designs.
Speaking of performance, one cannot fail to mention modular designs. This solution allows you to assemble a socket in a standard case for a certain combination, for example, install it in RJ-45 and RJ-11 modules or with a different category.

This should not be a problem, since each contact group is color-coded in accordance with the T568A and T568B standards (it can be marked with the letters "A" and "B", as in the figure below).

It doesn't matter which standard is used, the main thing is that it be of the same type for the LAN, otherwise problems are guaranteed. It is believed that we have adopted a “swaging” of the T568B type, but this is a rather conditional statement.
If you do not know which standard your provider uses, then you can install it by pinouting the connector installed on the cable that enters the apartment.

Let's start with the tool that will be needed to terminate twisted-pair sockets. Ideally, it is desirable to purchase a universal extractor (shown in Figure 9). It allows you to crimp and cut the rest of the wire in one motion. Thanks to Chinese manufacturers, such a universal tool costs about 3-4 dollars. The price of branded products can be 2-3 times more expensive.
 Rice. 9. Universal extractor
 This tool has a special mechanism that allows you to press the wire between two contact knives and cut off its excess (3 in Fig. 9). In addition, it is equipped with a flat screwdriver (2) and a hook (1) that allows you to remove the wire in case of incorrect termination. The cost of a universal extractor is relatively low, and the benefits are quite tangible.
No less useful will be universal pliers for stripping insulation. They cost about the same as an extractor, they can cut a cable Ø3.5-9 mm such as UTP, STP, FTP. It is possible to adjust the depth of the cut.

It is undesirable to use a stripping knife, since in this case there is a high probability of damaging one of the cores of the twisted pair.
Having dealt with the necessary tool, let's move on to the algorithm for embedding a twisted pair into a switching device. We will proceed from the fact that the cable has already been laid, the seat for the socket has been prepared. The procedure is as follows:
 Rice. 11. A - cable with wires separated by clamps, B - pressing with an extractor
 At this stage, we will make a small digression regarding the use of available tools for pressing. Sometimes you can find tips in which, in the absence of the necessary tool for pressing, it is recommended to use a clerical knife or a thin slotted screwdriver. This approach can be used only as a last resort, when you urgently need access to the network, but there is no tool at hand. But in the future, such an outlet must be pinched. Otherwise, it is likely that the wire will lose contact with the latch after a while.
We also note that many branded manufacturers attach a simple plastic extractor to each outlet, which allows you to securely close the wire, after which it remains only to carefully cut off its excess.
When using a shielded cable, you must install an appropriate socket that has a shield connection. Otherwise, it turns into a large antenna, which will not be slow to affect the bandwidth, and, consequently, the data transfer rate. For the same reason, you should not use an STP or FTP cable if ungrounded equipment is connected to it.
Twisted-pair LAN technology requires the use of complete lines. Twisting, adhesions are unacceptable, this leads to serious losses. If, nevertheless, it became necessary to extend a piece of cable, special connectors should be used for this purpose.
 Rice. 12. Twisted pair connectors
 These devices are a box in which a board is installed with two RJ-45 connectors (A in Fig. 12), or twisted-pair latches, like sockets (B in Fig. 12).
It is not recommended to use sockets with more than two ports in domestic conditions. A large number of patch cords in one place will cause them to become tangled. It is better to spread the sockets at some distance.
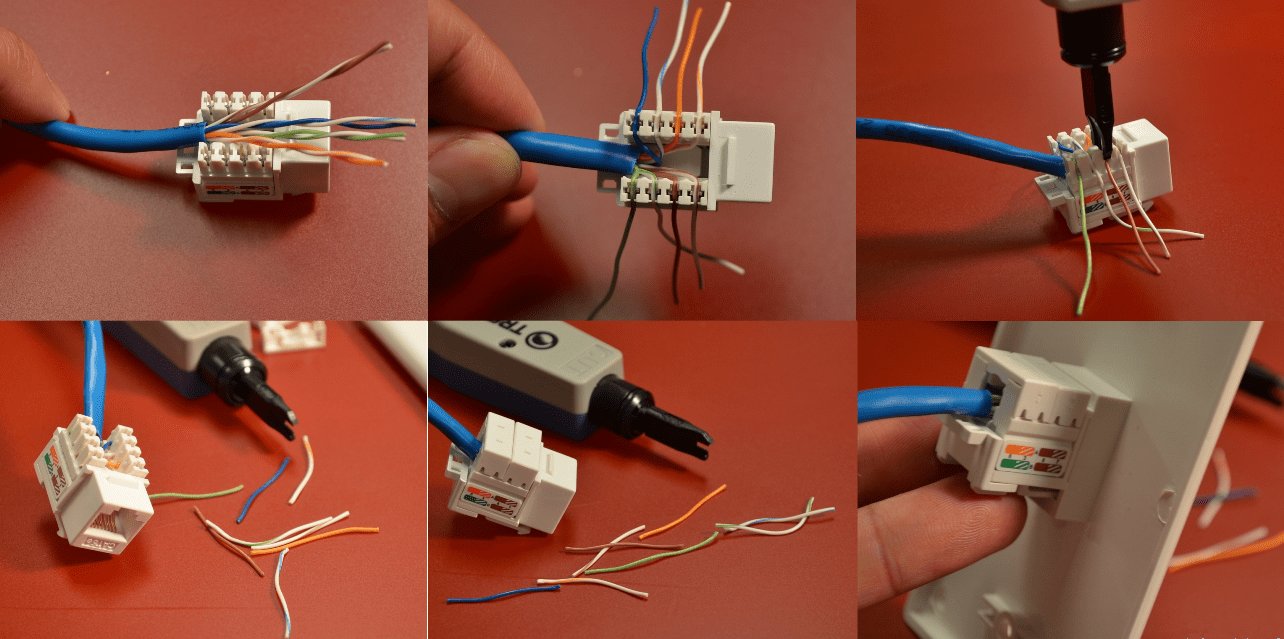
There are two main types of sockets - this is for hidden and outdoor cabling. In this case, an independent crimping of a hidden RJ45 network socket is considered. But there are no cardinal differences from the second one in the performance of work, with the exception of the presence of additional work on the installation of the socket box! Therefore, focusing on this example, you can easily perform an independent crimping of a hidden-type or outdoor power outlet.
So, let's start with the fact that the twisted pair is brought out to the socket.
If the cable ends are too long, they can be cut off.
 After that, remove the top layer of insulation. There are special tools for this. If they are not, then a similar operation can be performed using a regular clerical knife. The main thing is not to damage the cores of the twisted pair! Otherwise, the cable will have to be cut again and stripped from the outer insulation on a new one.
 It is not necessary to "fluff" the twisted pair cable at this step!
 Next, we need the power outlet itself. This model of the Schneider power socket uses a clamping mechanism for crimping cables. The latches in the photo below are raised. On them, by the way, there is a pinout diagram, which will be needed in further work.
 Through a special hole in the latch we push the twisted pair cable.
 Next, the cable needs to be fluffed. Those. separate paired wires. After that, each individual posting is installed in the socket corresponding in color on the latch. At this stage, a reasonable question of choosing a pinout may arise. On the color scheme drawn on the socket body, there are two options - scheme A and scheme B. The maximum connection speed depends on the correct choice of pinout. Those. instead of gigabit, you can get 100Mbps, or instead of 100Mbps, you can get only 10.
Determining the right pinout is easy! To do this, look at the crimped end of the patch cord that you have (for example, cut off from the cable) and look at how the wires are located there. If, as in the photo below, then the crimping of the power outlet should be performed according to the “A” scheme
 If the first wire in the connector is "white-orange", then we use the "B" scheme.
 In general, we insert the wires into the holes that match the color of the selected scheme.
 Next, fasten the latch.
 You can cut off excess wires for aesthetics.
 If necessary, crimp the second socket in the same way.
 Next, install the socket in the socket. In this case, it is fastened with screws to the body of the outdoor unit for outdoor wiring. If the installation is carried out in a conventional socket box, then the Schneider power outlet has clamping "ears" that perfectly fix it in this case.


