Virtualization is an umbrella term that covers the abstraction of resources for many aspects of computing. Some of the most typical examples of virtualization are given below. In turn, a virtual machine is an environment that appears to the “guest” operating system as hardware. However, in reality it is a software environment that is simulated by the host system software. This simulation must be robust enough to allow the guest drivers to operate reliably. When using paravirtualization, the virtual machine does not simulate the hardware, but instead offers the use of a special API.
Terms used:
In this guide, I will talk about the new virtualization features of the Windows 7 operating system. Virtual PC Windows is a new optional system component that can be used to deploy and migrate compatibility support for applications in Windows 7 that can be managed on legacy operating systems. This component is available when you download the update package.
Virtual PC Windows provides an easy way to manage Windows XP and support compatibility for applications that need to be managed on this operating system. Can be used to access a virtual image of Windows XP that is ready to provide compatibility customization with the applications the user needs. You can even use Windows XP Mode and Windows 7 to run applications directly from Windows 7 when the applications are, in principle, installed in the Windows XP virtual machine. Windows XP Mode is available in Windows 7 Professional, Windows 7 Enterprise, and Windows 7 Ultimate.
Under the Windows 7 operating system, other 32-bit operating systems can also be used in Windows Virtual PC. Namely:
In this guide, I will describe several options for using Virtual PC - installing Windows XP Mode, as well as installing another operating system. In both cases, virtual machines are used to provide management of the operating system. Windows XP Mode is a faster method because... it involves fewer steps and effort. Once the operating system test environment is installed, we'll look at a few key features of Windows Virtual PC, such as sharing physical resources: USB devices, printers, and hard drives.
Pre-installation steps
To install Windows Virtual PC, you must download and install a specific system update. Before you install Windows Virtual PC, you need to review the requirements to determine whether your computer can run Windows Virtual PC. Windows Virtual PC requires Windows 7 hardware support for virtualization. Virtualization support is available for processors that include a virtualization option—namely, processors with Intel Virtualization Technology (Intel VT) and AMD Virtualization Technology (AMD-V), as well as some VIA processors. You can enable hardware support for virtualization using the BIOS. For more detailed information regarding hardware support for a specific virtualization processor, it is best to consult the hardware manufacturer's Web site.
In order to find out whether hardware virtualization is supported in Intel processors, you need to do the following:
In order to find out whether hardware virtualization is supported on AMD processors, you need to download, install and run the AMD Virtualization Compatibility Check Utility
The following list shows some Intel processor models that have hardware virtualization support:
This section of the guide describes the process of installing Windows Virtual PC, as well as installing the virtual machine itself. Additional configuration and technical details in the examples.
Installing Windows Virtual PC

After installing Windows Virtual PC, you need to install a virtual machine. You can use Windows XP Mode or create your own virtual machine. If you plan to use Windows XP, you can download it using the Windows XP Mode installation package discussed in the "Before You Begin" section.
A little about integration components
Integration components make a virtual machine easier to use by improving the interaction between physical resources and the virtual machine environment. They are installed automatically along with Windows XP Mode. For other operating systems, they must be installed manually after installing the operating system itself. Integration components are included with Windows Virtual PC and provide access to the following resources:

Installing Windows XP Mode
Installation process:

Attention
The installation process is as follows:


After installing Windows XP Mode, you may want to create new accounts for this component. If you create accounts, you will need to add them to the Remote Desktop User and Administrators groups. Accounts can be either domain or local.
Installing a virtual machine manually
This method can be used if you do not want your guest system to be Windows XP. In this section, I'll show you how you can create a virtual machine and install the guest operating system that you plan to manage in Virtual PC. You can use the Create Virtual Machine Wizard to create a virtual machine. The wizard will walk you through configuring the virtual machine with basic settings that you can customize to suit your needs for using the virtual machine. For example, you can specify a certain amount of memory that the virtual machine will use. The amount of RAM allocated should be the same as what you would allocate to a physical computer. It is advisable to provide the virtual machine with enough memory so that you can easily manage the operating system and applications installed on it. You should also pay attention to how you will install the guest operating system. For example, to install an operating system, you can use a network installation server or a physical CD or DVD drive into which you simply place the installation disk with the system. If you are installing a Virtual PC-supported guest operating system, you will need to install the Integration Component Pack after installation.


Folder " Virtual machines" provides detailed information about all virtual machines created by the current user, and from this folder you can share, create and modify virtual machines and virtual disks.


The first step is to name the new virtual machine and specify its location.

In the second step, the virtual machine creation wizard prompts us to specify memory parameters for the virtual machine.

The third step requires you to specify the virtual machine disk settings.


B) In the left pane, select the drive where the image is located. In the right pane, select " Open ISO image" Click the button OK.


Closing a virtual machine
Before you start performing some actions in the virtual machine, you may want to know how to log out of the virtual machine. When you close a virtual machine, it may hibernate, shut down, or shut down. When a virtual machine wakes up from hibernation mode, it does not boot the system sequentially, so this option is much faster than shutting down and shutting down.
Attention
When you open a virtual machine, Windows Virtual PC provides it with memory and processing resources. The length of time it takes to open a virtual machine depends on how you closed it during your last session. The amount of memory you allocated when creating the virtual machine also matters. By default, when you click the “Close” button in the virtual machine window, the Windows XP Mode virtual machine goes into hibernation mode and prompts you to select the same action for other virtual machines. You can change this option yourself.
Changes to the default action to close a virtual machine

Shutting down a virtual machine
Attention! If you want the installed software to appear on the desktop of the host operating system, you need to log out of your account before closing the virtual machine.
If you are running certain versions of Windows XP, Windows Vista, or Windows 7 in a virtual machine, then you have the ability to access an application directly from the desktop on the host computer when the application is installed in the virtual machine. With this feature, you can run existing applications on your Windows 7 host machine, avoiding problems that may arise if they are not compatible with the host operating system.

Business applications running on the Windows XP operating system are great for testing this feature. However, Windows Virtual PC does not support applications that require stereo sound or 3D graphics. This means that user applications, such as games, cannot be launched in this case.

Using USB devices in a virtual machine.
Windows Virtual PC supports USB devices version 2.0, and it is also possible to share a device or record from a device to a virtual machine. The method you use depends on the type of USB device you are using. If integration components are installed and enabled by the guest operating system, storage devices and smart card readers are automatically shared between the virtual machines and the physical computer. No additional steps are required for these types of storage devices. For other types, their use is possible by attaching them to a virtual machine. For example, you can attach the following types of USB devices:

Printing from a virtual machine
There are several ways to make a printer available on a virtual machine. Some factors that influence the methods you can use include whether a printer driver is available on Windows 7 and whether the printer is connected locally or over a network. You can also use the XPS format if your computer supports this printing method.
Using a Local USB Printer
Attention! This method is suitable if drivers are available for both systems - the Windows 7 host system and the guest operating system. You only need to go through a few steps to install the printer on a virtual machine. The following steps assume that you have already printed to the printer using the host operating system.
Make sure the printer is turned on and available for driver installation. For example, you can install drivers on it using a CD.

If you are using a Windows XP guest system, you must manually install the driver for the printer that will be used.

Printing from a virtual machine
You can also use Print to XPS Document from your virtual application or virtual session to save the file you are printing to the host, and then you can print the file using a printer installed on the host computer. This option is useful when drivers are not available for the guest operating system or you do not want to install a printer on it. This method requires the following configuration:


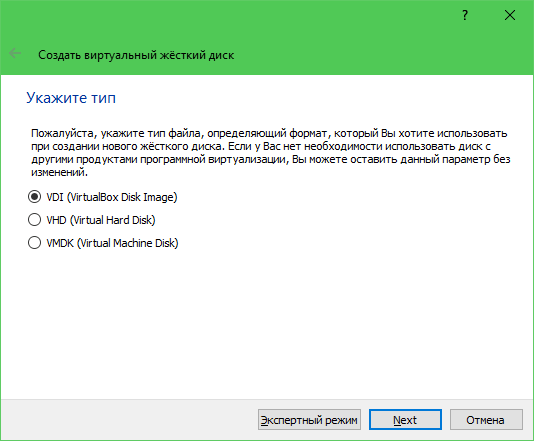
Step #3: Let's create a new hard drive. Select “Create a new virtual hard disk” and click “Create”.

Step #4: In the new window, indicate the file type that will be used to create the “VDI (VirtualBox Disk Image)” disk. Click “Next”.

Step #7: Go to “Settings” in the upper left corner and click on the “General” tab. Click on “Advanced”. Let's configure the clipboard operation mode between your computer and the virtual machine. In the “Shared Clipboard” drop-down list, select “Bidirectional”. Check the box next to “Use in full screen modes” and “Remember changes while the VM is running.”

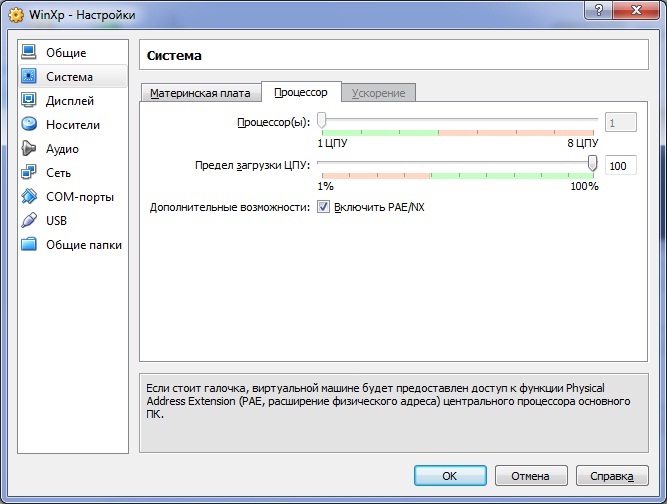
Step #8: Go to the “System” tab. We set to boot from CD/DVD-ROM.

Go to “Processor” and check the “Enable PAE/NX” checkbox.
Step #9: Click on the “Display” tab, check the boxes next to: “Enable 3D acceleration” and “Enable 2D video acceleration.”

Step #10: Go to the “Media” tab. Add a new device “Add optical drive” and select the system image that we are installing.

The machine is ready to start, click “Start”.

Step #11: The Windows XP installer starts, press “Enter”. We get to the disk partition master, but our disk is only 10 GB, so we press “C”.

We wait while the disk is formatted.

Step #12: Start installing Windows XP itself.

Step #13: After the installation is complete, extract the disk image from which we did the installation. Click on the “Devices” tab, go to “Optical disc drives” and select “Remove disc from drive”.

Fresh selection of jokes
Watching this video will increase your lifespan by a year.
Sometimes running certain applications or testing programs requires another operating system in addition to the one already installed on your PC. Installing a new system on a second hard drive is time-consuming, expensive and inconvenient! The best solution is to run the OS on a virtual machine created using Windows Virtual PC.
This program was developed by Microsoft and is designed primarily for emulating the Windows OS family. Virtual PC only works on Windows 7, however, it can run Windows XP, Vista and 7 different editions and versions. Using the utility, you can run virtual applications in other operating systems that are not installed on the hard drive. But since the virtual machine does not have a 3D accelerator, it is not suitable for running computer games.
When creating a virtual machine in Virtual PC you must specify the amount of allocated RAM for the emulated OS. For XP, 256 MB is enough if you do not plan to run “heavy” applications. You can also specify individual network parameters in the program settings. If you have several providers, you can use each provider for a separate OS.
Functions and features of Windows Virtual PC 6.1:
Supported Systems
Official site:
Computer users are sometimes faced with a situation where they need to work with old programs that worked successfully on previous versions of Windows. Managing two computers at once is not always convenient. But it is possible to install another edition of the operating system on a work laptop. Parallel operation of two systems can be ensured by a virtual machine for Windows 7 (VM). From this article you can learn:
Virtual machine- software. With its help, a copy of a real computer is created with:
A virtual laptop with its own operating system runs in a separate window and occupies a certain amount of space on the physical hard drive. It looks like this:
The example shows how in a real operating system with Windows 7 Professional installed, the program runs with the virtual Windows XP operating system. And it performs the same actions as on a real device.
Almost everyone is faced with a situation where a program downloaded from the network and installed brings with it a trail of unnecessary applications. That is why more advanced users prefer to install the downloaded application in a virtual system and test it both for functionality and for unexpected surprises.
In addition to this, other problems are solved:
You can find many programs with which you can create a virtual Windows. But it’s best to familiarize yourself with the most popular ones.
This is the most common free program with which you can emulate the most popular operating systems:
Windows 7 and the created virtual machine can be easily configured by the average user. The program differs in both performance and stability. In addition, despite its free nature, it has extensive capabilities and a clear interface. It is better adapted for home use than others.
Also a well-known and popular program. It found its main application in large corporations.
There are two versions of this product:
Version Workstation will be able to fully satisfy the user's needs, but this is a paid program. Regular users can use a free analogue Workstation - VMware Player.
The paid version supports work with 32- and 64-x systems, sees USB 3.0, and various operating systems work quite successfully. VMware Workstation- an advanced version of a computer emulator, but due to its cost, it has found its use mainly among large companies, and not among ordinary users.
A similar virtual machine for working in Windows 7. It has wide functionality and a clear, convenient and practical interface. But there is also a significant drawback - it can only work with operating systems of the Windows family. Other operating systems, such as Linux or Mac OS, cannot be run on it.
This brief overview describes three of the most popular virtual machines. Now you can see that for home needs it is best to use the program. Next, the procedure for installing and configuring it will be discussed.
The installation process of a virtual operating system can be divided into several stages:
Let's consider all these processes separately.
First of all, you need the virtual machine itself. As already mentioned, there are several of them. We are interested in . You can download it from the official website https://www.virtualbox.org. From the proposed list, select VirtualBox 5.1.14 for Windows hosts.

The process of how to install a virtual machine is described in other articles, but there are a few points:

After the Internet connection is restored, you can begin downloading and installing the finished VM file in Windows 7.

Microsoft, in order to test different versions of Internet Explorer (8, 9, 10, 11), has specially prepared several options for downloading VMs with pre-installed Windows versions (7; 8.1; 10) from its website https://developer.microsoft.com/ru- ru/microsoft-edge/tools/vms/ . If this link is not available, the browser will automatically redirect to the English version of the site https://developer.microsoft.com/en-us/microsoft-edge/tools/vms/

So, first you need to select a Windows 7 image with any version of IE (8, 9, 10, 11).

From the drop-down list, select the item which virtual machine will undoubtedly be used. In our case it is .

And click on the Download .zip button. The zip file download process will begin.

All that remains is to install and run the virtual machine on Windows 7.
The virtual Windows file itself is extracted from the archive “IE10.Win7.For.Windows.VirtualBox.zip”. 
After the file is extracted, right-click on it  and from the drop-down list we select “ To open with».

In principle, nothing needs to be changed in the import parameters. You can leave it as is and click the Import button.

The configuration process will start. The "" window looks like this:

After the process is completed, the new seven and VM will appear in the program list. To launch it, just double-click on the VM itself, or click on the arrow button “ Launch" The operating system startup process will begin immediately. If you install it for the first time, it will take a little longer, however, the same thing happens when installing a real OS. Once the installer has completed all the necessary steps, a desktop with a working Windows 7 system will appear.

Windows 7 in English and the created virtual machine are ready to run.

All VM controls are intuitive. But if you have any questions, you should carefully read the pop-up tips in Russian. You can turn to help for help, where you can find answers to all your questions.
Typically, both the mouse and keyboard only work in the VM and are blocked in real Windows. But it is possible to switch between the two systems using the Right Control host key.
Now that the virtual machine is installed and running, you can configure Windows. The first step is to install software components (drivers) for all virtual devices. This process is quite simple. You need to go to the main menu and in the line “ Devices" click on " Install guest OS additions».
After installation is completed, the VM is rebooted. Now the picture has become clearer, the VM window can be dynamically changed, support for mouse integration will be enabled, and access to the Internet will open.
It is also possible to expand the display functions. In this mode, windows that open in the VM will be displayed on the real desktop, and not in a separate program window. This makes it possible to facilitate access to all controls and installed VM programs.
Just like in a real laptop, Windows installed in a VM requires a certain order to be completed. You can complete the job by pressing the button to stop the job. A menu will open offering three options for closing the VM.

« Save machine state"- before shutting down, the machine will save all running applications at the time of shutdown. When the VM is turned on again, work in it can continue from the moment it was turned off.
« Send a shutdown signal"- all applications can be closed, and the machine will turn off automatically.
« Turn off the car" - the same as if a real computer were de-energized.
From this short overview it is clear that working with virtual machines, such as, makes it possible to connect several different operating systems on one device at once. Naturally, the more powerful the real device (RAM and CPU), the faster the virtual computers will work. Disabling the antivirus on your home machine or adding a virtual directory to the antivirus program’s exclusion list will also help speed up the work.
To have several operating systems with separate workspace and applications at hand, you don’t need to buy a second (third, fourth, etc.) computer. Because it all fits into your single PC. How? Thanks to virtual machines (VMs) - special programs that create (emulate) imaginary (virtual) computers inside the main operating system.
A virtual PC is almost like a real one. It has its own processor, memory, hard drive, network adapter and everything else. Of course, these are not physical devices, but they are made in such a way that operating systems consider them to be exactly that - real.
Several virtual computers can work simultaneously on one physical computer. Exactly how much depends on the hardware resources: the faster the processor, the larger the RAM, the more spacious the storage, the more. A typical average-performance home PC running Windows 10 can handle three to five lightweight operating systems simultaneously (for example, Windows XP, Android and Lubuntu + the main system). Or two or three relatively heavy ones (for example, the main Windows 10 + virtual Windows 7 and Mac OS X). As you already understand, virtual computer emulator applications allow you to install and run a variety of operating systems on them.
General purpose virtual machines (as opposed to specialized ones, such as the Java VM) use:
And of course, virtual machines are widely used to distribute server work resources.
Today we will not touch on the industrial use of VMs, but will only consider what can be useful to home users of Windows OS.
Let's look at the process of creating a new virtual machine and starting to install Windows 10 on it.


Clicking on the virtual machine window will capture the mouse cursor (i.e. it will only move within the virtual screen). To return the cursor to the main OS, press the Ctrl+Alt combination.
To access the full range of features of the guest OS, you need to install special add-ons. Go to the "Devices" menu, click "Mount Guest Additions Disk Image" and follow the further instructions.

To connect a folder to the guest system for exchanging files with the main one, click the “Shared Folders” item in the “Devices” menu. Click on the “folder+” icon in the window that opens and use the “path to folder” field to specify it in Explorer (it shows the directories of the main system).
If you want the setting to work permanently, check “Auto-connect” and “Create permanent folder”. The shared folder will be accessible from the virtual machine explorer as a network folder.


To change the order in which boot devices are polled (for example, to boot a virtual machine from a DVD), shut down the guest OS, open its settings (in the main Virtualbox window) and go to the first tab of the “System” section. In the "Load Order" list, select the desired media and press the arrow buttons to move it to the top.

To take a snapshot of a running guest OS, open the top menu of its Action window and click Checkpoint. Or press the combination Ctrl+N.
Access to the settings of an individual virtual machine is opened from its context menu in the list of the main manager window and hidden behind the “Settings” button.
Other features of the program are also very simple and can be mastered without much difficulty.


