Wired communication using an intercom (intercom) between the rooms of an apartment or house is far from a luxury, but a rather useful invention of our time. To provide such a connection, it is not at all necessary to purchase a home telephone exchange or DECT radiotelephones.
If a simple intercom is required, then it will not be difficult to make a low-frequency amplifier and lay a pair of thin wires between rooms. In addition, apartment owners who have disconnected from the broadcast line of wire broadcasting can use the "noodles" already laid in the walls of their houses.
So, it remains only to make an electronic device that will ensure the transmission of sound signals over wires. It is very convenient to use the LM386 microcircuit, a universal low-frequency amplifier, as the basic element of such a device.
This inexpensive microcircuit is widespread and allows, with a minimum of external "strapping" elements, to manufacture a low-frequency amplifier with the required parameters.
The proposed intercom allows you to organize the transmission of a voice message (for example, “Eat is served”) or provide a conversation in the so-called simplex mode, when one of the subscribers speaks and the second listens, and vice versa.
A schematic diagram of one of the two subscriber stations is shown in the first figure. In the position of the button switch SB1 shown in the diagram, the device is de-energized.
When the SB1 button is pressed and held, a supply voltage of 9 V is applied to the circuit. And the signal from the BM1 electret microphone, amplified by the DA1 chip, is fed through a pair of wires to the second subscriber station (Fig. 2), the circuit of which is similar to that shown in Fig. 1. Through normally closed contact of the switch SB1 of the second station, the signal goes to the loudspeaker BA1.
Having completed the transmission of a message or finished a phrase in a conversation, the subscriber of the 1st station releases the SB1 button. If after that the same button is pressed and held by the subscriber of the 2nd station, then the signal from him will be heard by the 1st subscriber.
 To power each subscriber station, it is convenient to use small-sized transformer power supplies that are inserted into an AC outlet or a Krona battery. Current consumption from the power supply occurs only when the SB1 button is pressed, and the quiescent current of the DA1 chip is no more than 10 mA. At an average volume of sound emitted by a loudspeaker having a winding resistance of 8 - 16 ohms, the current. consumed by the amplifier from a source of 9 V. does not exceed 50 - 70 mA.
The optimal volume of the sound signal is set when setting up the intercom. To do this, select the resistance of the resistor R2. With R2=1.2 kΩ, the voltage gain of the low frequency amplifier is about 50.
By decreasing the resistance of this resistor, you can increase the gain (the maximum value of 200 is obtained when R2=0), and by increasing its resistance, you can reduce the gain down to the minimum (20 in the absence of the R2-C3 chain)
Based on the article "Jednoduchy intercom - domaci telefon", published in the magazine Prakticka elektronika".
This electrical circuit was assembled and tested in laboratory conditions with a communication channel connected to an external exchange. The switched virtual number for connecting the scheme was kindly provided by the Mango Office company.
Intercom from old phones
Now, with the dominance of mobile and radio telephones, ordinary wired devices remain "out of work" and are often simply thrown away. with a little modification, it can be successfully used for simple intercoms. One of these intercoms (for two subscribers), accessible even to a novice radio amateur, is discussed in this article.
functional scheme wired telephone is shown in Fig.1.

With the handset down, the telephone line is connected to the ringing device (VU) through the switch SA1 and the isolation capacitor C1. which passes only the variable component of the ringing signal. When the tube is removed. SA1 moves to the top position (as shown in Fig. 1), connecting the line with the spoken node (RU). The dialer (HH) is connected to the line through switch SA2. At the time of dialing, this switch disables the speaking node. Since a dialer is not needed for two subscribers, it is advisable to exclude it.
When designing two-wire intercoms, power is most often carried out as shown in Fig. 2 (the source is connected in series with telephones, and capacitor C2 shunts it for a conversational signal). In the case of a stabilized power supply, the role of C2 is performed by the output capacitor of the filter. With this scheme, the constant voltage in the line does not change. But the caller must have a ring tone generator that turns off when the second party goes off-hook. The second inconvenience: if the power supply is on the called side and is not turned on, then communication is not possible.

In telephone networks (city exchanges), the line is powered in parallel (simplistically shown in Fig. 3). Line voltage Ul is defined as Up=UistUr. It is equal to approximately 12 V when the handset is removed, which ensures the normal operation of the electronics (in electronic devices).

The advantage of such a power system is that that it can be connected in parallel from any side (shown by the dotted line in Fig. 3). In these telephone networks, the ringing signal is generated at the exchange and sent to the line. In this case, the constant voltage in the line remains at the level Uist. When the called party picks up the handset (a conversational node is connected to the line), the voltage in the Ul line decreases (below 20 V), which serves as the PBX command to turn off the ringing signal. As you can see, the parallel circuit, eliminating the power supply problem, leaves the issue with the call generator unresolved.
In the proposed device, the call signal is generated on the called side. To do this, a generator is provided in the call device on the receiving side, which responds to a decrease in the supply voltage. This solution not only greatly simplifies the circuitry, but also allows you to turn off the call generator for sure. Replacing the device in the device (Fig. 1) with a call generator, we get that when the tube is lifted, SA1 will turn off the generator, and its signal will not get into the line. The control signal for triggering the call generator is to reduce the voltage in the line to 20 ... 15 V, which is provided by simply lifting the handset on the calling side. Alteration of the phone is reduced to the replacement of the ringing device, leaving the conversation node unchanged, regardless of the type of telephone.
The diagram of the intercom is shown in Fig.4. It works in the following way. MocrVDI simplifies the connection of the phone to the line: no polarity has to be observed. The line voltage is fed through the divider R3-R4 to the input of the DD1 chip. The divider is selected from the condition that when the voltage in the line and IC1, the level at the input DD1.1 corresponds to the logical "G. and when the voltage drops to 20 V -" 0 ". In this case, the divider must have the maximum possible resistance so as not to shunt the line. Logic" 0" at the input of the element DD1.1 leads to the appearance of "1" at its output and at the output of DD1.3 (DD1.2 and DD1.3 invert the signal twice), and at the output of DD1.4 - "0". Low level with output DD1.4 closes the transistor VT3, and high, from the output DD1.3, opens the transistor VT1 and, accordingly, VT2.

Through the public key on VT2, the voltage is supplied to the ringing signal generator on the DD2 chip. The generator is two-tone. On the first two elements (DD2.1 and DD2.2) a low-frequency generator is assembled, on the second two (DD2.3 and DD2.4) - high. The load of the generator is a key on the transistor VT4, at the output of which the piezo emitter HA1 is turned on. The power supply of the IC with a private key VT2 is provided by the R7-VD2-C1 chain. and when open (since the current consumption increases due to the operation of the generator DD2) - VD3-R9-VD2-C1.
The described refinement refers to the simplest phones without electronics. When altering such devices, instead of a separating capacitor and a bell, the proposed device is switched on. The piezo emitter, like the new board, is located in any convenient place in the phone case. For devices with electronic calling devices (for example, on the KR1008VZh4 chip), it is enough to make only a part of the proposed circuit (circled in Fig. 4 by a dotted line). The generator itself and the sound emitter are used by those that are already in the converted apparatus.
Although the PBX system is taken as the basis for the intercom, it makes no sense to set the voltage at 60 V. For such a device, 30 V is quite enough. For phones with "electronic filling", it is important to ensure that the line loaded on one phone gives a voltage within 14. ..18 V, and two - 10 ... 14 V. This ensures normal (without distortion) operation of the conversational node. If you want to reduce power consumption, you can connect a second power supply (as shown in Figure 3). In this case, the caller turns on his power source, but there is one inconvenience: when connecting the line, polarity must be observed so that if both sources are accidentally turned on at the same time, they will not be connected back to back. To do this, LEDs can be turned on on both sides of the line. If you use modern super-bright ones, then they have enough current of 2 ... 3 mA, which will not affect the operation of the circuit.
The device is assembled on a printed circuit board made of one-sided foil fiberglass with a thickness of 1.5 ... 2 mm and dimensions of 100x40 mm. The drawing of the board is shown in Fig.5.

The power supply circuit is shown in Fig.6. It must provide the required voltage (in my version - 30 V) and current consumption of at least 100 mA. The second requirement is the minimum ripple at the output, since the background of 100 Hz is very well heard in telephone sets. Instead of a ballast resistor, a miniature light bulb (26 V, 0.12 A) is used. This is convenient because when both devices are turned off, the light does not light up at all, when one (during a call) is dim, when talking it is bright.

Details. The transformer is typical, TA-1 or TA-2, but any one that provides a voltage on the secondary winding of 35.. .40 V and a current of at least 100 mA will do. Fixed resistors in the device - MLT-0.25, variables - SPZ-22. Electrolytic capacitors - type K50-35 or their foreign analogues, constant - KM, KD or their analogues. KT3102B transistors can be replaced by any other low-power p-p-p structures with a permissible collector-emitter voltage of at least 45 V, KT940A is replaced by KT801, KT603, etc.
Diode bridge - any. You can also assemble a bridge from individual diodes KD521 or KD522. Zener diode VD2 is selected with a low stabilization current - KS191E. Piezo emitter ЗП22 can be replaced by ЗП1 or ЗП5. Instead of DD1 K561LA7, you can take K561LA5 (without any modifications) or K561LN2, but R3 should be excluded and the change in pinout should be taken into account. DD2 can be replaced by K561LA5. You can also use their analogues of the 176 series. If the device is supposed to be used around the clock, the KR142EN12 stabilizer IC should be installed on a small radiator
Structurally, the device is made as a separate module and is located in the telephone in any convenient place. In older phones (with an electromagnetic bell), the sound emitter can be placed under the handset holder or on the back wall, and the board can be placed at the place of the call. In phones with electronics, the emitter is already installed, the board itself is small (there is no generator), so it easily fits even in handsets. The power supply is made in the form of a separate unit, it can be placed either at one of the devices or anywhere along the telephone line.
Before adjustment device, the regulator R4 of the power supply sets the output voltage (UMCT). The load is connected. The resistance R3 is selected (Fig. 4) so as to provide "1 * at pin 11 DD1 when the tube is off (the line voltage is below 20 V) and "0" - when it is put (in the line - UMCI). Capacitance C3 is selected to provide the desired timbre and loudness.The length of the line, experimentally tested by me, exceeded 300 m.
Literature
See other articles section.
It turned out that after the apartment was exchanged, two simple rotary telephones became superfluous. There was no telephone point in the new apartment, and no one regretted it - everyone had cell phones. The devices lay in the pantry for several years, until it was necessary to organize an intercom between the garage and the country house (both objects on the same site).
So. a diagram of a typical telephone set is shown in Figure 1. B1 and M1 are the components of the handset - a carbon microphone and an electromagnetic capsule. F1 - call. S1. S2 is the dialer until it is touched S1 is closed and S2 is open. And when the number is dialed
S2 closes, and S1 opens the circuit as many times as the units of the dialed digit, for example, spinning "9" - opened the line nine times. S3 is a lever switch. When the handset hangs, it is in the same position as in the diagram, that is, it connects a call to the line. And when we pick up the phone instead of ringing, he connects the phone.
 The problem is how to connect these two circuits together. Having searched the Internet, I found several options, but all of them with additional call buttons. Or complex circuits on digital microcircuits. - individual mini-automatic telephone exchanges.
In a simplified form, a telephone line is a direct current source with a voltage of about 60 V and an internal resistance of about 1000 ohms. When there is a call signal, it turns into an alternating voltage source of about 100V with the same internal resistance. That is, in principle, in order to “talk” you need to connect telephone sets as in Figure 2.
But now it becomes a question after a challenge. In principle, it is solved even in such a scheme, especially with some simple models of telephones equipped with electronic calls. Remember what happens if you pick up the handset of one of the parallel phones - the call of the second device will ring or squeak. And if you start dialing a number, then this tinkling or beeping will continue all the time while the number is being dialed. So, here's your call signal. - pick up the phone and dial "O". The second machine will ring ten times.
 There is also a drawback, firstly, not all telephone sets behave in this way - it depends on the design of a particular ringing device. Secondly. even if there is sound, it is not
It turns out that for a full-fledged call, you need an AC voltage source. The easiest way to apply AC voltage on a separate wire. This does not create a big problem, because now it is easy to buy a three-wire cable - it is used for electrical wiring with grounding and is sold in any electrical store. In addition, it has multi-colored wires, which prevents confusion when connecting.
It turns out the circuit shown in Figure 3. The power source is a ready-made transformer T1 with an output voltage of 42V. The voltage through the rectifier on the diode VD2 is supplied to the capacitor C1. Where a constant voltage of about 60V is formed. It is fed through the diode VD1 and the resistor R1 to the telephone sets TA1 and TA2.
The alternating voltage is removed before the rectifier and is supplied to the telephone sets through the push buttons S1 and S2. If we press S1, an alternating voltage is supplied to TA2, which is in the hung-up state, and therefore rings. If we press S2, the alternating voltage is now supplied to TA2, which is in the hung-up state and is ringing.
Thus, in order to call subscriber TA2, subscriber TA1 presses the button S1, releases it and listens to the answer. To call subscriber TA1, subscriber TA2 does the same, but presses the button S2. Buttons S1 and S2 can be installed in telephone cases - there is usually a lot of free space there. Transformer T1 is ready, you can use any transformer with secondary voltage from 36 to 50V. The transformer can be even the most low-power. - the load current in this circuit is not more than 50 mA.
simple communication schemes
The simplest telephone was invented by Bell back in 1876 and consisted of two headphones connected by a pair of wires.

Since the circuit does not contain any amplifiers and power supplies, its range does not exceed 100 - 200 meters. To test the operation of the circuit, high-resistance headphones of the "Tone" or "Octave" type with a voice coil resistance of 1000 Ohms should be used.
Similarly, you can build the simplest intercom from two tubes from an industrial telephone set of an old design (with a rotary dialer):

This intercom uses low-impedance (with a voice coil resistance of about 65 ohms) telephones in conjunction with carbon microphones and a battery. By using a power supply, you can significantly increase the communication range. This principle is still widely used in telephony. The communication range depends on the battery supply voltage and the cross section (thickness) of the communication line wires. The typical supply voltage in the automatic telephone exchange ranges from 30 to 60 volts, which makes it possible to use this type of communication over distances of up to 100 kilometers without the use of additional amplifiers.
A further improvement of the intercom is the introduction of a call device. This scheme was developed for standard telephone sets of analog PBXs (previously, these were widely used in everyday life and in industry). Phones with defective (or missing) rotary dialers will work.

Batteries with a voltage of 3 to 12 volts are used to power phones and a ringing device (not critical - the voltage depends to a greater extent on the distance between subscribers). The conversational chain is similar to the one we discussed earlier. To call, the simplest generator of AF oscillations (multivibrator) on transistors T1 and T2 is used. As switches, the contacts of a standard switch installed in the phone case are used. In the initial position - the tubes are placed on the lever - the switches are in the position indicated in the diagram, the generators are de-energized. When you pick up any of the handsets, the multivibrator of the opposite phone starts to receive voltage and a sound is heard in the phone of the device. When picking up the handset by another subscriber, the batteries are connected in series with the handsets. You can start a conversation ... At the end of the conversation, the handsets are placed on the levers - the power circuits are de-energized ... In this scheme, it is convenient to use "flat" batteries for pocket lamps of the 3336 type for power. The batteries are strengthened together with the multivibrator scarves in the apparatus cases. As practice has shown, the batteries last for a long time (practically, the battery life is equal to its storage life). If, due to the large distance between the devices, the volume of the call signal turns out to be insufficient, you can install call buttons parallel to the handsets (without fixing!), Or increase the battery voltage (for example, use the 9-volt "Krona"). Pay attention to the polarity of connecting the devices to each other (crossed)! Incorrect connection can lead to damage to multivibrators and batteries! This scheme was described in the magazine "Radio" for 1997, number 4, p. 38.
Below we consider several devices with electronic amplifiers.
The first scheme is a wired intercom. When using two such devices, it is possible to establish a connection between two subscribers at a distance of more than 250 meters (when using a sufficiently thick wire as a line). In order to combine two such devices with each other, you need to connect the terminals of the same name to each other (terminal "1" with terminal "1" and "2" with "2"). You can use, for example, a heating battery instead of one of the wires - and then only one wire will need to be connected for communication. Grounding is connected for both devices to the terminal "2", and to the terminals "1" of the devices we connect the communication wire. The amplifier of the device is assembled on three transistors. The first two stages are made according to the scheme with a common emitter and provide the main voltage gain. The cascade on the transistor VT3 is connected according to the common collector circuit and ensures the matching of the amplifier with the line.
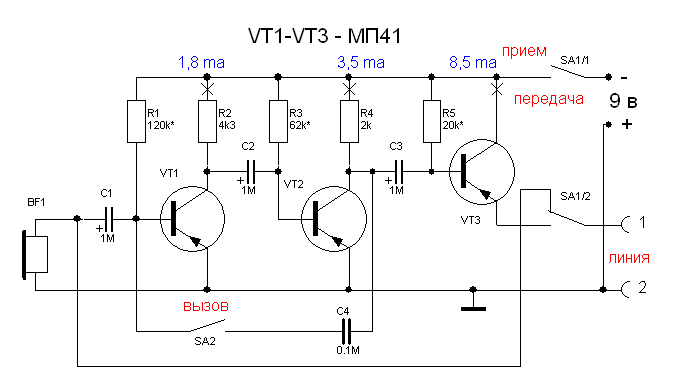
The amplifier circuit is quite simple, so we will not dwell on it for a long time. Let's define the control buttons. To switch the amplifier from the "reception" mode to the "transmission" mode, use the double button SA1. Using part of the SA1 / 1 button, we supply power to the amplifier, and using the SA1 / 2 button, we switch the line. In the diagram, the SA1 button is shown in the "receive" position. In this position, a BF1 telephone capsule is connected to the line. If the SA1 button is pressed, the amplifier will go into the "transmission" mode. At the same time, the phone is disconnected from the line, the power supply voltage (9 V) is applied to the amplifier, and the line is connected to the amplifier output. In order to be able to quickly call another subscriber, a "call" button has been introduced into the amplifier. If you press the "call" button in the transmission mode, the amplifier on transistors VT1, VT2 switches to the generation mode and a loud call signal will be heard in the telephone capsule of subscriber 2.
To obtain maximum volume, the telephone capsule must be low-resistance (no more than 100 ohms) - it can be used from an industrial telephone. Such capsules called TK-47 are sold in stores selling telephones.
Instead of MP41 transistors in the amplifier, you can use transistors of MP39-MP42 types; MP25, MP26. It is also possible to use silicon transistors (for example, types KT208, KT361), but in this case, you will have to change the values of the bias resistors in the base circuits of the transistors (in the direction of decreasing). Separating electrolytic capacitors can have a capacity of 0.5 to 10 microfarads. Capacitor C4 - type KM for a capacity of at least 0.068 microfarads.
To power the amplifiers, you can use batteries of the KRONA type, or imported batteries of the 6F22 type. As buttons, you can use single switches of the P2K type, or PKN without fixing.
The design is assembled in a small box of suitable sizes.
Setting up the amplifier (they need to be made in total 2 pieces) comes down to setting the collector currents of the transistors using resistors in the base circuits. At the time of setting the collector current of the transistor VT3, you need to turn on the telephone capsule in the line jacks!
Using modern microcircuits, you can assemble a very simple wired intercom:

The amplifier of this device is assembled on a voltage stabilizer chip KR142EN12.
The LF amplifier circuit on this microcircuit was described in detail in the article by I. Nechaev (Radio magazine 12-2000).
Subscriber devices are unequal: in one of them contains an amplifier with power, in the other - only a speaker with a switch. The device uses push buttons. Resistor R1 - volume control. The connecting cable consists of two wires, one shielded and one unshielded. The shielded wire is connected to the input of the amplifier. The speakers are connected to the output of the amplifier through the same resistance, while choosing the resistance of the resistor R5, the resistance of the line wires should be taken into account.
Setting up the amplifier comes down to setting the voltage at pin 5 of the microcircuit, equal to 2.5 volts using resistor R5 (the volume control slider during this procedure must be in the lower position according to the diagram!).
The intercom was described in the journal "Radioconstructor" 04-2007, page 29. Author - Erokhin Yu.V.
To communicate with a friend without using wires, you can use a radio transmitter, the diagram of which is shown below.

The transmitter is designed to operate in the short wave range (HF). As a receiver, you can use your existing broadcasting receiver that covers the ranges of 25-41 meters. The modulation in the transmitter is mixed AM and FM.
The transmitter consists of an audio frequency amplifier assembled on a VT1 transistor and a radio frequency oscillation generator on a VT2 transistor. You can connect a microphone to the transmitter input, or some source of sound frequencies, for example, a tape recorder. In the second case, music can be listened to at some distance from the tape recorder.
The audio frequency amplifier is assembled according to a typical scheme. The capacitance of the capacitor C6 can be 5-10 microfarads. If the amplifier is assembled correctly, it does not require tuning.
Let's take a closer look at the radio frequency generator circuit. If you look closely at the circuit, you can catch the similarity of the generator with a conventional amplifier with an oscillatory circuit included in the collector circuit of the transistor. The operating frequency of the generator depends on the parameters of this circuit. For the occurrence of generation between the collector and emitter of the transistor, a tuning capacitor C5 is included. By changing the capacitance of this capacitor, stable oscillations of the generator are achieved at maximum output power.
The oscillatory circuit coil is wound on a frame from the IF circuit of an old tube TV. The coil has a diameter of 7.5 mm and a tuning core made of carbonyl iron. Coil L1 contains 25 turns, PEV-0.25 wires wound turn to turn in one layer. Coil L2 contains 10 turns, PEV-0.15 wires and is wound over coil L1. The tuning of such a coil to the frequency of the transmitter can be done using a tuning capacitor C4, as well as using a magnetic core. The core can be used to smoothly tune the transmitter frequency to an area where powerful radio stations do not work. If another radio station is on the operating frequency of the transmitter, the range of the transmitter will not exceed a few meters.
Power can be indirectly measured using a field indicator, consisting of a coil and a detector diode.

The field indicator coil contains 2 turns of PEV-0.6 wires wound on a mandrel with a diameter of about 10 mm. After winding, the coil is removed from the mandrel. We get the so-called VOLUME coil. If such a coil is placed near the circuit of a high-frequency generator, then a certain voltage will appear in it, which, after detection, can be measured millivoltmeter direct current. The best results are obtained by using instead of a millivoltmeter a sensitive (with a total deflection current of the arrow of 50 - 100 microamperes) pointer microammeter. You should not use cheap multimeters made in China for this purpose! But if such a need arose, the multimeter switch should be set to maximum (usually no more than 200 millivolts) sensitivity!
We tune the generator until the maximum readings of the voltmeter are obtained using the capacitor C5 of the transmitter. Next, turning on the radio receiver, we tune it in range and find the frequency (wavelength) at which the transmitter operates (the transmitter signal is heard in the receiver in the form of hiss). In order to make sure that the receiver settings are correct, turn off the transmitter. With the transmitter turned off (with the receiver set up correctly), the receiver hiss should disappear.
A well-tuned transmitter with an antenna about 2 meters long can be heard at a distance of up to 200 meters (the range of the transmitter depends on the sensitivity of the receiver).
This radio transmitter can be reconfigured to operate in the VHF band. To do this, you only need to change the winding data of the inductor. To operate in the range of 66-70 MHz, the coil must contain 5 turns, PEV-0.6 wires. The frame for winding the coil is the same as in the HF range.
When reconfiguring the transmitter to the VHF range, it should be borne in mind that the communication range is reduced. In proportion to the increase in frequency, frequency stability deteriorates (the transmitter will spontaneously re-range).
To increase power, you can replace the generator transistor with a more powerful high-frequency one (for example, KT909) with a heat sink. With such a replacement, it will be necessary to reduce (experimentally) the resistance of the resistor in the base circuit to increase the collector current. The setting of this version of the transmitter can be made according to the maximum glow of an incandescent lamp (2.5 volts 150 milliamps) connected in parallel with the L2 coil. Such a transistor in the VHF range is capable of providing a transmitter range of up to 1-2 kilometers. In this case, the current consumed by the circuit can reach 300 milliamps and it will have to be powered only from the mains power source. When the circuit is powered from a mains source and a high level (more than 30 millivolts) of ripples, a background with a frequency of 100 hertz may appear in the receiver. To eliminate the background, it is necessary to use high-quality voltage stabilizers and increase the capacitances of the filter capacitors in the stabilizer.
It must be taken into account that a powerful transmitter assembled according to this scheme can become a source of interference in a fairly wide frequency range (due to its imperfection), since it has a large number of spurious frequency emissions ("harmonics")!
Schematic diagram of PU is shown in Fig.2. The amplifier is assembled on an operational amplifier (op-amp). This is a medium precision op amp with built-in correction and output short circuit protection in the load.
Consider the operation of the amplifier. The signal from the BM1 carbon microphone with an amplitude of 30 ... 60 mV is amplified by the op-amp to a voltage of 1 V. The gain of the op-amp is set by resistors R5 and R4 and is selected equal to 20 ... 30 (Ku = R5 / R4 = 240k / 9.1k = 26, 3).
These values of the gain of this op-amp and the amplitude of the input signal from the microphone were obtained from experimental data and are optimal. The greatest communication range is provided by the maximum amplitude of the signal in the line, at which there are no distortions. When a signal with an amplitude of 150 mV was applied to the input of the amplifier, a signal with an amplitude of 3.5 V was obtained at the output of the PU. With a further increase in the input signal, noticeable distortions began. Increasing the gain of the op-amp by more than 30 is not advisable, because the probability of self-excitation of the amplifier increases.
The input signal level is set by resistor R1, which determines the current passing through the carbon microphone. A decrease in resistance causes an increase in current through the carbon microphone, which means an increase in the input voltage taken from the microphone and applied to the op-amp.
If an electret microphone MKE-3 or an electrodynamic DEMS is used, then the resistor R1 can be excluded and the switching circuit for the microphone used can be used.
A voltage divider of resistors R2 and R3 allows for unipolar power supply. These resistors should be of the same value, if possible, otherwise distortion of the signal at the output of the op-amp is not excluded. Their choice will be correct if the voltage measured at pin 6 of the op-amp turns out to be equal to half the supply voltage.
Resistor R6 - balanced, necessary to ensure duplex communication. It performs the function of a resistor Ra or Rv (Fig. 1).
Resistor R7 allows you to adjust to different line resistance and the resistance of the telephone capsule, which means that you can achieve the elimination of the local effect when the signal from your microphone drowns out the signal coming into your phone from the interlocutor. If there are several lines and subscribers, it makes sense to make the R7 resistor variable and bring it under operational adjustment to the case.
To call another subscriber, just press the S1 "Call" button. In this case, the feedback formed by the capacitor C2 turns the op-amp into an RC oscillator. The amplitude of the signal in the line during a call is from 3.5 to 4.5 V, the repetition rate of rectangular pulses is 1 kHz. The power released in the interlocutor's telephone capsule is at least 150 mW. This is enough to hear the call.
Rice. 2
A little about the design and details of PU. The printed circuit board (Fig. 3) for the amplifier is made of one-sided foil-coated fiberglass with a thickness of 1.5 mm.
SP3-1b is used as a tuning resistor R7 in the amplifier, it can be replaced with SP-4 or a variable resistor, for example, SP3-41. All other resistors are MLT-0.125 W. Oxide capacitor C1 - K56-12 (or K50-35); . C3 - K50-35; capacitor C2 - MBM. Instead of a microcircuit, it is suitable, made in a rectangular plastic case. Switch S1 - PKN2-1V, switch S2 - P2K. Telephone capsule - with a resistance of 50 ... 60 Ohm, microphone - carbon, electrodynamic (DEMSh), electret (MKE-3). Power source - battery "Krona", "Korund", "Nika".
Now about the setting. The first thing to do is to check the correct soldering of the pins of the DA1 microcircuit (if you look at from the side of the legs, then opposite the key-metal protrusion, there will be the first leg of the microcircuit and then clockwise - the second, third, etc.). If you are not satisfied with the quality of communication, you will have to deal with the PU more thoroughly. You will need an audio frequency generator, an oscilloscope and an avometer. Then we can recommend the following algorithm of actions. Check if there is a voltage on pin 6 of the microcircuit equal to half the supply voltage. If necessary, set the specified mode by more accurate selection of resistors R2 and R3.
Having connected the oscilloscope first to the microphone, and then to the output of the control panel, measure the signal amplitude in each case, speaking in front of the microphone. If the microphone signal is significantly less than 50 mV, change the microphone. If there are no other microphones at hand, and the signal from this one no longer develops with any selections of R1, try increasing the gain of the op-amp by increasing the resistance of resistor R5 or decreasing R4.
When observing a signal from a microphone on an oscilloscope, many harmonics of different frequencies and amplitudes are visible, it is difficult to determine and measure the true amplitude of the signal. Therefore, it is better to temporarily turn off the microphone, and instead apply a sinusoidal signal with a frequency of 1000 Hz from the generator. Using an oscilloscope, measure the signal amplitude at the input (left terminal C1 according to the diagram) and output (pin 6 of the op-amp) of the amplifier, determine the gain and, if it turns out to be less than 20, select the resistors R4 and R5.


