In this article I will talk about what to do if your washing machine stops heating the water. Namely, what kind of breakdown in the control unit (brains) of a washing machine of this brand leads to such a malfunction. Washing machine AEG 60060 SL.
I'll start with some background. One day I decided to change the wash program during the wash cycle. I pressed pause, then turned off the machine, turned it to rinse and turned on the machine. After that, the machine reset the washing time to 2 minutes, then to 1 and then to 0. However, it did not drain the water and did not want to unlatch the door. If you press the pause and delay buttons at the same time, the machine will show the error number that is in memory. I got error E66. I tried unplugging the machine, waited a little and turned it on again, setting it to drain mode. The same picture, only this time the door snapped open. I unplugged the machine and went to the country. After 3 days, the machine turned on and even drained the water and began to wash, but at the same time it stopped heating the water.
Reasons for such a malfunction.
I decided to go point by point.
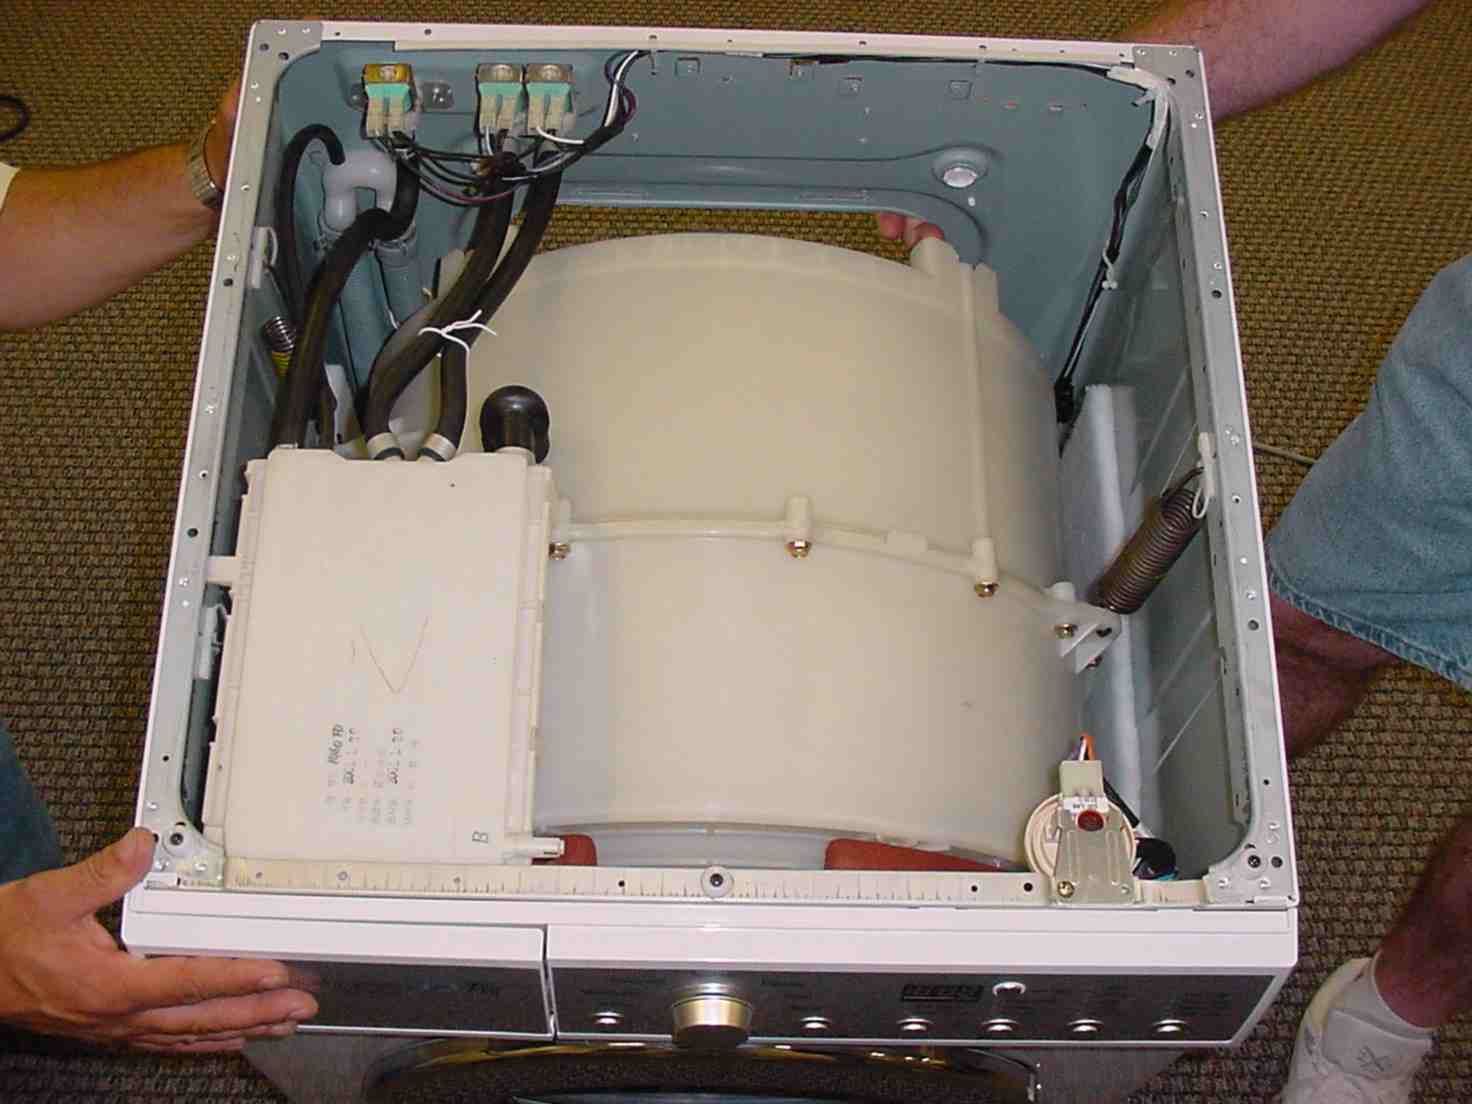
Remove the back cover of the machine. To do this you will need a set of sockets, preferably deep ones.
Everything there just don’t be scared :)
Be sure to disconnect the washing machine from the power supply, otherwise it will give you an electric shock! And also from water. Make sure that the water is drained from the machine.
We look at the very bottom and see the heating element. Almost all modern machines have it in this place.

Unscrew the central bolt. Disconnect the contacts. Be careful with the temperature sensor, there is a tab on top, you need to press it to pull out the contacts.
To remove the heating element from the drum, you will need to pry it with a screwdriver. Again, be careful not to break it. The plastic is also quite soft.
We take out the heating element. Be careful not to expose your eyes. Ten may have difficulty getting out. Firstly, there is a thick rubber band, and secondly, it is probably full of scale and debris. All this will interfere with pulling out the heating element.
So, I did it and I got it. 🙂

Along with the heating element, a bunch of dirt and scale came out (seen in the photo). The consistency of scale resembles hardened cement. I was lucky the heating element didn’t burn out.
I cleaned it with a cloth.

To clean the heating element from scale, you can use battery acid or just a solution of citric acid; it’s easier, safer and cheaper. Pour hot water into a vessel that will fit the heating element. Add a packet of citric acid. We put the heating element there and wait. It is better to place the container under the hood. The gas released during this process is not useful.

The temperature sensor can also be carefully pulled out and its metal part placed in acid.
Do not under any circumstances lower its cavity. It will fail.
We wait several hours and get an almost pure heating element.

Ten is a little rusty, but still capable of working. In addition, spare parts for cars of this brand are very expensive.
So, let's check the heating element.
Take a multimeter. Set the resistance measurement mode. We measure between the contacts of the heating element. It should be approximately 26-28 ohms. Details on how to ring the heating element can be found on the Internet. There are many good articles.
The contacts on the body and ground are also called (contact on the heating element). There should be no ringing. If the heating element rings to the body (ground), change the heating element.
You can try to choose a heating element with the same characteristics.

Next we check the sensor. In this case, the sensor changes resistance when the temperature changes. As the temperature increases, the resistance decreases. You can check it with a multimeter and hot water. Evidence of serviceability is a continuous and smooth change in resistance. If this is not the case, change the sensor.
What does the sensor look like?

If both elements are working, you are lucky on the one hand, but not on the other :) You are in need of repair of the control unit.
I won’t talk about the pressure switch, since the machine washes and does not overflow water. If you have a problem with overflow, just check the tube to the pressure switch; it is most likely clogged with dirt.
As I wrote above, I ended up having the control unit repaired.
Repair only makes sense if the controller is working. In my case it works fine because the machine washes. If it doesn't erase, buy a new unit.
To remove the control unit you need to remove the top cover. To do this you will need a Phillips screwdriver. Unscrew the 2 bolts and move the cover. It is done.
Unfortunately, I didn’t take a photo :) But you will see the block right away. White box on top. It looks something like this.

You can immediately order a new unit and not worry about repairs. But it costs about 8,000 rubles. I decided to try to repair it.
It is very difficult to find any useful material on this topic on the Internet. But I did it and I will share it with you.
Let's look at the fee.

In the upper left part of the board is the controller power supply. The machine would not wash if it were not working properly.
On the right side is the stabilizer.
In the lower left part is the controller block.
The manuals are right from a slightly different machine (with vertical loading), but the principle is the same.
The repair manual provides a good diagram of the control unit. True, there is no schematic diagram of the block.
So what could be the problem. The description for error E66 says that there is a mismatch in the data received by the controller. To resolve, replace faulty parts.
The heating element is connected to the connector located in the middle of the board (middle and slightly towards the top). What could be wrong? Resistors around the connector, large resistor above the connector or relay - 2 white cubes. Call them.
If they are working properly, then most likely your microcircuit is broken - the ULN2004A relay controller. Essentially, this microcircuit controls the activation of the relay and protects the controller from voltage surges.
She is here

You can ring it using the diagram

We take a multimeter, set the diode test mode and start ringing. We always place one contact on pin 9 (common). and take turns calling 10-16 contacts. If there is a breakdown, change the microcircuit.
It helped me. The washing machine washes and heats water.
There may be other reasons for the malfunction. To find them, carefully inspect the printed circuit board.
One retreat. AEG is the premium segment from Electrolux. Zanussi also has approximately the same filling. Therefore, this article may also be useful for repairing machines of these brands.
If something doesn't work out for you or you need help. Write comments.
Allemein Elektritats Gesellschaft (AEG) is one of the most famous German companies in the world. All over the world, AEG technology is associated with concepts such as German quality, durability and prestige. Since 1994, AEO has been part of the Swedish concern Electrolux.
The history of the company began at the end of the 19th century. from the production of household appliances using electricity. In 1896, the AEG catalog included eighty “electrical household and kitchen appliances for domestic use.” By that time, the design principles of a vacuum cleaner, washing machine and dishwasher had already been developed. However, their implementation required a compact converter of electrical energy into mechanical energy. Such a device - a three-phase electric motor - was developed by our compatriot Mikhail Dolivo-Dobrovolsky, who in 1884 went to work at AEG.
By the 50s. In the 20th century, AEG was a huge industrial concern that produced aircraft, elevators, power tools, electric motors, and had its own developments in the field of a variety of advanced technologies - from liquid crystal displays to military tracking systems.
Washing machines began to be produced in Nuremberg in 1951 and were called LAVALUX. In 1958, the first fully automatic washing machine was released, which subsequently became the best-selling washing machine in Europe and the name of which is borne by all models now produced by AEG-Lavamat. It was the first machine that not only washed, but also rinsed and spun clothes. AEG becomes the undisputed leader in the development and production of automatic washing machines. In 1976, a washing machine with record low energy consumption was released, and in 1983 the first washing machine with electronic control appeared, and in 1987 the FUZZY LOGIC control system was first used. In 1997...1998 New ART direct water injection technologies are being developed and applied, which have significantly improved washing performance while reducing water and electricity consumption.
All AEG equipment produced these days is divided into three classes: “basic” (devices that have all the basic functions and meet the highest quality standards), “comfort” (devices with additional functions and low energy consumption) and “extra” - devices with the highest functional characteristics. The “Update” marking in the latest AEG models means the possibility of further modernization (“upgrade”) of the product.
In total, since 1975, water and electricity consumption when washing in automatic washing machines has decreased from 140 liters to 39 liters and from 3.2 to 0.89 kW. The noise level during operation of the washing machine has been halved over the past 10 years and in the new 8-series models does not exceed 43 dB. In 1999, at the international exhibition DOMOTECHNIKA-99, new washing machines with an expanded loading hatch, a maximum spin speed of 1800 rpm and a number of special delicate washing programs were presented, for example, EASY IRON - a program for washing the “weekly norm” of men’s clothes. shirts, after use of which creases do not form.
AEG washing machines are equipped with a number of modern functional systems, which, thanks to a set of sensors and an electronic control system, allow you to solve the problems of washing, rinsing and spinning clothes as efficiently as possible.
The Aqua-Control system shown in fig. 1, protects the washing machine from water overflow and leaks associated with damage to the inlet hose.

Rice. 1. Aqua-Control water leak protection system
When leaks occur, the Aqua-Alarm alarm system gives an audible warning signal.
The Sensotronic system is used to control the level of foam in the washing machine drum. If excess foam is detected, the drum speed stops and additional water is added. The nominal spin mode is reached only after the permissible level of foam in the drum is reached (Fig. 2).

Rice. 2.
The electronic system UKS (Elektronisches Unwucht-Kontroll und Korrektur-System) serves to monitor the imbalance of laundry in the drum.
The “bio-phase” of the washing program (BIO-program) provides 20-minute washing of laundry at a temperature of 40°C (the most optimal for the effective impact of bio-components of detergents), and only after that the user-selected washing temperature is reached.
A.R.T. system (Advanced Rinse Tachnology) allows, if residues of undissolved washing powder are detected, to perform a series of additional rinses of the laundry to remove any remaining detergent.
The VARIOMATIC system (Fig. 3) avoids the formation of wrinkles when spinning delicate fabrics.

Rice. 3. VARIOMATIC spinning system for delicate fabrics
The duration of high-speed periods of drum rotation increases gradually; in the intervals between these periods, the laundry is redistributed in the drum by alternating its rotation at low speed in opposite directions.

Rice. 4.
The digital display of the washing machine (Fig. 4) has indicators of the drum rotation speed during spinning (1), the residual moisture of the laundry (2) and the user-entered delay time for the start of the program (3). This time can reach 19 hours, thanks to which the machine can be started, for example, when a low (night) electricity tariff is in effect.
The technical characteristics of some AEG washing machines are given in table. 1.
| Front loading | Top loading | ||||||||||||
|---|---|---|---|---|---|---|---|---|---|---|---|---|---|
| AEG-Lavamat 86800 |
AEG-Lavamat 74700 |
AEG-Lavamat 72600 |
AEG-Lavamat 60300 |
AEG-Lavamat 4940 |
AEG-Lavamat 47370 |
AEG-Lavamat 45000 |
|||||||
| Class | "Extra" | "Comfort" | "Comfort" | "Base" | "Extra" | "Comfort" | "Extra" | ||||||
| Fuzzy Logic control system | √ | √ | √ | √ | √ | ||||||||
| Number of basic programs | 20 | 20 | 20 | 9 | 9 | 9 | 9 | ||||||
| Delay of start time of washing, h | Up to 19 | Up to 19 | Up to 19 | Up to 19 | Up to 19 | ||||||||
| Electronic balance control (UKS system) | √ | √ | √ | √ | √ | ||||||||
| BIO washing program | √ | √ | √ | √ | √ | √ | |||||||
| Leak protection Aqua-Control | √ | √ | √ | √ | |||||||||
| Maximum drum rotation speed during spinning, rpm | 1600 | 1400 | 1200 | 1000 | 1200 | 1300 | 5 | 5 | 5 | 5 | 4,5 | 4,5 | 4,5 |
| Energy consumption, kWh | 0,94 | 1,0 | 1,0 | 1,05 | 1,0 | 0,96 | 1,03 | ||||||
| Energy class | A | IN | IN | IN | IN | IN | IN | ||||||
| Water consumption, l | 48 | 52 | 52 | 58 | 59 | 49 | 59 | ||||||
| Washing efficiency class | A | A | A | A | IN | A | IN | ||||||
| Maximum wash duration | 116 | 110 | 110 | 118 | 130 | ||||||||
| Spin efficiency class | IN | IN | IN | WITH | IN | IN | WITH | ||||||
| Residual humidity, % | 47 | 50 | 53 | 59 | 59 | ||||||||
| Dimensions (HxWxD), cm | 85x60x60 | 85x60x60 | 85x60x60 | 85x60x60 | 85x40x60 | 85x40x60 | 85x40x60 | ||||||
Let's look at the design of AEG washing machines using the example of a top-loading machine AEG-Lavamat 4940. This model has an electronic control system, a number of special washing programs (short, economical, intensive, BIO), and a UKS laundry imbalance control system. Its technical data are given in table. 2.
| Parameter | Meaning |
|---|---|
| Rated voltage, V | 230 |
| Rated current, A; | 10 |
| Current frequency, Hz | 50 |
| Power consumption, W | 2300 |
| Drum rotation speed, rpm: - during spin - when washing |
1200 55 |
4,5 |
| Drain pump Power, W |
30 |
| heating element Power, W Resistance, Ohm |
1950 27 |
| Water levels Level I,l |
5,6 |
| Level relay Level I, mm water. Art. |
170/75 |
| Circulation pump Productivity, l/min |
12 |
| Adjustable thermostat Range, °C |
0...87 |
| Solenoid valve Throughput, l/min Winding resistance, Ohm |
8 4300 |
| Electric motor Type |
Collector |
| Hatch locking device Response time when closing, sec |
Symbols on electrical diagrams of AEG washing machines:
1 - level I pressure switch;
2 - level II pressure switch;
3 - level III pressure switch;
AS- level “prevention of wrinkles”;
D- overflow level;
AE- heating element activation level;
APS- anti-interference filter;
EVF- solenoid valve for cold water inlet;
MOD- control board (electronic module);
ILO- electric motor;
MTI- stepper motor of the command device;
RS- recirculation pump;
PV- drain pump;
1/0 - power switch “ON/OFF”;
AA- “Anti-allergy” program button (additional rinsing);
R.C.-TEN;
SPT- hatch locking device;
THR- adjustable thermostat;
VDV- potentiometer.
IN- blue; L- violet; M- brown; G- grey; N- black; R- red; V- green
The structure of the AEG Lavamat 4940 washing machine is shown in Fig. 8 - 12, and lists of relevant structural elements are given in table. 3 - 7.

Rice. 8. Structural elements of the AEG Lavamat 4940 washing machine (body)
| Pos. | Code | Description |
|---|---|---|
| 1 | 129 25 41-01/6 5318 89 43-08/7 |
Left sidebar Right sidebar |
| 2 | 129 52 36-10/1 | Plank |
| 7 | 5065 38 66-00/9 | Roller support |
| 8 | 5065 38 65-00/1 | Video clip |
| 9 | 129 20 70-00/8 | Insert |
| 10 | 129 39 48-00/4 | Retainer |
| 11 | 5065 40 44-00/2 | Key |
| 12 | 606 04 17-02/6 | Adjustable leg |
| 13 | 124 62 10-00/7 | screw |
| 15 | 129 12 84-01/4 | Roller pin |
| 16 | 5065 24 38-00/8 | Video clip |
| 17 | 5318 51 48-00/3 | Front Panel |
| 18 | 129 27 50-57/5 | Back panel |
| 19 | 129 38 65-04/2 | Base |
| 20 | 129 19 48-37/8 | Base |
| 22 | 602 01 90-08/5 | Screw |
| 23 | 129 62 91-00/6 | Mounting bracket |

Rice. 9. Structural elements of the AEG Lavamat 4940 washing machine (top cover and control panel)
| Pos. | Code | Description |
|---|---|---|
| 1 | 129 22 82-03/3 | Control Panel |
| 2 | 129 60 46-09/5 | Control panel overlay |
| 8 | 129 31 31-09/8 | Washer |
| 15 | 129 27 48-03/3 | Top cover |
| 17 | 129 31 32-01/3 | Latch |
| 18 | 129 12 42-26/9 | Inner cover |
| 19 | 5065 15 42-00/8 | Hinge cover |
| 20 | 5318 89 44-80/4 | Cover gasket |
| 26 | 129 19 12-58/0 | Detergent dispenser housing |
| 27 | 129 27 38-01/8 | Insert |
| 40 | 129 17 08-01/2 | Button |
| 40A | 129 17 08-01/2 | Button |
| 42 | 129 17 09-20/0 | Lever |
| 43 | 129 20 60-01/7 | |
| 50 | 129 16 74-14/9 | Push-button switch mounting |
| 60 | 604 78 35-03/5 | Sleeve |
| 61 | 600 02 18-03/9 | Screw |
| 62 | 129 20 78-01/9 | Overlay |

Rice. 10. Structural elements of the AEG Lavamat 4940 washing machine (tank and drum)
| Pos. | Code | Description |
|---|---|---|
| 1 | 5318 00 08-97/0 | Bearing support assembly |
| 6 | 129 54 96-11/9 | Undertank casing |
| 7 | 129 01 33-00/6 | Screw |
| 8 | 129 15 45-00/0 | Washer |
| 13 | 5318 50 95-00/6 | Left motor mount |
| 14 | 5318 50 96-00/4 | Right motor mount |
| 18 | 5318 89 33-45/0 | Heating element support |
| 19 | 5318 89 43-16/0 | Tank |
| 20 | 129 28 65-01/9 129 28 65-11/8 |
Front suspension spring Rear suspension spring |
| 21 | 606 04 85-13/0 | Drum assembly |
| 22 | 5318 89 26-55/3 | Hatch flap |
| 23 | 635 02 44-99/9 | Plastic drum cover |
| 25 | 5318 02 45-00/2 | Screw |
| 32 | 129 32 51-02/9 | Frame |
| 33 | 5318 89 45-15/7 | Right flange |
| 34 | 5318 89 20-48/1 | Seal |
| 35 | 5318 89 19-37/6 | Screw |
| 36 | 129 46 08-01/1 | Right counterweight |
| 37 | 129 27 86-01/7 | Pulley |
| 38 | 124 02 10-10/2 | Belt |
| 39 | 5006 83 03-00/2 | Washer |
| 40 | 600 02 39-01/9 | Screw |
| 42 | 129 13 64-10/5 | Cross |
| 43 | 129 22 26-00/6 | Spring |
| 47 | 129 28 28-00/9 | Left counterweight |
| 48 | 5318 509 7-00/2 | Pad |
| 49 | 129 23 48-60/2 129 23 48-70/1 |
Right shock absorber Left shock absorber |
| 51 | 124 00 41-05/1 | Bolt |

Rice. eleven. Structural elements of the AEG Lavamat 4940 washing machine (hydraulic system)
| Pos. | Code | Description |
|---|---|---|
| 1 | 5006 86 14-00/2 | Union nut |
| 2 | 678 02 40-99/7 | Pad |
| 3 | 5318 89 19-40/0 | Inlet hose |
| 10 | 129 12 90-00/3 | Clamp |
| 11 | 129 28 13-13/4 | Hatch seal |
| 12 | 5318 48 59-00/6 | Spring |
| 13 | 129 54 63-01/0 | Recirculation pump assembly |
| 14 | 5318 61 89-00/6 | Filter |
| 15 | 129 57 86-00/6 | screw |
| 16 | 129 54 00-00/4 | Screw |
| 20 | 604 00 73-01/4 | Pipe branch |
| 21 | 602 01 90-01/0 | Screw |
| 22 | 129 19 94-00/0 | A tube |
| 23 | 129 20 82-02/9 | Hose |
| 24 | 129 27 82-01/6 | Pipe branch |
| 26 | 129 27 39-03/2 | Support panel |
| 27 | 129 27 35-00/6 | Lid |
| 28 | 129 27 34-00/9 | Lever arm |
| 29 | 129 12 60-01/4 | Traction |
| 30 | 129 27 36-01/2 | Overlay |
| 31 | 129 12 46-10/4 | Plank |
| 40 | 129 28 09-04/1 | Corner |
| 45 | 129 32 43-11/7 | Drain hose |
| 46 | 604 55 34-01/0 | Drain hose holder |
| 49 | 129 10 71-01/5 | Plank |
| 50 | 129 39 46-00/8 | A tube |
| 51 | 129 39 47-01/4 | Stub |
| 63 | 129 31 68-00/9 | Sleeve |
| 65 | 129 29 77-00/4 | A tube |

Rice. 12. Structural elements of the AEG Lavamat 4940 washing machine (electrical part)
| Pos. | Code | Description |
|---|---|---|
| 2 | 124 54 06-01/0 | Power switch |
| 2A | 124 54 08-01/6 | Push button switch |
| 2B | 129 20 74-01/8 | Block |
| 3 | 605 07 97-10/6 | Adjustable thermostat |
| 4 | 124 03 15-62/0 | Indicator lamp |
| 5 | 129 19 63-01/3 | Program switching mechanism |
| 6 | 129 13 39-51/1 | Level relay |
| 7 | 605 13 68-09/7 | Solenoid valve |
| 10 | 5318 48 58-00/8 | Thermostat |
| 11A | 124 01 52-03/1 | Thermostat seal |
| 11V | 5009 55 63-00/8 | Adjustable thermostat seal |
| 12 | 129 09 89-32/4 | Hatch locking device |
| 13 | 605 08 26-11/1 | heating element |
| 14 | 124 66 02-00/5 | Electric motor |
| 16 | 129 03 77-01/7 | Drain pump |
| 18 | 190 69 19-02/0 | A tube |
| 19 | 125 30 55-00/6 | Terminal box |
| 21 | 602 01 90-01/0 | Screw |
| 23 | 5318 61 91-00/2 | Control board |
| 25 | 129 20 54-50/7 | Anti-interference filter |
| 28 | 605 11 66-03/8 | Regulator |
| 29 | 129 27 12-03/9 | Washer |
| 30 | 129 24 79-00/1 | Insert |
| 31 | 129 33 70-00/1 | Plank |
| 32 | 129 13 11-10/6 | Filter cover |
The article was prepared based on materials from the magazine “Repair & Service”
Repairing equipment yourself without the appropriate knowledge and experience may be more expensive than calling a specialist. We recommend professional repair of AEG washing machines in Moscow.
All the best, write e to © 2006
Repair of AEG washing machines (AEG) is required extremely rarely due to the high quality of German assembly.
However, external factors have not been canceled: power surges, problems with plumbing, hard water, etc. Therefore, even such good washing machines as AEG can break down.
All these factors can cause a breakdown, as a result of which the heating element or control module can burn out.
If the machine starts to work abnormally, then you can try to figure out what’s wrong on your own. If your model has an electronic display, then an error code should appear on it: E11 (C1), E21 (C3, C4), E61 (C7), E71 (C8), E74, EC1, CF (T90).
Let's look at what these alphanumeric combinations mean below.
| Error code | Cause of occurrence |
| E11 (C1) | There is no water flowing into the tank, which may be caused by a broken fill valve. |
| E21 (and also C3 or C4 for some models) | Waste water lingers in the tank for a long time. This may be caused by a pump failure or, less commonly, an electronic module failure. |
| E61 (some models - C7) | The water does not warm up to the indicated t. For example, you set the wash to 50 degrees, but the water remains cold. Often this means a breakdown of the heating element. |
| E71 (C8) | Incorrect temperature sensor resistance readings. The problem could be either the temperature sensor or the heating element (but this is less common). |
| E74 | The temperature sensor is displaced, the wiring has come loose. |
| EC1 | Fill valve blocked. There are two options: either the problem is in the valve itself, or the control module has failed. |
| CF (T90) | Always indicates a failure of the electronic controller (module, board). |
Important! Error E61 (C7) can only be seen by turning on the self-diagnosis mode!
There are a lot of models of AEG washing machines, so the list of errors can be huge. We propose to consider the most common ones.
Due to the fact that some codes only appear in diagnostic mode, we will explain how to do it:
Leaving the test mode is simple: turn on, turn off and turn on the machine.
Having determined what the fault codes mean, you can begin repairs yourself or call a specialist. If you are a brave craftsman with experience, feel free to start repair work: it will not cause you any particular difficulties. Well, if you don’t have time to understand the intricacies of repairs, it’s better to invite a specialist.
This is relevant when errors E61 (C7), E71 (C8) are detected
Follow this action plan to remove the old heating element from the machine and replace it with a new one:

Carefully! When removing the temperature sensor, do not pull it sharply towards you. There is a tab at the top that needs to be pressed to quickly remove the sensor from the hole.


Relevant for errors E71 (C8) and E74
In modern washing machines, the temperature sensor is a thermistor mounted on the heating element. Therefore, when checking the heating element with a tester, at the same time spend time on the thermistor. Replacing it also does not require much effort and time - as written above, hold the sensor tab, carefully remove it and replace it with a new one.

If error E21 (C3, C4) occurs, indicating a breakdown of the pump (drain pump), you can remove it and replace it with a new one without the help of a specialist, doing everything yourself. Getting to the pump is a little more difficult than getting to the heating element, so it’s worth stocking up on tools and patience.
To get to the location of the drain pump, you need to remove the SM facade wall. Follow these instructions:


Repair or replacement will be needed if errors CF (T90), EC1 or E21 (C3, C4) appear.
Often the breakdown of an electronic module is accompanied by breakdowns of other systems and components, so the first difficulty that you may encounter during repairs is diagnosing the breakdown.
The second problem is that it is not always clear whether the control module should be replaced or whether it can be repaired.

That is why, if you need firmware or replacement of the board, it is better not to save money and contact a specialist who will check the board with special equipment and give his verdict - repair or replace.
Another common problem that owners of AEG brand SMs face is that their washing machine is leaking. Water and electricity are not the best friends, so the problem is acute and dangerous and needs to be resolved quickly.
The culprits in this situation are the hatch cuff or the inlet hose. The pipes leading to the drain pump could also have failed, or the oil seal may have worn out its life. You can replace damaged parts with your own hands - in AEG machines, replacing these elements is the same as in other brands.


