A metal detector is a very specific and unusual tool that not every person may need. Despite its uniqueness, a metal detector is the dream of many people. Most people try to purchase such equipment, but you can do it yourself. Detailed instructions for the "Terminator 3" metal detector and a diagram are offered by many specialized forums. Look for this information in this article.
This model of metal detector is considered by many to be one of the most popular. The developers of the device are users of one of the forums on the Internet.
It should be noted right away that assembling a metal detector with your own hands according to detailed instructions will be very difficult for those who have never been interested in this before and have not used such equipment. It will be really difficult to do such work, but you should not be afraid of this: it is enough to carefully prepare for the process and collect all the necessary details and elements.
The metal detector can search for coins and other objects at different depths:
All given parameters are calculated for sensors with 240 mm wire and chernozem soil. Separately, it is worth mentioning the discrimination of the Terminator 3 metal detector by many users, which is completely unfair: unlike its counterparts, which can only determine the depth of an object, this model determines the metal from which the object is made.
To assemble and configure the metal detector, you will need the following equipment:
When buying the entire listed set for a metal detector, you will have to pay a tidy sum. In order to save money, many users prefer to limit themselves to a virtual measuring complex based on a personal computer. You can find suitable software designed for such purposes on the Internet.
By its design, the Terminator 3 metal detector is a standard coin that has undergone some changes that allowed it to detect gold and ignore other non-ferrous metals. When using a scheme with a special "all metals" mode, the device can search for any scrap metal. The standard scheme allows you to search for coins with a metal detector, nothing more.
The non-standard application of logic as an op amp is the basis of a metal detector circuit. The disadvantage of this is the extra noise and unknown KU of all microcircuits. Of course, it is possible to use domestic logic to create a device, but this threatens with too large a spread of parameters. You can reduce damage and avoid additional problems by replacing the sound chip with a domestic analogue.
The price of the metal detector "Terminator" is in the middle range. When compared with similar devices of the same category, the "Terminator 3" bypasses them in terms of such parameters as the accuracy of object identification and search depth. Cheaper analogues are significantly inferior to "Terminator 3" in all respects.

On the metal detector diagram, certain nodes are marked, which are taken into account, since during further assembly you will have to focus on them. This may also be needed during the setup process of the metal detector.
The emission of current oscillations by the generator is carried out after connecting the transmitting coil to it. Similar fluctuations come out of the MC1 microcircuit in the form of a meander.
The current induced by the TX and creating the field is transmitted through the receiving coil. According to the generated field, the search coil is balanced with the TX: in other words, the RX field is subtracted from the TX field. For this purpose, a compensation coil CX is used. Depending on the sensors, its representation changes: in the case of the DD CX sensor, the coil is virtual, in the “RING” CX sensor it is real. It is connected in such a way that the direction of current flow in it is opposite to the receiving coil. Balancing RX and TX is achieved by unwinding from the compensation coil.
The oscilloscope controls the balance reduction, due to which the minimum amplitude is set in all positions of the knob. One end of the compensation coil is used to make a tuning loop, which is activated after the amplitude reaches a certain point, at which it begins to increase again. TX and RX must be pre-tuned in frequency, while TX must be 100 Hz higher than RX. You can tune all the coils to the desired frequency by connecting them to the generator of the Terminator 3 metal detector and the oscilloscope.
It is not necessary to tune the CX by frequency. When a metal object appears under the sensor, the balance is disturbed, which provokes the flow of current into the RX, which is then fed into the preamplifier and the sync detector, which captures the phases of the incoming signal and outputs them to the amplifying channels. In the latter, all the received parameters are amplified and fed to the MS8 comparator, which compares the received signal levels and activates the sound generator.
The principle of operation of almost all metal detectors is similar to each other, with the exception of some nuances. In most cases, they affect the detuning of the device from the ground. In the case of the "Terminator M" metal detector, the detuning is phase.

After soldering all the details of the circuit, the printed circuit boards of the metal detector are checked. This is done in order to check the quality of the soldering of the circuit and its performance.
The check is performed as follows:

When the battery is discharged, the metal detector beeps at regular intervals. This is accompanied by a continuous burning of the LED and a sharp decrease in the sensitivity of the sensors.
The frequency settings of the metal detector are carried out using the cable with which the device will be operated in the future. The cable length remains unchanged after making all the necessary frequency settings.
"Terminator Trio" is a two-tone metal detector equipped with a 250 x 300 mm DD coil. Equipped with four setting modes - "Sensitivity", "Volume", "Discrimination" and "Ground Balance" - and a switch between ordinary and non-ferrous metals.
The advantage of the "Terminator Trio" metal detector is the confident detection of non-ferrous metal objects. The device finds non-ferrous metal in 85% of all operations, the remaining 15% are iron and rusty items.
Another plus is the absence of false positives. Many analogues react to the edges of dug pits, grass stalks or small wires, which the Terminator Trio does not sin with.

The only drawback of the metal detector is the poor detection of rusty iron. In almost all situations, when the device gives a dirty signal, that is, a mixture of black with an admixture of color or, conversely, a color with an admixture of black, there is a rusty metal object.
Of course, this shortcoming can be simply ignored, however, there is a possibility of losing some of the finds due to an incorrect signal. It is possible to distinguish between a pure color signal and a dirty signal only when gaining experience with a metal detector.
The reviews left by users on the "Terminator" indicate that the maximum search depth of the metal detector is superior to that of another model - "Asi 250" with a standard coil. Despite such assurances, in practice it turns out that according to this criterion, "Terminator" is equal to "Ace". When searching in the air for 50 Ukrainian kopecks, the detection depth is 32 centimeters, while searching on the ground for the same coin is limited to 26-28 centimeters with reduced sensitivity. Basically, a metal detector allows you to detect objects at a depth of no more than a bayonet of a shovel, which, however, can be a very good indicator for such a device.
The metal detector "Terminator Trio" cannot be attributed to devices that can start searching immediately after being turned on. The cost of the device is several times less than the cost of the new ACE 250 model, but at the same time, the "Terminator" is more suitable for those seekers who want to try their hand at instrumental search.

It's not that hard to assemble. This will require certain financial and time costs, but at the same time, a user who has assembled a metal detector on his own receives certain advantages as a bonus.
"Terminator 3" is a rather powerful device in comparison with similar branded metal detector models. Given the fact that you can assemble it yourself with the possibility of saving money, it is more affordable, profitable and attractive to users.
Correctly assembling and setting up a metal detector in the absence of the necessary experience is quite difficult. Beginning radio amateurs on specialized forums are provided with detailed instructions and manuals that will allow them to carry out all the work correctly and without errors, which is very important when working with electronics.
The advantage of the "Terminator 3" metal detector and subsequent models is the possibility of self-assembly of the device and an affordable price. You can find the necessary schemes on the Internet at specialized forums of specialists professionally engaged in the search for metal objects. The creators of the device are always ready to give advice to those who plan to assemble a metal detector on their own.
Hello to all comrades, today we will try to figure out what kind of metal detector this is - Terminator? Have you heard of such a device? In particular, one of the popular models is the third. My friend, whom we met on the Internet thanks to our hobby, has a Terma, and this is what he told me about this device.
There are a lot of photos on the Internet, all different modifications:
Regular trio:
Model "Terminator M":

Well, another photo of two homemade products at once:

The first and most important thing is a homemade metal detector, which means that ordinary people make it, or rather those who are well versed in circuits and electronics. If you don’t “rummage” in this, then you won’t be able to do it yourself.
They make it according to schemes, which are a dime a dozen on the Internet. The most important thing is that there are a lot of nuances here and each "developer" makes the device for himself - something changes, improves, adapts. Here is the general scheme - it is guaranteed that you can assemble this MD yourself:

And this is what the board looks like, where everything is already soldered:

The Terma has several varieties - here you can talk about the Trio model, it has been improved, some gadgets have been added that make the search more convenient and comfortable. The Trio already has 2-tone identification and, compared to older models, it is more convenient for them to search.
The Terminator-4 model is already considered obsolete, but those who started with it speak warmly about this model and continue to use it. It was “invented” already in 2007, while the “troika” is already 2009.
Three and four are single-tone devices most often (however, two-tone models have already begun to be assembled), but the Trio is already 2-tone. So if you decide to buy a “thermal”, then it’s better to take a two-tone model. Still, when there is no display that helps in detecting, and you have to navigate only by sound, then the more tones, the better. And here, monotonous homemade products, of course, lose to factory devices, which have several tones by default.
There are also PRO models and a recent novelty - 2012. We will not talk about them here yet, because at a price they are already comparable to professional-level devices.
Which is better, Terminator or Garrett Ace 250?
As you can see, this MD is practically from the same price category, the third “term” on thematic forums can be bought for 4-5 thousand rubles. Whereas 250 ICQ costs 2 times more at least.
However, at such a low price in terms of depth, "Thermic" does asya, it sees colored targets deeper. Of course, if everything is correctly configured and the operator fumbles.
On the other hand, ICQ’s convenience and information content are much higher, and if you are a complete novice in detecting, then I would advise you to take a better factory device. And ICQ is still time-tested - a worthy entry-level device.
Does this MD have a pinpointer?
An urgent question, because now they are already aggravated to put DD coils on them and without a pin you have to dig huge holes and even the search technology, when you swipe crosswise on the target, does not help. The answer is that there is no pinpointer, and therefore we recommend buying an inexpensive manual pin from this list.
How well does he see small targets?
The design of this MD is such that he sees “small things” just fine and easily does all entry-level devices in this - graters and ICQ. Again, we recall that it will be difficult to master this device from the very beginning.
What is this metal detector for - for coins or for war?
Here the answer suggests itself - most often this model is discussed on forums dedicated to war cops (in particular, Reibert), which means they use it for this purpose. They dig shell casings, helmets, rifle bolts and other things interesting for war seekers. However, diggers of antiquity, using these devices, put it above ICQ 250 and 34 Minelab graters, primarily in terms of detection depth.
What MD is most often compared to "Terminator"?
Most often they are compared with devices of the same level - in particular, with the Cardinal Profi MD from the Sturmlab office. However, as diggers notice, the Thermal is more balanced, with fewer glitches (Cardinal often starts by waving the coil over dewy grass). Well, I also note that the food lasts longer.
In general, after talking with the comrade, I got the impression that the device is actually very worthy, well, it’s not for nothing that it has so many fans and reveres. Plus, it is being actively improved by adding more and more new features.
And now I have already seen on sale rather “fancy” metal detectors with a convenient panel and a nice design. And in terms of characteristics, they say that they compete even with Minelab's medium and top-end detectors - 705 grater and Expo. So this MD is worth paying attention to. Well, if you are friends with a soldering iron and fumble in all sorts of circuits and transistors, then maybe you should try to assemble it yourself? Fortunately, there are a lot of schemes on the Internet, and there are many thematic forums.
And finally, a video of a cop with "Term-4" - the quality is so-so, but what finds and, most importantly, a new, lyrical song about diggers. I advise you to watch it even purely because of it. Well, it is clearly seen that with this MD it is quite possible to dig old coins.
One gets the feeling that there are simply no other signals, only coin ones) And there are no false ones either, which indicates a good settling from the ground and a general setting of the device.
And here is a test video about the Trio model - it’s already more fun and clearer here:
Hi all!
What does a normal person associate with the word Terminator? Of course, the image of Schwarzenegger with a red eye, etc. Regarding the phrase “normal person” - no offense, we all understand that treasure hunt is a kind of disease that is hard to get rid of. But if you ask an experienced digger, another option will appear - a metal detector! Anyone who has come across this device knows what it can do and what it is all about. For everyone else, I will review the Terminator-M metal detector.
Metal detector Terminator - M is the latest model of Terminators, and as practice shows - the most successful! This is an analog metal detector of a budget level, but with discrimination! It is this feature that makes this metal detector very popular and in demand. Not many analog metal detectors can boast of this. In addition to discrimination, the Terminator has excellent search characteristics. Let's take everything in order.
The metal detector is available in 2 versions - on the factory bar and on the workshop. If everything is clear with the factory, then the workshop makes it even more accessible. In a word - the bar does not affect the depth.

I came across devices with DD coils sized 20 and 25 cm. Since this is a selective metal detector, it can be lowered into the water up to the control unit - the coil is not afraid of water. Operates at a frequency of 10 kHz - agree, very well.
The device runs on 6 AA batteries (it used to be 8). Operating time under average loads is approximately 30 hours. If a couple of hours a day - for a week is definitely enough!
For control, two regulators are used, as well as a switch. The first control is sensitivity. The greater the sensitivity, the greater the depth, everything is simple. With the help of the second, you can make a ground balance. By the way, it should be noted that not many budget metal detectors have ground adjustment. Discrimination works very simply - when the switch is activated, ferrous metals are eliminated.

Let's move on to the metal detector tests. Here is a general overview of the metal detector, video:
Let's summarize the review and functionality and determine the advantages of the Terminator-M metal detector:
An excellent device for those who are looking for practicality and not a brand.
Thank you all for your attention!
Sincerely, Your Digger.
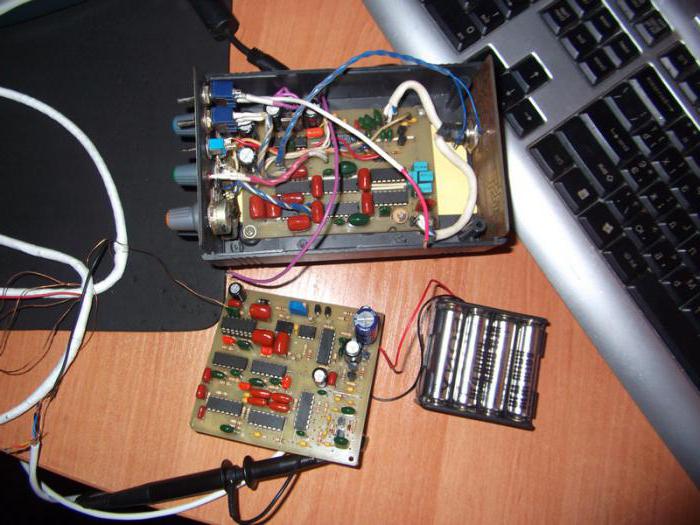
For many years, the Terminator metal detector has taken pride of place in the ranks of homemade metal detectors. Over the years, many improvements have been made, resulting in various modifications of this instrument. Consider the two-tone metal detector Terminator 3 (Fig. 1), which operates on the principle of induction balance. In fact, this is an advanced Terminator 4 metal detector. Its main features are: low power consumption, metal discrimination, non-ferrous metal mode, gold only mode and very good search depth characteristics, in comparison with semi-professional branded metal detectors. With a relatively small investment of money and time, anyone can assemble the Terminator 3 metal detector with their own hands, if they strictly follow the detailed instructions in this article.
The circuit is assembled on a circuit board. Finding a board for sale for a specific scheme is problematic, so let's create it on our own. Below is the exact plan of action for successful circuit board creation:

The size of the circuit itself should be 104 × 66 mm, so when printing, we reduce the image to the desired size. You can also download the circuit board and the program for processing and printing it from the link.
We cut off the excess edges, leaving 10 mm in reserve on each side. We buy a foil textolite corresponding to the size of the scheme with a margin of 10 mm on all sides. We clean the textolite with sandpaper to a shine, while trying not to completely erase the copper layer;
The manufacturing process can be viewed in the video below.
The scheme of the metal detector is shown in Figure 3. Based on it and the drawing of the circuit board, we assemble the board.

Parts marked with an asterisk in the diagram can be selected empirically to improve the performance of the device. But for starters, it is recommended to assemble everything strictly according to the scheme, and experiment when you get to the device settings.
The list of parts and comments on them are indicated in the table in Figure 4, and Figure 5 shows the pinout of microcircuits and transistors.


We start soldering by connecting the jumpers on the side of the radio components. To do this, we use a varnished or insulated wire of the smallest cross section. Jumpers are marked on the wiring diagram with simple thin lines.
From the side of the tracks, we solder smd parts - radio elements of miniature size and increased thermal stability. They are highlighted in yellow. Then solder the connectors for the microcircuits and the remaining parts. For adjustment elements, turning on and off, changing the mode, batteries, sound and light indication - we output wires to fix these parts on the case. For adjusting resistors we find suitable caps. We also remove the connector for the sensor wire. A sample of the assembled board with a connector, regulators and switches is shown in Figure 6.

Capacitor C2.3 and switch SA3 are assembled by surface mounting.
To check the operability of the assembled circuit, we connect a 9 V battery. When the device is turned on, the LED should light up and go out, as well as when it is turned off. When you touch the sensor connector, the sound of the metal detector should stop for a short period of time. At the maximum position of the sensitivity control, there should be a tonal sound, and at the minimum, there should be no sound. Do not forget to check all the control voltages on the circuit. To do this, we turn on the tester's constant voltage mode within 20 V. We apply the negative probe to the minus of the board, and measure the voltage at the points according to the scheme with the positive one.
The case is made from any plastic box of the required size and is fixed on the metal detector rod. You can use the case from other metal detectors, such as terminator m or terminator trio. We sign buttons and controls in accordance with the functions performed.
With the successful creation of such a circuit, you will gain valuable experience that will be needed to assemble the most complex metal detector with your own hands.
An important part of any metal detector is the sensor. It consists of coils in the housing, which are searched by transmitting and receiving a signal.
To assemble the metal detector sensor, you will need the following set of components:

First of all, you need a housing for the sensor coils. For a high-quality metal detector, it is recommended to buy a ready-made ring-type case. You can also make it yourself, but this will require a lot of time and a high degree of skill and ingenuity. In the purchased case, there will already be recesses for coils of the required diameter, an output for the wire and attachments for the rod. The sensor rod can be made from any durable stick, PVC pipe and other dielectric material.
We wind the outer winding, hereinafter referred to as TX. We select the diameter according to the body, about 20 cm. We wind the winding clockwise on a round object of the same diameter, for example, on cut foam. The winding is made by two folded wires in the amount of 30 turns. You should get 4 outputs, of which we connect 2 outputs of different wires from different sides. Tightly fasten the winding sections with threads and varnish. After drying, we isolate the winding with electrical tape and wrap it with foil on top. At the end of the winding, we do not connect the foil, we leave a gap of 1-2 cm. We solder and lead out the wire to the foil, and again wrap the TX coil with electrical tape.
The inner winding, called RX, is made in the same way, but with a diameter 2 times smaller. The number of turns is 48. Just like in the TX coil, we connect two wires together.
The middle winding is called compensation or CX. We wind counterclockwise 20 turns with a single wire, taking into account that it must fit in the groove with TX. We do not isolate or varnish this winding.
You should get three coils corresponding to Figure 8. The coils will be fixed after adjusting the sensor.

The following is a detailed instruction for assembly and final adjustment of the coils. For this we need an oscilloscope. You can use a computer as an oscilloscope. There should be no metal objects near the metal detector. To set up, follow 2 steps.
The first step in tuning is to equalize the frequency of the coils:
We connect the TX winding according to the scheme. The wire with shielded foil is connected to the common shielded contact of the connecting wire, and then to the minus of the board. We turn on the device. We attach the negative probe of the oscilloscope to the minus of the board, and the positive probe to one of the coil terminals. We measure and record the frequency.
In the same way, we connect the RX coil instead of TX and measure the frequency.
The RX winding frequency must be 100 Hz less than the TX frequency. The adjustment is carried out by parallel connection of 500 pF capacitors to capacitor C1. For example, the frequency of the TX and RX coils is 16500 and 15900 Hz, respectively. Therefore, we need to lower the oscillator frequency for the TX coil by 500 Hz. To do this, without disconnecting the RX coil, we connect additional capacitors until we reach the RX frequency of 15400 Hz. For convenience, in the circuit we adjust all the capacitances of the capacitors and replace them with a capacitor with a capacitance of this sum.
The second step is balancing the coils:
We settle all the windings in the case and make the connection according to Figure 8. We make the connection of CX and RX with a margin, for future adjustment. We connect the minus of the oscilloscope to the minus of the board, and the plus to the output of the capacitor C5 and the RX coil. We set the time/div to 10 ms on the oscilloscope, and the volt/div to 1 V.
The setting is to achieve the minimum amplitude. You will have to constantly solder and solder the output of the CX coil in order to reduce the number of turns. As soon as we have reached the minimum amplitude, we switch the volt / division regulator to the next lower value.
So we repeat until we reach the smallest amplitude value at the smallest volt / division.
After that, you can fill half of the circuit with epoxy, leaving the adjustment loop CX and RX free. After drying, we again check the amplitude with an oscilloscope and adjust it by moving the loop. Having chosen the optimal position of the loop, we try, without moving it, to fix it with super glue. And after one more check, we completely fill the coil with epoxy glue (Fig. 9).

The assembled sensor can also be used on terminator pro, terminator trio and terminator m metal detectors, with the correct and high-quality circuit settings.
To configure, turn on the SA2 switch in the non-ferrous metal only mode. The cutoff point of the ferrite should be in the region of 40 - 50 kOhm, so we set the ground balance regulator R8 to this range. If the cutoff point is in the range of 0 - 40 kOhm - add a capacitance to C2 in parallel, and if 50 - 100 kOhm - add a capacitance to C1. The discrimination regulator R7 should be equal to zero, so we unscrew it to its extreme position clockwise. We bring non-ferrous metal and ferrite to the metal detector. If two signals sound on the ferrite, and one on the non-ferrous metal, the windings are connected correctly, if vice versa, we swap the conclusions of the TX coil.

With a decrease in capacitance C1, a shift towards the foil occurs, and with a decrease in capacitance C2, towards aluminum. We achieve the visibility of all metals from the table, the visibility of copper and the cutoff of ferrite with a ground balance of 40 - 50 kOhm. Capacitor C12 make an additional adjustment.
After setting up the metal detector terminator 3, we enter the search area and turn on the metal detector with the SA1 switch. We approach and move away the sensor from the ground. When giving signals, gradually unscrew the R8 soil regulator counterclockwise, achieving the absence of signals to the ground, and make sure that copper is visible. It is desirable to mark the successful position of the regulator. By turning the discrimination control R7 counterclockwise, we cut out the metals we do not need. The cutting takes place alternately from the foil and further, according to the table in Figure 10. With the R29 sensitivity knob, you can increase the visibility range of metals and adjust false alarms. The SA2 switch is recommended to be set to the all-metal mode, as it slightly increases the detection range. Switch SA3 can turn on the mode - only gold, which works when the mode is turned on - all metals.
Since the price of non-ferrous metals and old coins can be very high, when searching in the right area, you can quickly pay for a home-made metal detector.
Hello! Recently, given the "dolce life", most beginner treasure hunters are looking for the best solution in terms of price and quality. One of the main parameters, or rather the functionality that remains a priority for choosing an entry-level metal detector, is discrimination. Not all budget metal detectors can boast of the ability to distinguish between metals, but still there are good options.
Several times I have already paid attention to a good model - Terminator-M. This is the latest model of the Terminator metal detector series, but there were many predecessors before it. True, sometimes I come across interesting modifications of Terminator craftsmen. Because of such "manufacturers", new, unknown names or indices appear that add to the word "Terminator". In order to dispel the fog among all real and invented devices, I decided to make a small summary of all official devices. As a result, I got a comparative table of Terminator metal detectors.
|
Depth see air/in ground 5kop. USSR |
Suppression of the influence of the soil on a 5-point system |
Target Voice |
pin point |
Note |
||
|
Terminator M |
Polytonality color/- |
Easy to set up and operate. Mastered on the first cop. High thermal stability and efficiency, and most importantly, minimal losses in the ground. |
||||
|
Trio M |
Polytonality color/black |
The nature of the voice acting compensates for the lack of a pin |
Due to the abundance of knobs and switches, it is difficult for a user who does not have deep knowledge of metal detecting to achieve good results. |
|||
|
Trio |
Two tone color/black |
Absent, there are difficulties in localization of the subject |
It is mastered over two or three trips to the cop. Minus instability but a plus for those who like to recognize many phantoms. |
|||
|
Terminator PRO |
two tone color/black, with increasing sound volume |
The nature of the voice acting compensates for the lack of a pin |
It is mastered over two or three trips to the cop. Annoying is the constant need to adjust the ground balance and the sound of deep colored targets in black tone, you need headphones to hear a small coin at a depth of more than 10cm.. |
|||
|
Terminator - 3 |
Absent, there are difficulties in localization of the object. |
Easy to set up and operate. Poor sensitivity to small targets. |
||||
|
Prospector |
Polytonality color/black |
The nature of the voice acting compensates for the lack of a pin |
A complete copy of the Trio M with all the shortcomings, and an unsuccessful attempt to implement vector clipping. Contrary to the expectations of search lovers, it does not have any unique features. |
|||
|
Megatron |
two tone color/black, with increasing sound volume |
The nature of the voice acting compensates for the lack of a pin |
Suitable for demonstrating air tests - deservedly forgotten by search lovers. |
The result is quite expected, with time and experience, the Terminators improved and modified. The result was a stable Terminator-M model.
Thank you all for your attention!
Sincerely, Your Digger.


 work?")

 with your own hands how to make?")


